


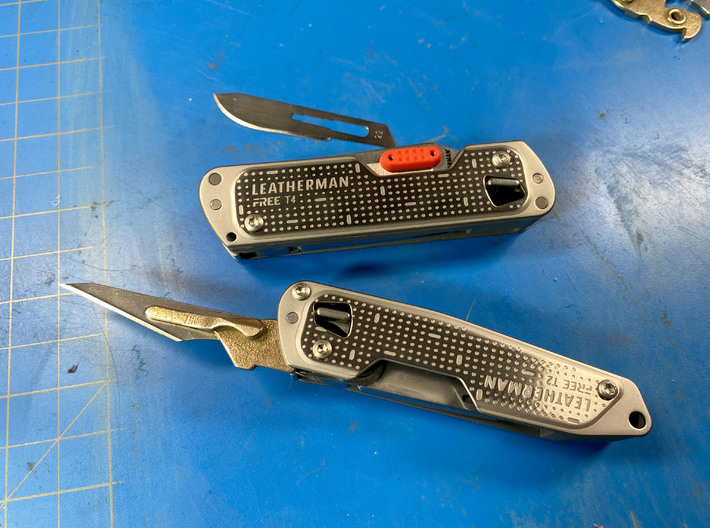

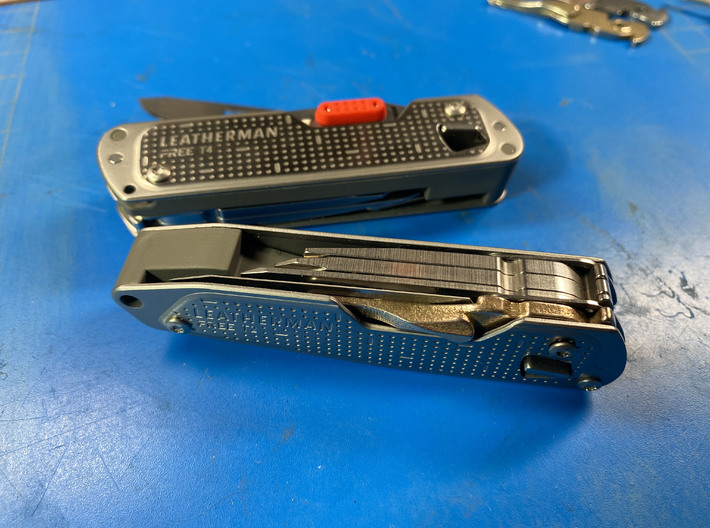

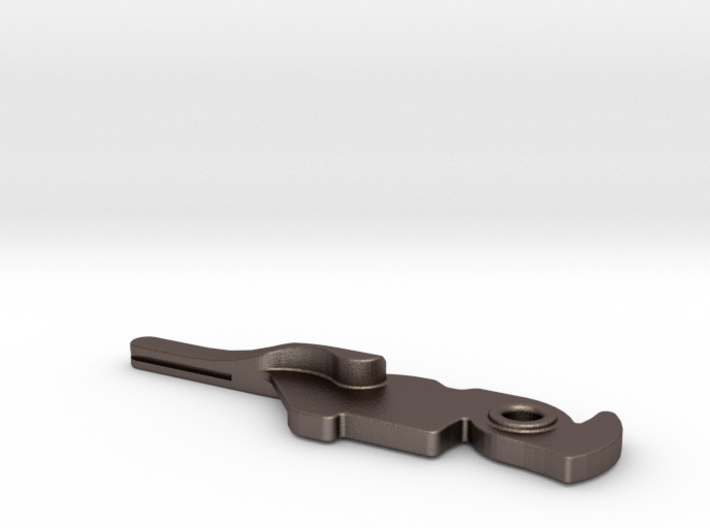
Scalpel holder for Leatherman FREE P4 & P2
Made by
Print With Shapeways
 Choose Your Size
 Choose Your Material
 Choose your color and finish
$41.00
Have a question about this product?
contact the designerYou must be logged in and verified to contact the designer.
Product Description
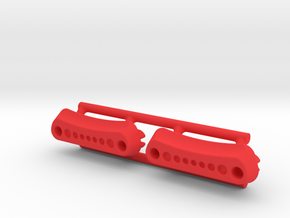
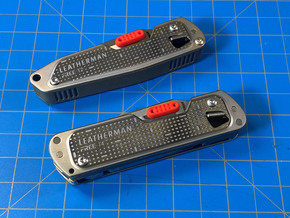
This modification adds a #4 Scalpel holder to your Leatherman FREE P4 or P2.
See the video at the end of this page for details, and how to install this mod.
Also fits the FREE T2 or T4 when used with smaller blades, details below.
Features:
Design:
This is another customer requested product. Designed in collaboration with Shapeways and fellow Multitool.org user: Eric Au, Metropolicity. Please visit his shop if you would like a Scalpel holder or other tools such as the Leatherman Charge. Details on the Multitool.org design thread.
User installed modification:
You must remove the existing main blade, scissors or serrated blade. Taking the tool apart is a non-destructive process, however any warranty concerns are entirely up to the user. Text and video instructions on how to install are below.
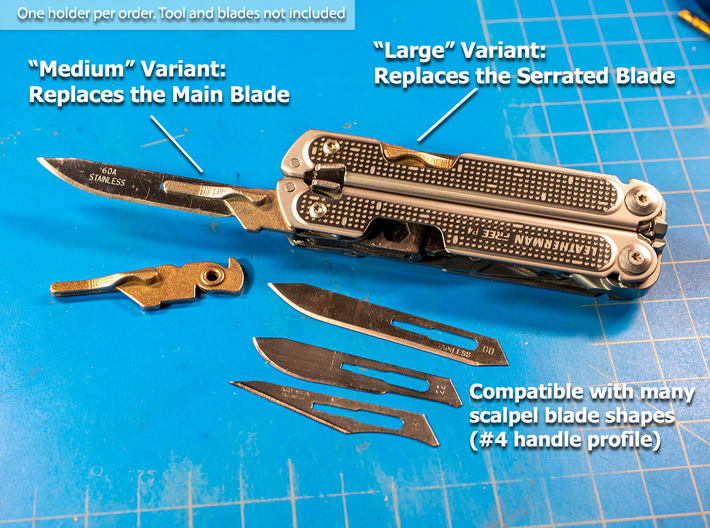
Two variants:
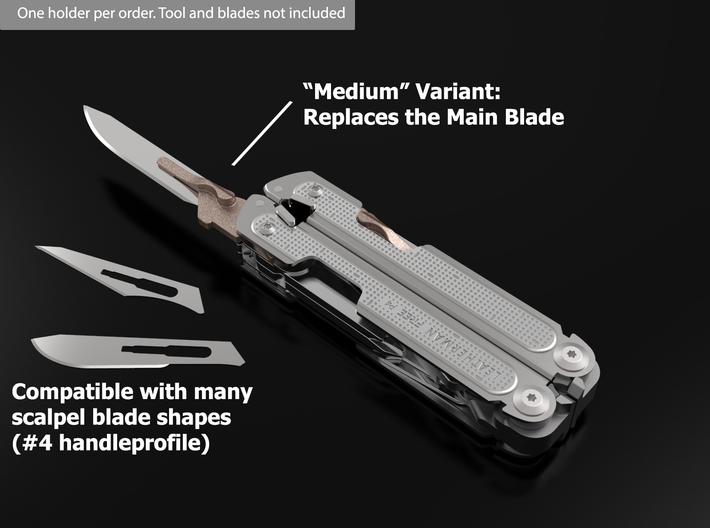
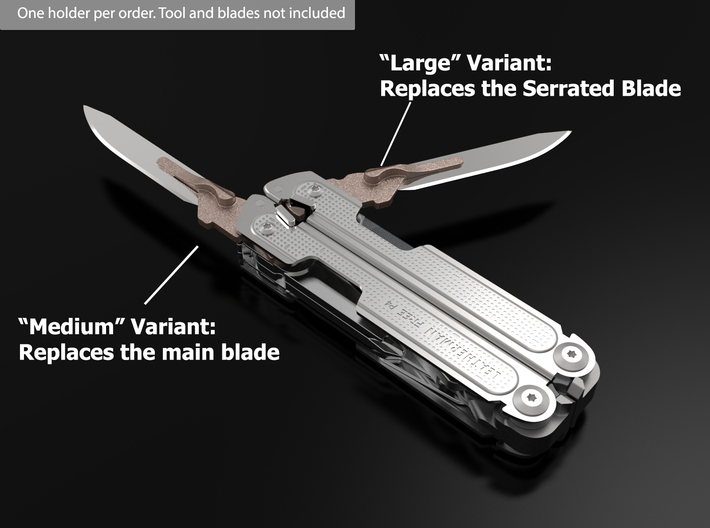
The default "Medium" variant replaces the Main Blade on either the FREE P4 or P2. It can also replace the saw on the FREE P4.
The alternate "Large" variant is a mirrored design. It can replace the Serrated Blade on the FREE P4, or the scissors on the FREE P2 or P4..
Both versions may be installed at the same time to hold two different blades. Please select the variant from the options listed near the purchase button, I cannot alter your order after it has been placed.
Compatible Scalpel Blades:
Scalpel blades are ultra sharp and inexpensive in quantity. You can simply replace the blade when dull. Please dispose of used blades responsibly. Take great care when installing or removing scalpel blades. Use pliers or another tool to grip the blades. Do not use your bare fingers.
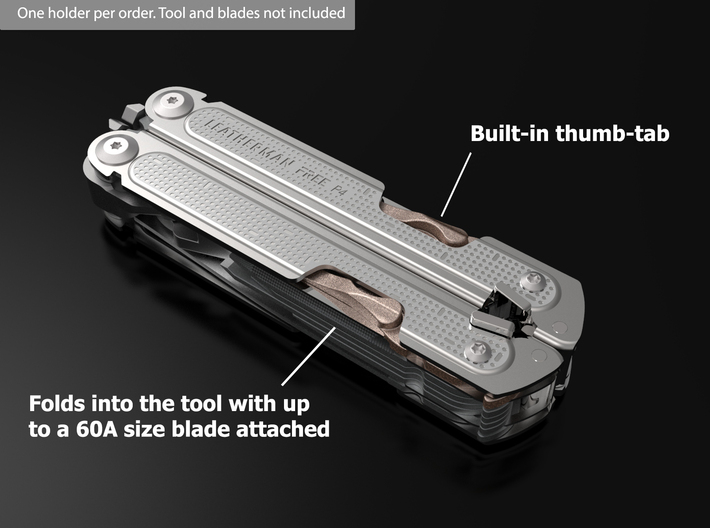
I recommend using Havalon 70A, Havalon 60A, or Wiebe, or Gerber Vital replacement blades. These are the longest blades that will fit into the FREE series. They are also long enough to ensure the blade won't accidentally deploy while using the pliers. All these have physically been tested to fit. Note the 70A blade is the safest to use as it won't have the sharp tip that can tilt out when the tool is in your pocket.
Shorter blades that fit the #4 handle profile should also work, but are not long enough to lock in place while using the pliers. For an example of what I am talking about: Try tilting the scissors on your tool while the pliers are deployed, and then the main blade. The main blade is blocked by a hard stop built into the pliers.
I have also tested the fit with #22, and #26 blades Wikipedia has a list of blade profiles and the handles they fit.
The 60XT (0.6m) blades will not fit unless you grind the slot a bit wider. This can be done using a Dremel with a thin grinding wheel.
Warnings:
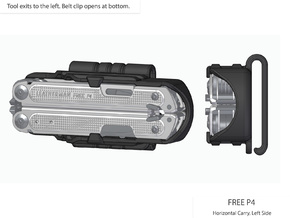
Scalpel blades are ultra-sharp. Unless you are using a 70A blade: The blade tip is very close to the edge of the tool. This makes any a partial deployment more likely to catch on something. As such, I recommend using sharp tipped blades only with a holster or pouch. I do not recommend using it in a pocket or with the default belt clip.
Post Processing:
The part may arrive with some polishing compound in the slot. To clear the slot of debris: Use a thin metal impliment to scrape away any debris. I use the back edge of a scalpel to do this (holding it the blade with pliers not bare fingers!).
You can also gently use a rotary tool with a very thin cutting wheel. (Dremel 0.025" thick wheel recommended). Take care not to remove too much material as that will effect the fit of the blade.
The mounting hole may require reaming using a drill bit capable of handling stainless steel. A 1/8" or 3.2mm drill bit may be used for this task.
About the material:
The part is made by bonding stainless steel powder in layers. The part is then sintered and impregnated with bronze to fully meld the two metals together (60% SS, 40% Bronze).
The part is similar to a casting, and shrinks a small amount during processing. The CAD model has been designed to compensate for this, but some manual filing may be required on some parts if the parts fit too tight or bind.
Installation:
The tool must be taken apart to install this modification. Please see the video below.
FREE T2 and FREE T4:
This mod can also be installed into the Leatherman FREE T2 or T4. (Medium variant. I have tested and #22 and #25 blades fit perfectly with either tool. Other short blades may also fit.
How ordering from Shapeways Works:
I am the part designer, and I receive a fixed portion of the total order. Shapeways.com handles the part production and shipping based on your order input.
Shipping costs and any other related fees are controlled by Shapeways.com:
Shipping time and costs
I cannot customize, alter or process any returns after your order has been placed. All post-sales issues must be handled through Shapeways customer service.
Order FAQ
Leaving any text in the "Personal Message" box will be printed on a gift card included with your shipment. I do not see these messages.
See the video at the end of this page for details, and how to install this mod.
Also fits the FREE T2 or T4 when used with smaller blades, details below.
Features:
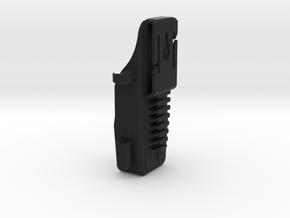
- Holds large scalpel blades which fit to a #4 handle profile.
- The blade can be folded into the tool just like the regular blades.
- Replaceable blades allows to exchange a dull blade for a fresh sharp blade anytime. (Blades are not included.)
- Available in three finishes:
- Select "Bronze Silver Steel" for the closest look to the tool
- Select "Bronze Steel " for a fully bronze color
- Select "Bronzed Black Steel" for a contrasting dark bronze look
Design:
This is another customer requested product. Designed in collaboration with Shapeways and fellow Multitool.org user: Eric Au, Metropolicity. Please visit his shop if you would like a Scalpel holder or other tools such as the Leatherman Charge. Details on the Multitool.org design thread.
User installed modification:
You must remove the existing main blade, scissors or serrated blade. Taking the tool apart is a non-destructive process, however any warranty concerns are entirely up to the user. Text and video instructions on how to install are below.
Two variants:
The default "Medium" variant replaces the Main Blade on either the FREE P4 or P2. It can also replace the saw on the FREE P4.
The alternate "Large" variant is a mirrored design. It can replace the Serrated Blade on the FREE P4, or the scissors on the FREE P2 or P4..
Both versions may be installed at the same time to hold two different blades. Please select the variant from the options listed near the purchase button, I cannot alter your order after it has been placed.
Compatible Scalpel Blades:
Scalpel blades are ultra sharp and inexpensive in quantity. You can simply replace the blade when dull. Please dispose of used blades responsibly. Take great care when installing or removing scalpel blades. Use pliers or another tool to grip the blades. Do not use your bare fingers.
I recommend using Havalon 70A, Havalon 60A, or Wiebe, or Gerber Vital replacement blades. These are the longest blades that will fit into the FREE series. They are also long enough to ensure the blade won't accidentally deploy while using the pliers. All these have physically been tested to fit. Note the 70A blade is the safest to use as it won't have the sharp tip that can tilt out when the tool is in your pocket.
Shorter blades that fit the #4 handle profile should also work, but are not long enough to lock in place while using the pliers. For an example of what I am talking about: Try tilting the scissors on your tool while the pliers are deployed, and then the main blade. The main blade is blocked by a hard stop built into the pliers.
I have also tested the fit with #22, and #26 blades Wikipedia has a list of blade profiles and the handles they fit.
The 60XT (0.6m) blades will not fit unless you grind the slot a bit wider. This can be done using a Dremel with a thin grinding wheel.
Warnings:
Scalpel blades are ultra-sharp. Unless you are using a 70A blade: The blade tip is very close to the edge of the tool. This makes any a partial deployment more likely to catch on something. As such, I recommend using sharp tipped blades only with a holster or pouch. I do not recommend using it in a pocket or with the default belt clip.
Post Processing:
The part may arrive with some polishing compound in the slot. To clear the slot of debris: Use a thin metal impliment to scrape away any debris. I use the back edge of a scalpel to do this (holding it the blade with pliers not bare fingers!).
You can also gently use a rotary tool with a very thin cutting wheel. (Dremel 0.025" thick wheel recommended). Take care not to remove too much material as that will effect the fit of the blade.
The mounting hole may require reaming using a drill bit capable of handling stainless steel. A 1/8" or 3.2mm drill bit may be used for this task.
About the material:
The part is made by bonding stainless steel powder in layers. The part is then sintered and impregnated with bronze to fully meld the two metals together (60% SS, 40% Bronze).
The part is similar to a casting, and shrinks a small amount during processing. The CAD model has been designed to compensate for this, but some manual filing may be required on some parts if the parts fit too tight or bind.
Installation:
The tool must be taken apart to install this modification. Please see the video below.
- You will need two Torx T9 bits to remove the screws holding the tool together.
- The screws need to be loosened by holding one side with a bit, and turning the other side.
- The screws are secured using thread-locking compound, and gentle heat may be required to loosen the compound on some tools.
- Care should be taken to open the tool on a clean surface.
- Remove the blade you plan on replacing.
- Also remove the spacer washer that sits between the blade and the outer scale.
- Install the Scalpel holder. (Without a blade pre-attached)
- Silicone based lubricant may be added during assembly.
- Re-install the post and screws. The tightness of the tool will depend on the amount of torque you apply during reassembly.
- Before installing a blade: Ensure the scalpel holder fully locks in the open position, if for some reason it doesn't fully lock, you may need to file away a small amount from the knee that catches on the latch mechanism.
- Take great care when installing or removing scalpel blades. Use pliers or another tool to grip the blades. Do not use your bare fingers.
FREE T2 and FREE T4:
This mod can also be installed into the Leatherman FREE T2 or T4. (Medium variant. I have tested and #22 and #25 blades fit perfectly with either tool. Other short blades may also fit.
How ordering from Shapeways Works:
I am the part designer, and I receive a fixed portion of the total order. Shapeways.com handles the part production and shipping based on your order input.
Shipping costs and any other related fees are controlled by Shapeways.com:
Shipping time and costs
I cannot customize, alter or process any returns after your order has been placed. All post-sales issues must be handled through Shapeways customer service.
Order FAQ
Leaving any text in the "Personal Message" box will be printed on a gift card included with your shipment. I do not see these messages.

Details
What's in the box:
Scalpel, A
Dimensions:
Success Rate:
First To try.
What's this?
Rating:
Mature audiences only.
