
N Wood Chip Rotary Dumper 2 of 2
Made by
Print With Shapeways
 Choose Your Material
 Choose your color and finish
$48.16
Have a question about this product?
contact the designerYou must be logged in and verified to contact the designer.
Product Description
** 8.9.20 - Updated name and pricing
** Set 1 of a 2 component of a 2 listing kit**
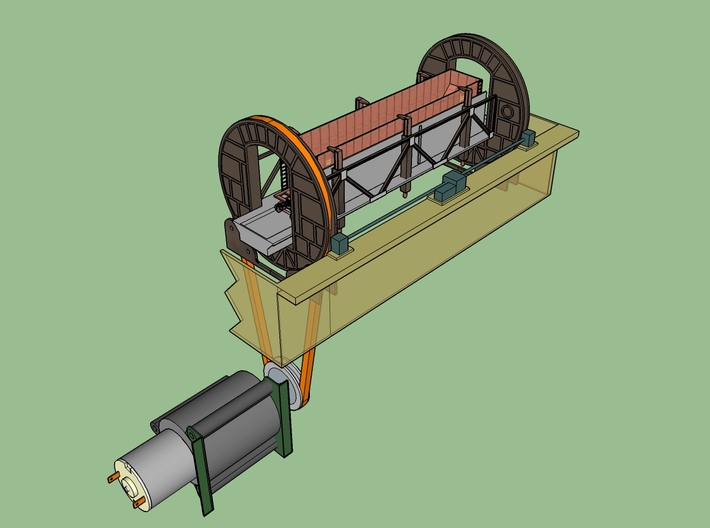
This model is a N Scale (1:160) Bulk Wood Chip Rotary Dumper found in various styles across the world. I have modified a HO scale version to be suitable for N scale. There is some assembly required and extra materials needed. There is not a "pit" area. You are responsible for mounting and locating according to your needs. Completed 3D generated model can be seen on the image resources along with a simple motorized setup.
PARTS NEEDED
1. Kit 1 - https://shpws.me/JVIR ie this kit
2. Kit 2 - https://shpws.me/JVHi
3. Evergreen Styrene Tubes in sizes 6-224 and 6-225
4. Bolts, Washers and Nuts. ie Microfasteners.com 2-56 size
5. N scale flex track, i am using Atlas. Code shouldn't matter.
6. PATIENCE!! post print modifications will be necessary
OPTIONAL Motorization: (NOT TESTED by myself)
1. Tamiya Planetary Motor Kit w/ a 1/8" wide belt pulley Can substitute your own options
2. 1/8" O-Ring to serve as a drive belt. https://www.servocity.com/html/smooth_belts.html#.Vnnp__krK9J
Build Instructions:
1. There are 2 parts to the kit. Make sure you have both before beginning.
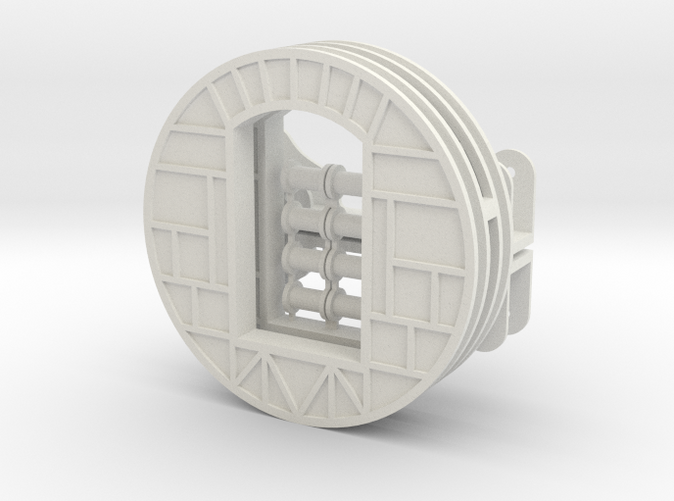
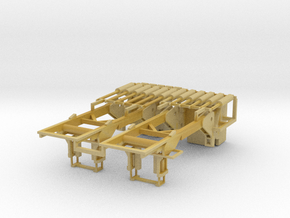
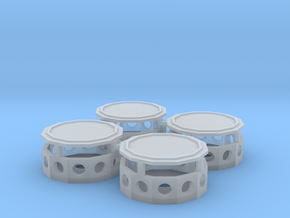
2. In Kit 1, separate all the parts from their sprues. There are 2 large Wheels, 4 Roller Supports and 8 Rollers.
3. In Kit 2 separate the clamping arms from their sprues. There are 4 of them.
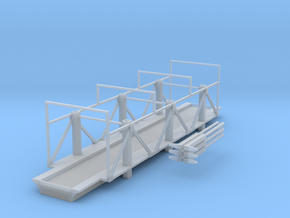
4. Place 1 clamping arm into each square hole on top of the rail platform. DO NOT GLUE them in at this time.
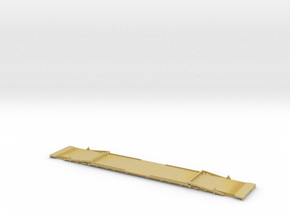
5. Cut a piece of flex track to fit into the trough of the Rail Platform. You will need to remove some end ties on both sides so that the rails extend to both edges of the platform. Once you have proper fit, secure it in place with super glue or gorilla glue.
6. Make sure the two large wheels are facing each other, the 2 sides with CIRCLES on them face each other.
7. You will need to cut 3 pieces of the Everygreen. 2x 115mm of 2-225 and 1x 115mm of 2-224. The length can vary on your final look. My images are ~118mm length.
8. Affix the 2 larger tubes at the top positions and the 1 smaller at the bottom location on 1 side of the Wheels. Use the other side as temporary support.
9. Place the rail plaform in your desired position on the same side that you just glued the tubes to and affix the platform to the wheel.
10. Repeat 8 & 9 for the other side.
11. Using 2 roller supports and 4 rollers, build each support. This is where you need to use the microfastener hardware. DO NOT over tighten. Just approaching snug is good for now.
12. Mount the supports on your base where you plan to mount the assembly and place the Rotary onto the supports. The large wheels will fit between the flanges of the rollers. DO NOT GLUE!!!
13. Revisiting #4 we will now adjust the height of the clamps. this is a good time to grab one of your coal cars and place it on the tracks and make sure the support clamps are resting on the top edge of the coal cars walls.
14. Using some scotch tape, place a few pieces over the clamps so they stay in place to the coal car.
15. Looking below the support you will see some round material sticking out of the bottom. this is the "cam" you can secure it permanently or rig a spring over the round as you wish. I have mine w/out the spring.
16. Using no spring you want to carefully mark the round at the base of the square tube. Remove the clamps and transfer that mark to the other 3 or individually measure each if you choose to.
17. on the END side of the tube away from the clamp, cut off the excess slightly longer than your mark. In my case I tried for .1 mm or so. Do this to all 4.
18. Using some scrap styrene from your trash bin cut 4 pieces the size of the square tube and affix 1 to the bottom of each support AFTER you reinstall them in the top. You now have a GRAVITY clamp. Rotate your Dumper with a car on the rails. It should have enough hold it in place enough to not move around too much and when rotated back it should settle back onto the rails.
19. That is pretty much all there is to it. The added "motor control" details will be placed on your pit edge when it gets constructed. see my reference photos.
** Set 1 of a 2 component of a 2 listing kit**
This model is a N Scale (1:160) Bulk Wood Chip Rotary Dumper found in various styles across the world. I have modified a HO scale version to be suitable for N scale. There is some assembly required and extra materials needed. There is not a "pit" area. You are responsible for mounting and locating according to your needs. Completed 3D generated model can be seen on the image resources along with a simple motorized setup.
PARTS NEEDED
1. Kit 1 - https://shpws.me/JVIR ie this kit
2. Kit 2 - https://shpws.me/JVHi
3. Evergreen Styrene Tubes in sizes 6-224 and 6-225
4. Bolts, Washers and Nuts. ie Microfasteners.com 2-56 size
5. N scale flex track, i am using Atlas. Code shouldn't matter.
6. PATIENCE!! post print modifications will be necessary
OPTIONAL Motorization: (NOT TESTED by myself)
1. Tamiya Planetary Motor Kit w/ a 1/8" wide belt pulley Can substitute your own options
2. 1/8" O-Ring to serve as a drive belt. https://www.servocity.com/html/smooth_belts.html#.Vnnp__krK9J
Build Instructions:
1. There are 2 parts to the kit. Make sure you have both before beginning.
2. In Kit 1, separate all the parts from their sprues. There are 2 large Wheels, 4 Roller Supports and 8 Rollers.
3. In Kit 2 separate the clamping arms from their sprues. There are 4 of them.
4. Place 1 clamping arm into each square hole on top of the rail platform. DO NOT GLUE them in at this time.
5. Cut a piece of flex track to fit into the trough of the Rail Platform. You will need to remove some end ties on both sides so that the rails extend to both edges of the platform. Once you have proper fit, secure it in place with super glue or gorilla glue.
6. Make sure the two large wheels are facing each other, the 2 sides with CIRCLES on them face each other.
7. You will need to cut 3 pieces of the Everygreen. 2x 115mm of 2-225 and 1x 115mm of 2-224. The length can vary on your final look. My images are ~118mm length.
8. Affix the 2 larger tubes at the top positions and the 1 smaller at the bottom location on 1 side of the Wheels. Use the other side as temporary support.
9. Place the rail plaform in your desired position on the same side that you just glued the tubes to and affix the platform to the wheel.
10. Repeat 8 & 9 for the other side.
11. Using 2 roller supports and 4 rollers, build each support. This is where you need to use the microfastener hardware. DO NOT over tighten. Just approaching snug is good for now.
12. Mount the supports on your base where you plan to mount the assembly and place the Rotary onto the supports. The large wheels will fit between the flanges of the rollers. DO NOT GLUE!!!
13. Revisiting #4 we will now adjust the height of the clamps. this is a good time to grab one of your coal cars and place it on the tracks and make sure the support clamps are resting on the top edge of the coal cars walls.
14. Using some scotch tape, place a few pieces over the clamps so they stay in place to the coal car.
15. Looking below the support you will see some round material sticking out of the bottom. this is the "cam" you can secure it permanently or rig a spring over the round as you wish. I have mine w/out the spring.
16. Using no spring you want to carefully mark the round at the base of the square tube. Remove the clamps and transfer that mark to the other 3 or individually measure each if you choose to.
17. on the END side of the tube away from the clamp, cut off the excess slightly longer than your mark. In my case I tried for .1 mm or so. Do this to all 4.
18. Using some scrap styrene from your trash bin cut 4 pieces the size of the square tube and affix 1 to the bottom of each support AFTER you reinstall them in the top. You now have a GRAVITY clamp. Rotate your Dumper with a car on the rails. It should have enough hold it in place enough to not move around too much and when rotated back it should settle back onto the rails.
19. That is pretty much all there is to it. The added "motor control" details will be placed on your pit edge when it gets constructed. see my reference photos.
Details
What's in the box:
N Wood Chip Rotary Dumper WSP Parts
Dimensions:
Success Rate:
First To try.
What's this?
Rating:
Mature audiences only.
