Wednesday Wips - Dec 21th

Discussion in 'My Work In Progress' started by Andrewsimonthomas, Oct 26, 2016.

  1. NoahLI
    NoahLI Well-Known Member
    a batch of test prints arrived. expect a trickle of painted parts in the coming weeks.

    [​IMG]
     
  2. MrNibbles
    MrNibbles Well-Known Member
    Since this is also a feedback thread... Is it even possible for them to reliably make something this small? I'm thinking it might make more sense to put several of these on a bigger flat base so it's easier to do the fabrication, and doing something so the pieces can be easily separated from the base by the end user. I'm not sure how the processing works in terms of firming up the print. The last thing anyone would want would be to end up with a bent or saggy pillar. The smallest pillar has a cross section less than 5x5 mm in the brick region which is not exactly giant.

    small pillar.jpg
     
  3. NoahLI
    NoahLI Well-Known Member
    I'd be more worried about the texture being too blurry than print integrity at 5mmx5mmx10mm
     
  4. MrNibbles
    MrNibbles Well-Known Member
    The smallest Z scale model is definitely at the limit for a visible color texture. That's why I had to go with larger "industrial size" bricks rather than conventional residential bricks. Here's a building at Z scale using the exact same brick and mortar sizes as the smallest pillar. Obviously things will get better as the part is enlarged for larger scales. I'm looking forward to see what a new full color plastic printer can print!

    625x465_1689045_1557237_1479343066.jpg
     
  5. MrNibbles
    MrNibbles Well-Known Member
    Still not sure what to do about the pillars. For color sandstone the handling fee is the same whether you have 1 or 4 parts in it, right? At the very least I should bump up the number of pillars in the file because they are a bit expensive in onesies. I can't figure out a good way to sprue multiple pillars to a base plate such that they are easily cut away for individual use.

    Anyway, I decided to make a Z scale gazebo using the pillars. It's the type of gazebo you would find in a public park to stay nice and dry and get out of the sun. Going to add this to my cart for the most recent sale, which is a good one. I'll probably generate some larger scale versions but those designs will need more detail and hollow zones/thinned walls to keep the cost down.

    [​IMG]
    https://www.shapeways.com/product/CAJ93W7SB/mini-gazebo-structure
     
  6. Andrewsimonthomas
    Andrewsimonthomas Well-Known Member
    I think its looking good.

    Textures probably not too bad when you have a whole bunch of parts all together
     
  7. Andrewsimonthomas
    Andrewsimonthomas Well-Known Member
  8. MrNibbles
    MrNibbles Well-Known Member
    Well that's kind of creepy. Last night's nightmare was getting lost on a bus in a strange city. In tonight's nightmare that alien bug will be driving the bus.

    I ordered the Z scale gazebo to see how it turns out. Then I returned my thoughts to the brick pillars which could work well as fence post pillars. I took the 12 foot HO scale pillars and put holes in them so wrought iron fence sections could be inserted between pillars. That requires 3 different pillars - end pillar, center pillar, and corner pillar. 12 foot fences are a bit tall so if you instead use these parts at 1:48 scale the brick pillars drop down to a more reasonable 6.6 foot tall (measured at the exposed brick). The wrought iron fence sections themselves would be about 10 foot wide by 7 foot tall in 1:48 scale and are designed for frosted detail material, I guess. Put them all together and you get this:

    wrought iron fence.jpg

    I will need to seek out some real fences to look for additional detail, and I suppose an opening gate door might also be a nice accessory. I don't think I want to get too deep into these kind of miniatures so I might eventually pass these on to a friend. But I do so enjoy playing with the bricks!
     
  9. NoahLI
    NoahLI Well-Known Member
    piggy backed this one with the last batch of test tank parts; just got around to painting it.
    [​IMG]
     
    CopperBezel likes this.
  10. MrNibbles
    MrNibbles Well-Known Member
    I have this project that's been waiting in the wings. It's an old thermometer that needs a new top lid. The original is thin anodized aluminum and has suffered from various people trying to crimp the metal to put the thing back together. I think the metal is probably toast and the thermo mechanism can could benefit from a new 3D printed top lid. Somewhere in the house might be the hanger piece that gets mounted to a wall but I might as well have that printed to match the lid.

    thermo1.jpg

    thermo2.jpg

    The original crimped top kept the mechanism dust free so it would be nice to have a tight fit of the lid. For plastic I'm thinking of using a screw together lid that pinches the rim of the clear plastic and the thin sheet metal edge of the thermo mechanism. For 3D printed metal I'm not sure what might work. Crimping is probably not a possibility for any printed metal but maybe a multiple piece lid that gets glued or epoxied might work. I'm stumped!
     
  11. NoahLI
    NoahLI Well-Known Member
    two piece affair with the cone shaped top and a ring to hold the clear housing would work. epoxy the two together with something like jb weld
     
  12. MrNibbles
    MrNibbles Well-Known Member
    Here's my first stab at a test piece for the plastic version. I'd like this one to get the thermometer mechanism to a safe spot on the wall and then worry about metal later. This design is for checking basic fits and the screw mechanism. I adapted this from another design I have and there's a lot of room to reduce wall thickness and add the final bell shape on top later. There's a little spring thing on top that is supposed to hold the plastic cover and the thermo mechanism top plate down. It's about 2 cm wider in diameter than the original but I don't think that is a major problem except for bloating the cost. About $24 for this test. I think I'll wait with this until after the holidays when more funds become available for experimentation!

    thermo3.jpg

    thermo4.jpg
    I'll try to inset the bottom piece so no seam is visible for the final version.
     
  13. Andrewsimonthomas
    Andrewsimonthomas Well-Known Member
  14. MrNibbles
    MrNibbles Well-Known Member
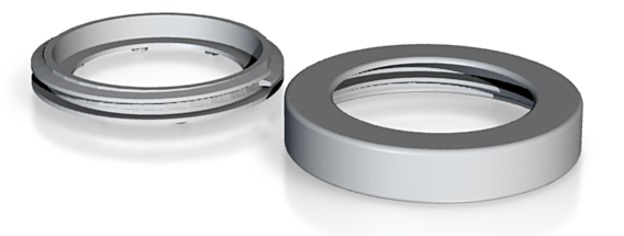
    I spent more time on my thermometer fixer thing. I decided to modify the previous design so it simply holds the existing parts together so they don't fall apart. That way I can hang the thing on the wall right away to keep it safe. I inset the bottom screw-in plug to hide the mating seam and added some bumps so there's something to grab when screwing it together. If this works then it's a simple matter of adding a dome and a hanging hook to this design. There's no big reason why it needs to look exactly like the original. If I ever need that I'll find someone that can spin thin aluminum on a lathe to form a replica of the original dome, unless a metal smith can smooth out and repair the original dome.

    thermo5.jpg
     
    Last edited: Dec 14, 2016
  15. I'm 3D printing these Minecraft buildings my brother made! Some of the details on one of the buildings were a bit too small, but since these models are tiny, I don't mind if some of the details don't show up. So I used "print it anyway". We'll see how it turns out! Capture.PNG
     
  16. Andrewsimonthomas
    Andrewsimonthomas Well-Known Member
  17. pendarestan
    pendarestan Well-Known Member
    Congrats! Same for me. I made a new sculpture!

    Tringix
    [​IMG]
     
  18. MrNibbles
    MrNibbles Well-Known Member
    Still playing with bricks! After I did the Z scale (1:220) gazebo I noticed a similar structure at a local train station. So I did a couple of additional designs at 1:144 and 1:110 to add some additional detail which is a bit difficult to achieve at Z-scale.

    Here's a photo matched up with the 1:110 scale design. I would need to measure the real structure if I wanted to duplicate it more exactly in a print and work on the brick colors.

    train_station_gazebo.jpg
     
  19. MrNibbles
    MrNibbles Well-Known Member
    Yay! My screw together thermometer thingee has been fabricated and is on its way. Such anticipation!

    I started a variation of my grafitti wall last Wednesday but this version is made from multi-colored randomly placed bricks. By randomly placed I actually mean manually placed with the goal of never having the same color bricks touching (which means it's not totally random). In the following example I customized the wall with a large hand image. Now all I need to do is to create a character with a spray can and maybe a ladder painting the graffiti. I've never created a good human figure so it seems like something I should try.

    https://www.shapeways.com/product/C...i-wall-with-sidewalk-medium?optionId=61568662

    color_graffiti_wall.jpg
     
  20. MrNibbles
    MrNibbles Well-Known Member
    My thermometer holder together thing is both a success and a failure. The two pieces screw together not too smoothly and not too tightly. There's just enough friction to make it perfect. On the other hand there were several things that needed to be corrected for a revision. Resizing holes, lowering heights of the finger grips, thinning walls, offsetting the screw thread a tiny bit in the smaller inside piece, reducing overall height. The revised version will only cost $15 as opposed to $20 which is another improvement. A spacer washer or plate will be needed to get a decent final fit so I might print some of various thicknesses in a separate file for the final fitting after I do the final version with a dome.

    Now the question is what to do with the old part. It can hold a disk that's about 60 millimeters in diameter having a thickness of up to around 7 to 10mm. That could be a colorful piece of glass to make a sun catcher or a photo with a cardboard backing to turn it into a round photo frame. Maybe a large watch mechanism could turn it into a pocket watch. An optical lens to make a magnifying glass with frame? Any other ideas?

    thermo1_part.jpg