Full Color Plastic

Discussion in 'My Shapeways Order Arrived' started by WillLaPuerta, Aug 22, 2014.

  1. WillLaPuerta
    WillLaPuerta Well-Known Member
    OK, so I ordered five items. The first was so distorted that they cancelled it and refunded my money. This one I can't help but think should have received the same treatment:
    IMG_1644.JPG
    Looks alright from the front.
    IMG_1645.JPG
    Not so good from the back.
    Unfortunately that's not the only problem. There's a ring inside to place an electric tea light but . . .
    IMG_1647b.jpg
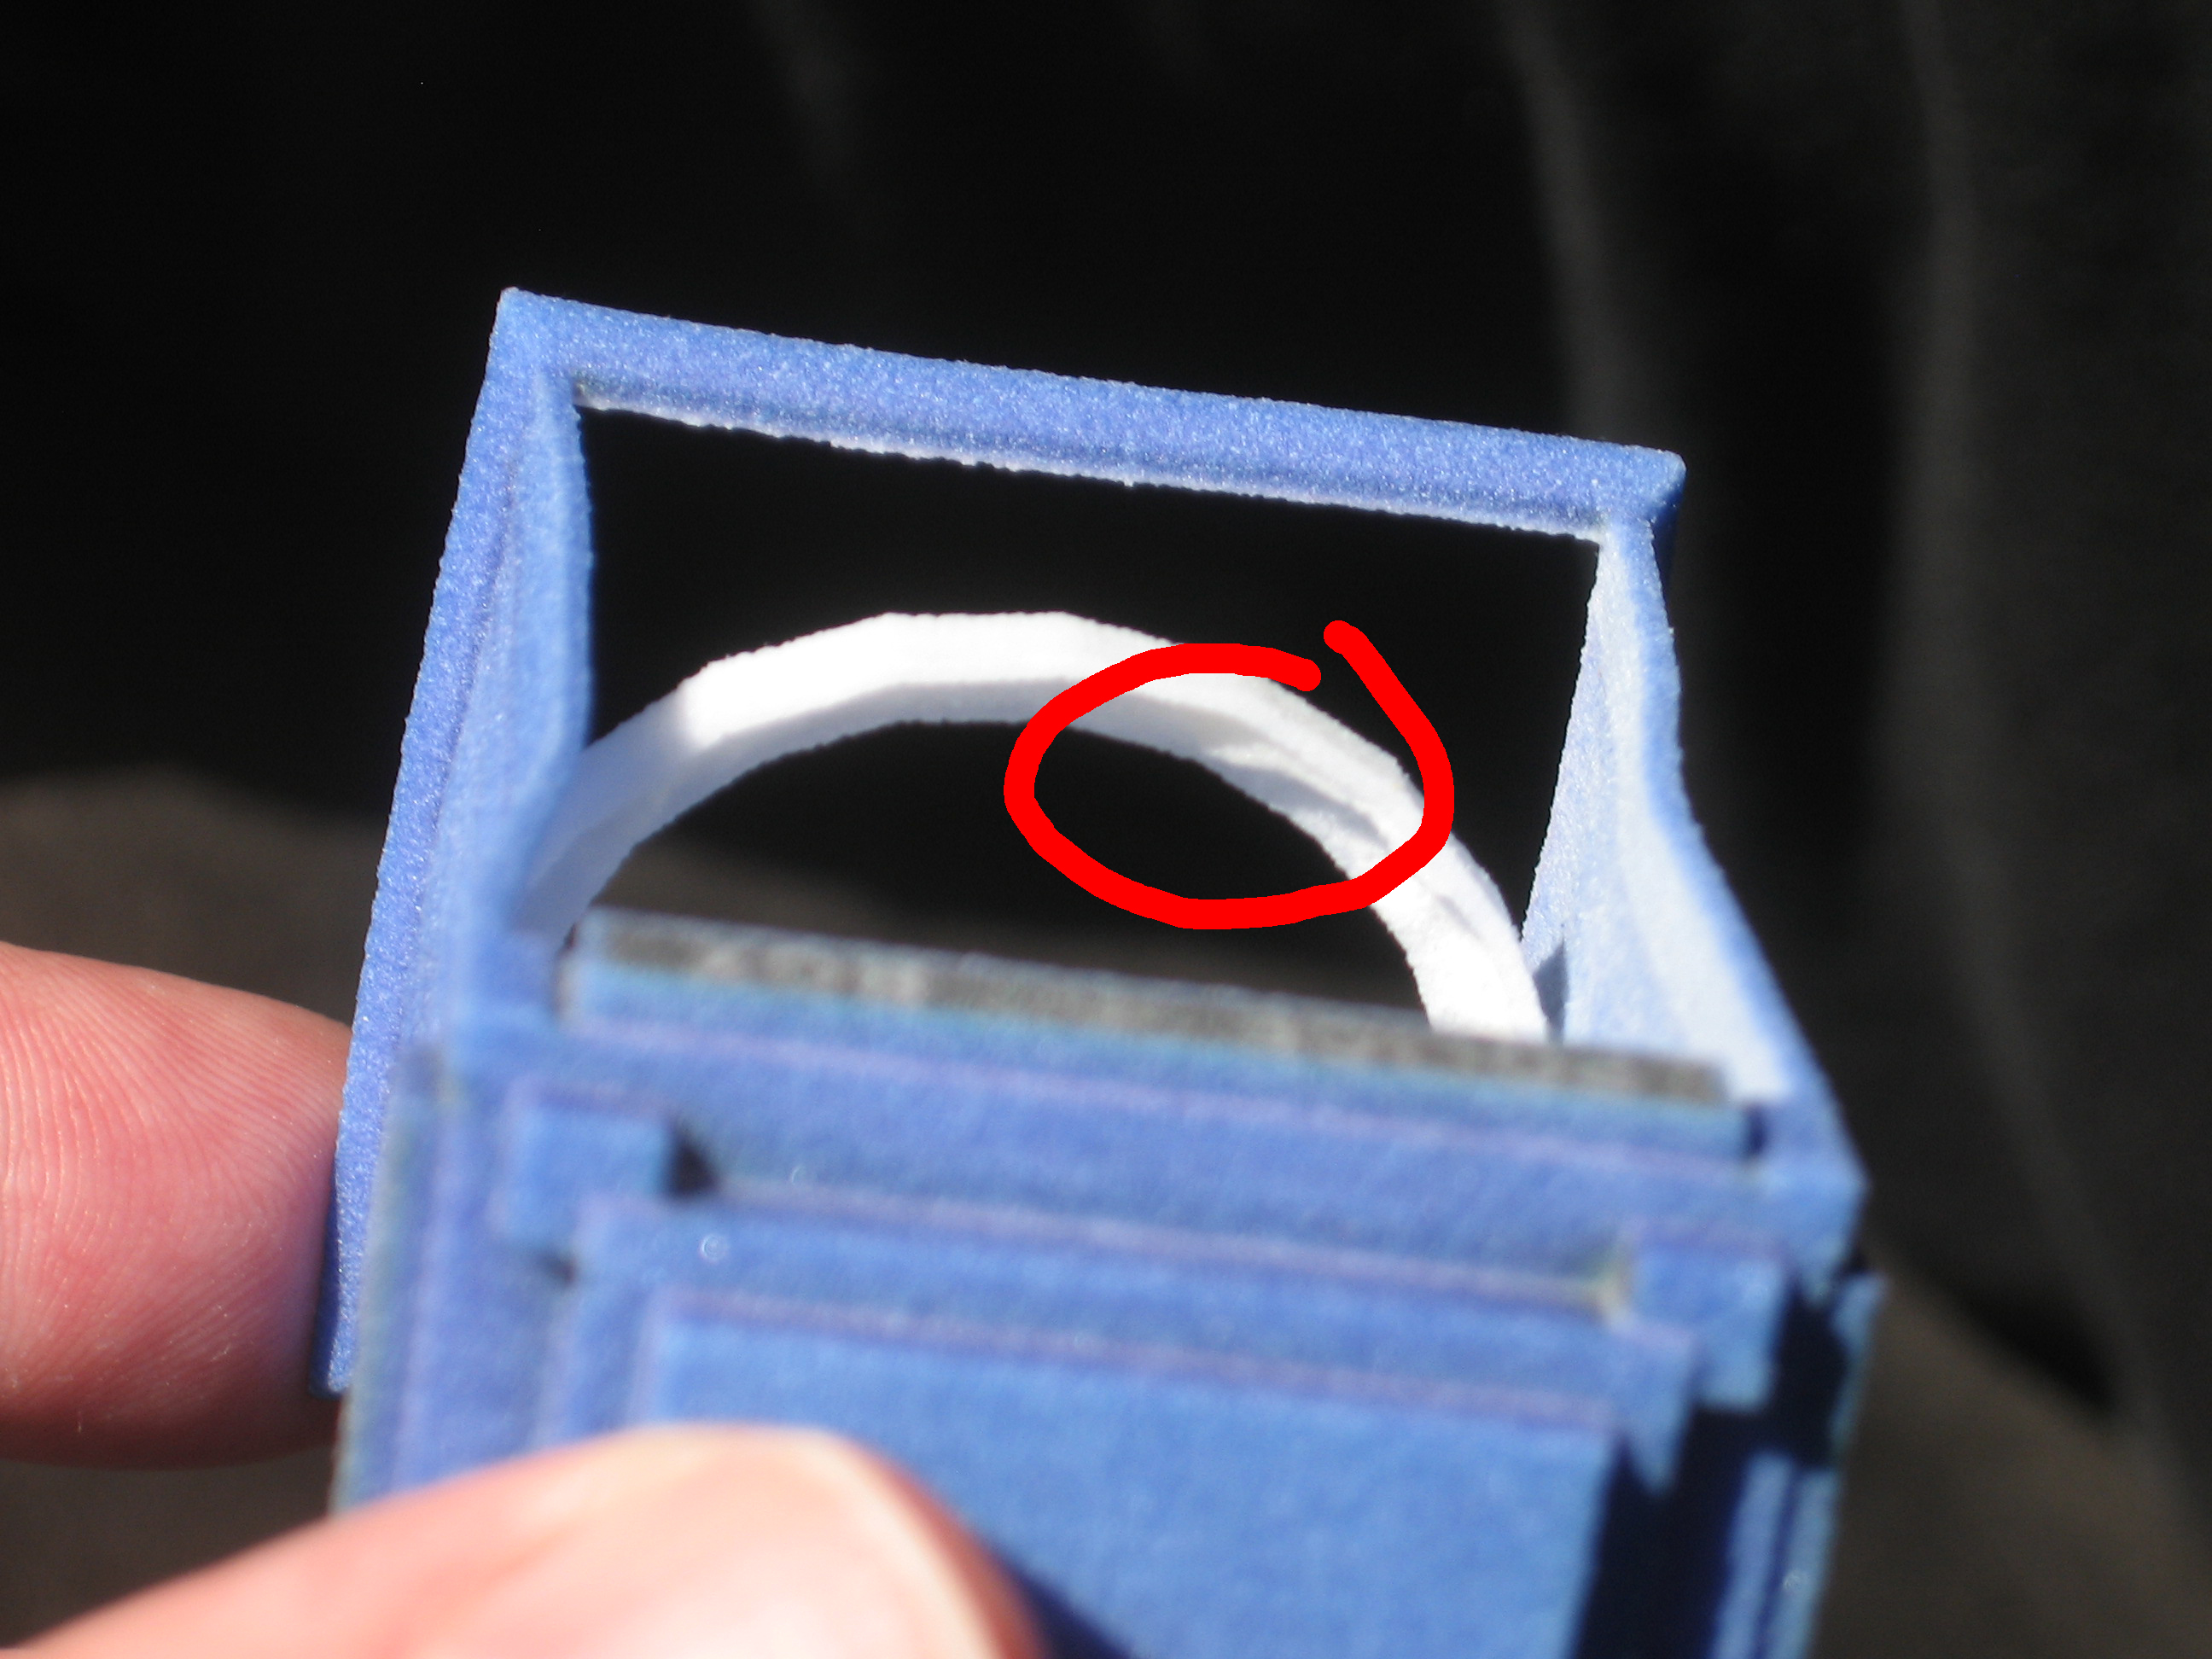
    There are little lumps of plastic fused inside the ring so it's impossible for the candle to go where it belongs.

    Then there's Grimlet. A thinner, more delicate version than the original, FCS version. Should look like this:
    [​IMG]
    Unfortunately his scythe arrived a little bent:
    IMG_1648.JPG
    IMG_1649.JPG
    I don't know if that's how it came out of the printer or if it's because he was jammed into the plastic bag so tight it bent along the way. He's also not setting flat on the ground, but that doesn't show up in the photos.

    As it is I don't think I'm going to use this for anything that requires long, straight sides since it doesn't seem to be able to handle that. Maybe I'll have better results with more organic shapes. I also don't think I'm going to bother redesigning the rest of my monsters since making them thin just makes it more likely that they'll wind up bent and twisted.
     
    Last edited: Aug 22, 2014
  2. WillLaPuerta
    WillLaPuerta Well-Known Member
    The next one doesn't have any distortions or bends anywhere.
    IMG_1651.JPG
    Unfortunately the material is either a little more see through than I expected or the color itself is bleeding through from the other side.
    IMG_1652.JPG
    I think this problem could be solved in the future by including an additional minimum wall thickness requirement. Well, a suggestion at least. A minimum thickness required to keep the colors from bleeding through.

    I think the last one turned out just fine.
    IMG_1653.JPG
    IMG_1654.JPG
    At least I think it's just fine. All those snakes are messing with my head. They're making it look distorted whether it is or not.
     
  3. numarul7
    numarul7 Well-Known Member
    Lots of warping going on! o_O
     
  4. stannum
    stannum Well-Known Member
    If you feel adventurous, try using warm (or hot) water to deform the parts back to how they should be, then cold water to quickly set them. Maybe it works, maybe it doesn't.
     
  5. WillLaPuerta
    WillLaPuerta Well-Known Member
    Do you think that could help me scrape out that blob of extra material stuck inside the candle holder?
     
  6. stannum
    stannum Well-Known Member
    It's a trick to straighten model kit plastic (PVC, PU, ...) when they have casting issues. For extra material, the devices to use are blades (not just cut, also scrape), clippers or sanding tools.

    How thick are the walls in the police box or the heart? And the scythe stick?
     
  7. lensman
    lensman Well-Known Member
    That's too bad. There is also the issue - as we have already been warned by Shapeways - of no true black, which is badly needed on Grimlet. The yellow and green look good on the dice, though.

    How would you compare the surface to FCS? In the photo's they look pretty much the same. When this was first announced I thought we were going to have a smooth material, but I guess technology still has a way to go.

    I have a few pieces in various stages of transit and will post in the forum when they get here.

     
  8. numarul7
    numarul7 Well-Known Member
    Looks like Green/Blue/Red are showing up , maybe replace the "blacks" with blue ? A good try will be indigo replacement to black when making the texture.

    Still the material rules must be adjusted.
     
  9. Armstrong3D
    Armstrong3D Active Member
    Wow...I'm definitely not paying for this yet. I understand that it's "new" and "cool" but give it a bit and let them work out the kinks.
    No point in wasting money on it yet.
     
    Last edited: Sep 5, 2014
  10. JoyComplex
    JoyComplex Active Member
    Thanks for sharing your FCP experience. I've got some models being printed right now so I'm very interested in how they compare to your results.
     
  11. WillLaPuerta
    WillLaPuerta Well-Known Member
    The Police Box is 1mm at the thinnest, the wall behind the heart is just under .9mm, and Grimlet's scythe handle is just over 1.8mm. I would like to say that his robe looks a lot lighter in my photo than it does it real life. Definately not black, but a dark grey that I could live with if I had to. I am thinking about how it would look in a deep blue or purple but for the future I might just stick to using brighter colors like with the Snake Die since that turned out so well. The surface itself doesn't feel that rough to me. In fact it looks a lot more so than it feels to the touch. If the hot water thing works and I can straighten out his scythe I'll try giving him a clear coat. I know it won't be black but maybe it'll be a deeper shade of something.
     
  12. mkroeker
    mkroeker Well-Known Member
    Could be worse - the distortions might simply be due to inappropriate cooling rate or too early handling, i.e. lack of experience with the process. Surface roughness looks surprisingly similar to FCS despite lacking its superglue coating, and I assume a thin coat of spray varnish would bring out the colors a bit. The grayish black was to be expected, at least it does not appear to show a color hue (imagine that inconvenienced reaper guy in a pink robe).
    The red heart showing through to the lettering on the back side is a bit intriguing - guess it might be interesting to see a cut through that part (though i guess you might not want to destroy it completely). Perhaps shapeways could conduct a bleed-through test on a smaller, cheaper part that is similar to your model?
     
  13. draw
    draw Well-Known Member
    Is it possible that the "bleed through" of colors in FCP is happening because the uncolored plastic is much more translucent than the sandstone interior? How does the uncolored FCP compare to WSF?

    I designed a couple of FCS and FCP test parts to put in a lathe so I can compare the pigment depths and uncolored core properties side-by-side in a destructive test. Now I'm thinking another test sheet of FCP without color would also be a good idea.
     
  14. numarul7
    numarul7 Well-Known Member
    When they arrive maybe use the same thread to post them ? So we can see all an compare here rather search thread by thread?

    Thank you advance!
     
  15. AmLachDesigns
    AmLachDesigns Well-Known Member
    How do you specify 'no colour'?
     
  16. draw
    draw Well-Known Member
    Not sure. Maybe set the R G B color values in the .x3d to 0 0 0 ? Either that or make a sheet/box with a dark color on both sides and then sand off the pigment layer until the color is gone.
     
  17. WillLaPuerta
    WillLaPuerta Well-Known Member
    It's really hard to tell if I'm seeing through it or if it is bleeding through. I've looked at it from different angles and in different lighting conditions and I still get the impression that the colors have bled through to both sides. I've seen broken pieces of FCS and the colors definitely seep into the surface by an observable amount and I haven't read anything about FCP to suggest that's not what's happening here.
     
  18. mkroeker
    mkroeker Well-Known Member
    By using a color-agnostic format such as STL (assuming that shapeways allows it as I believe they do for "sandstone") ?
    Otherwise 100 percent white (1. 1. 1.) should be a good substitute, as the printer has no way to make that up. (0. 0. 0. on the other hand would be
    black i.e. grimlet's gray coat)
     
  19. draw
    draw Well-Known Member
    In FCS the color layer appears to be a rather consistent 1mm deep from the surface, and the color layer itself has a lot of opacity. I don't think it's seeping in as much as that is what the FCS printers are programmed to do. Beyond a certain distance from the surface the printer just doesn't waste any printer toner. I once started a thread showing the results for some FCS ornament blanks that are meant to be machined to get at the insides of the prints, and convinced the printers to add color deep inside the object by using small gaps. https://www.shapeways.com/forum/index.php?t=msg&goto=828 42

    Here you can see that when you cut into the "red" wedges the insides are whitish (or noncolored sandstone material).

    [​IMG]

    Anyway, my guess is that the color thickness layer of the FCP is only half the minimum thickness, or 0.35mm. If you have a minimum thickness wall the color on one side will butt up against the color on the other side, and any lack of opacity will allow patterns to show through.

    This is the test piece I will use to figure out what is happening. I'll mount an FCS part next to an FCP part and take photos as I turn them on the lathe.

    testFCPFCS2.jpg

    -------------------------------------------------
    Edited to change the lathe test piece image. This piece adds two wedges because why not.
     
    Last edited: Aug 25, 2014
  20. stannum
    stannum Well-Known Member
    Color systems don't paint just the surface, but apply ink in the areas near the surface, like a "skin". You can see this in printing videos, "thick line art" appears with each pass. Cutting / sanding experiments confirm it.

    FCS is also translucent and colors can affect the other side... but the walls are a lot thicker, so issues are less obvious. You can see this in some special cases, by cutting or even by just looking at the right places (corners and other "thin" places). "Skin" can also be thicker than with FCP, we will have to wait for lathing results.

    FCP seems to be pretty much like FCS, but using a plastic instead of ceramic, and light / UV cured glue & inks. Which could explain why no black, too prone to hot spots.