HI everyone,I was recently asked by a co-worker to blog about 3d printing (a personal first). I felt "part" of the article might be of some use to the Shapeways community. Appologies if the tips and explanation are a little soft, it was written for a diverse audience of my peers. Finally, I realize this particular forum is not the ideal landing zone for this but I felt it would get more traction with the pics....sorry Moderator for re-posting. I'm still learning my way around.
I set a modest goal to produce two models with a budget of $500. Phase one was to print a complete building site in medium resolution nylon. Phase two, an art deco fountain, was to be printed in high-detail acrylic polymer. I've been in the 3d mix for years but am a relative newbie to 3d printing and I made lots of rookie mistakes. This in an account of my learning from phase one of my goal.
Planning:
I can't over emphasize the importance of planning out you're print. If you shoot from the hip you will fail. Don't expect that exporting your Revit model out of the box will land you a print; trust me, it won't. To be successful you must understand and play by the rules of the game.
Rule number one: Read the Material Guidelines FIRST. Rule number two is like rule number one: Obey the Material Guidelines.
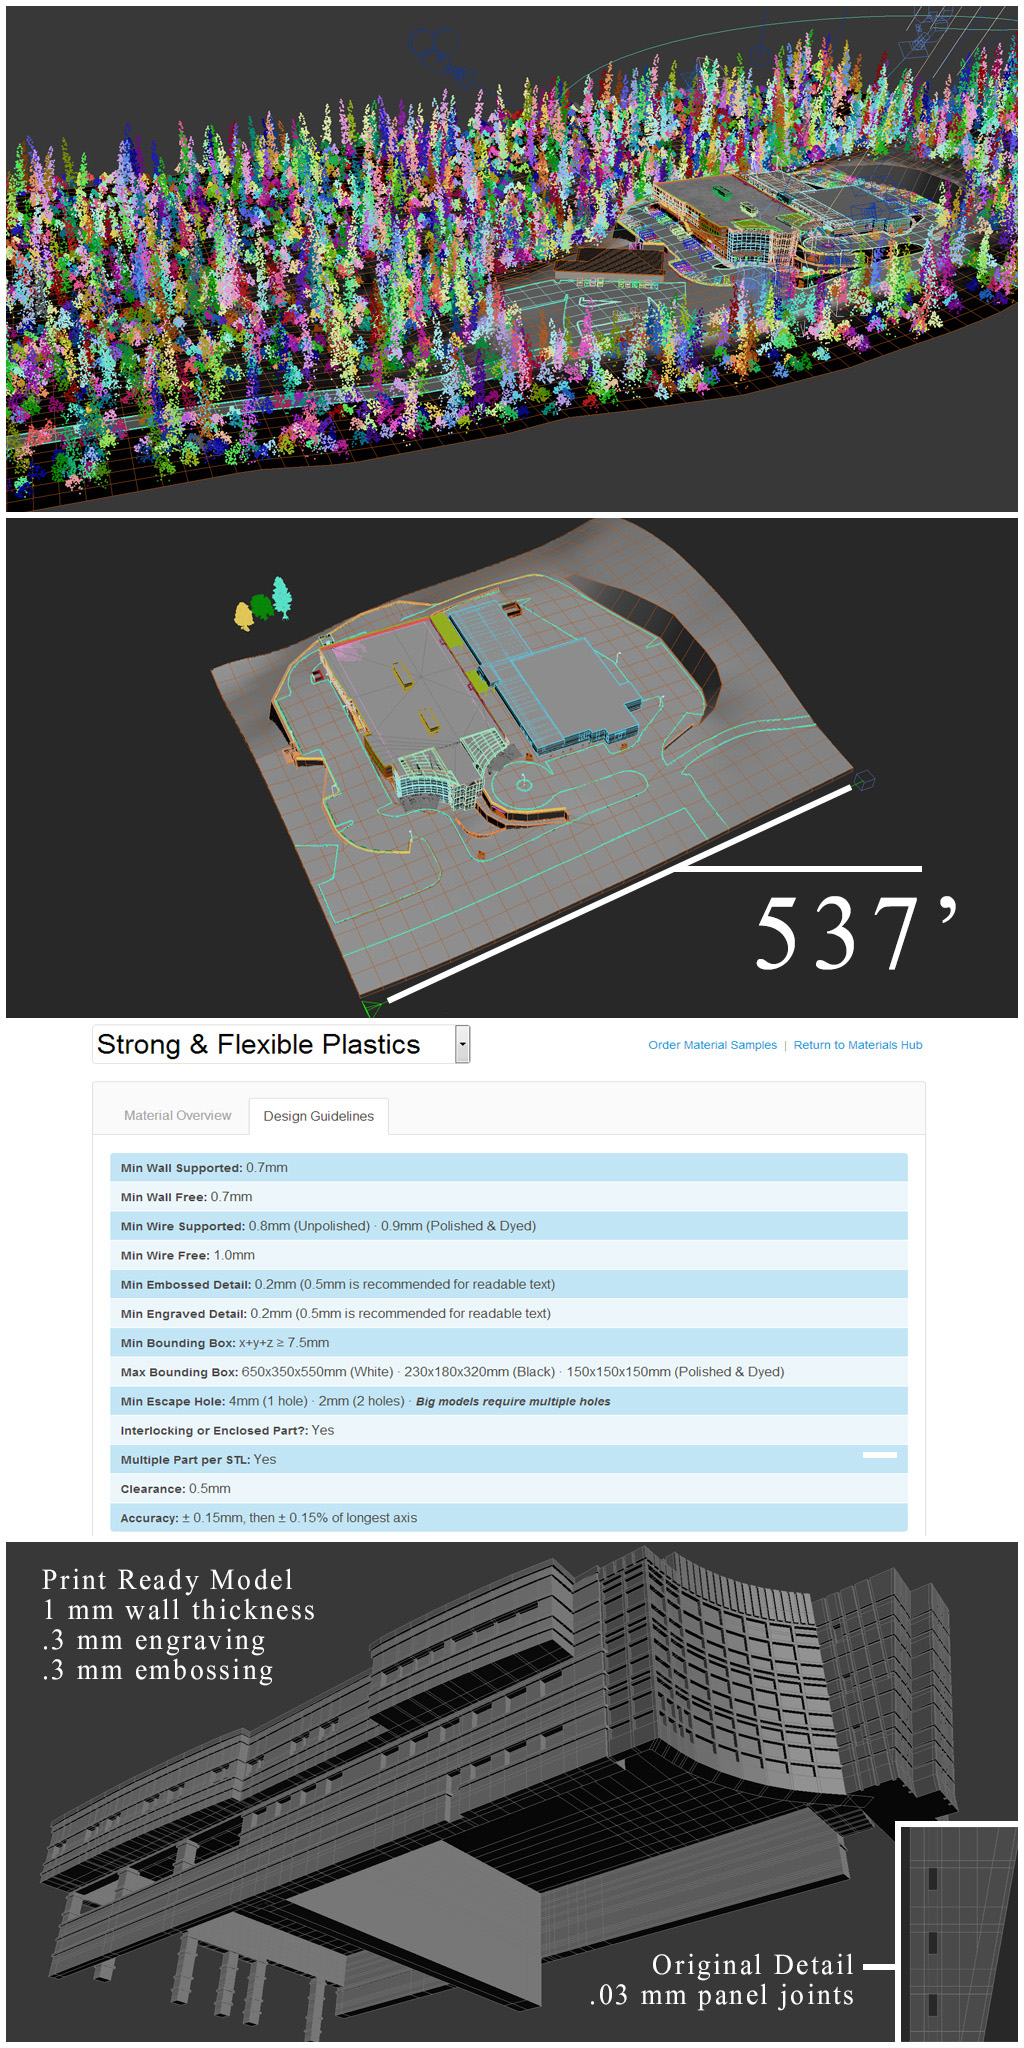
This first image is a screenshot of an animation ready Coquille Valley Hospital model getting along great in Max. It is also unprintable. At a glance there are approximately 6000 objects and over 1 million faces in the scene, including XRefs and proxy objects. The first step in my planning phase is to simplify the model.
The second image is getting warmer; the environment and non-essentials are gone but a clear problem remains. Scale. Working in the correct scale will save you countless rejection notices and rework. Don't make the same mistake I did and assume your re-sized scene will get the green light. The .stl check program will ultimately reject your thin walls and thin pins. Knowing this model would be printed in Shapeways' Strong & Flexible Plastic at 6" wide, I am designing accordingly.
The bottom image shows the original building model cleaned, simplified and properly re-scaled. I am also working in a metric unit space of millimeters. You will immediately recognize the need to inflate detailed elements. The columns, mullions, control joints, cantilevers, etc. will need to be addressed. Consider the building design carefully and expect to compromise on the aesthetic. * Note: It's good practice to reset the XForm on all parts not being rebuilt. This will assure proper importing and exporting moving forward.
Site Production and ZBrush for Architecture:
I said in the beginning that I would offer an alternative practice for most CAD users and from this point forward I begin to rely heavily on ZBrush. If you watch television, movies or play video games you have no doubt been exposed to its magic. ZBrush is a giant star in the content creation universe, but it is a clear departure from the norm. Set realistic training goals and give yourself time to learn this program.
Not many people use ZBrush for architecture. It is best known as an organic modeling and painting platform. While it may not find its way into you're daily toolbox it can be an invaluable resource for 3d printing. This is namely due to the Dynamesh, Remesh, Project, ZProjection, Morph, Morph Target and Decimation features. That sounds like a lot and it is. For the remainder of the article I will talk about the principles used to create the model but will not get into button pushing. If you remember just one thing from this posting make it Dynamesh. You can think of Dynamesh as a virtual vacuum press that excels in performing boolean operations. Oh yeah, it also re-meshes the garbage you put into it, repeatedly.
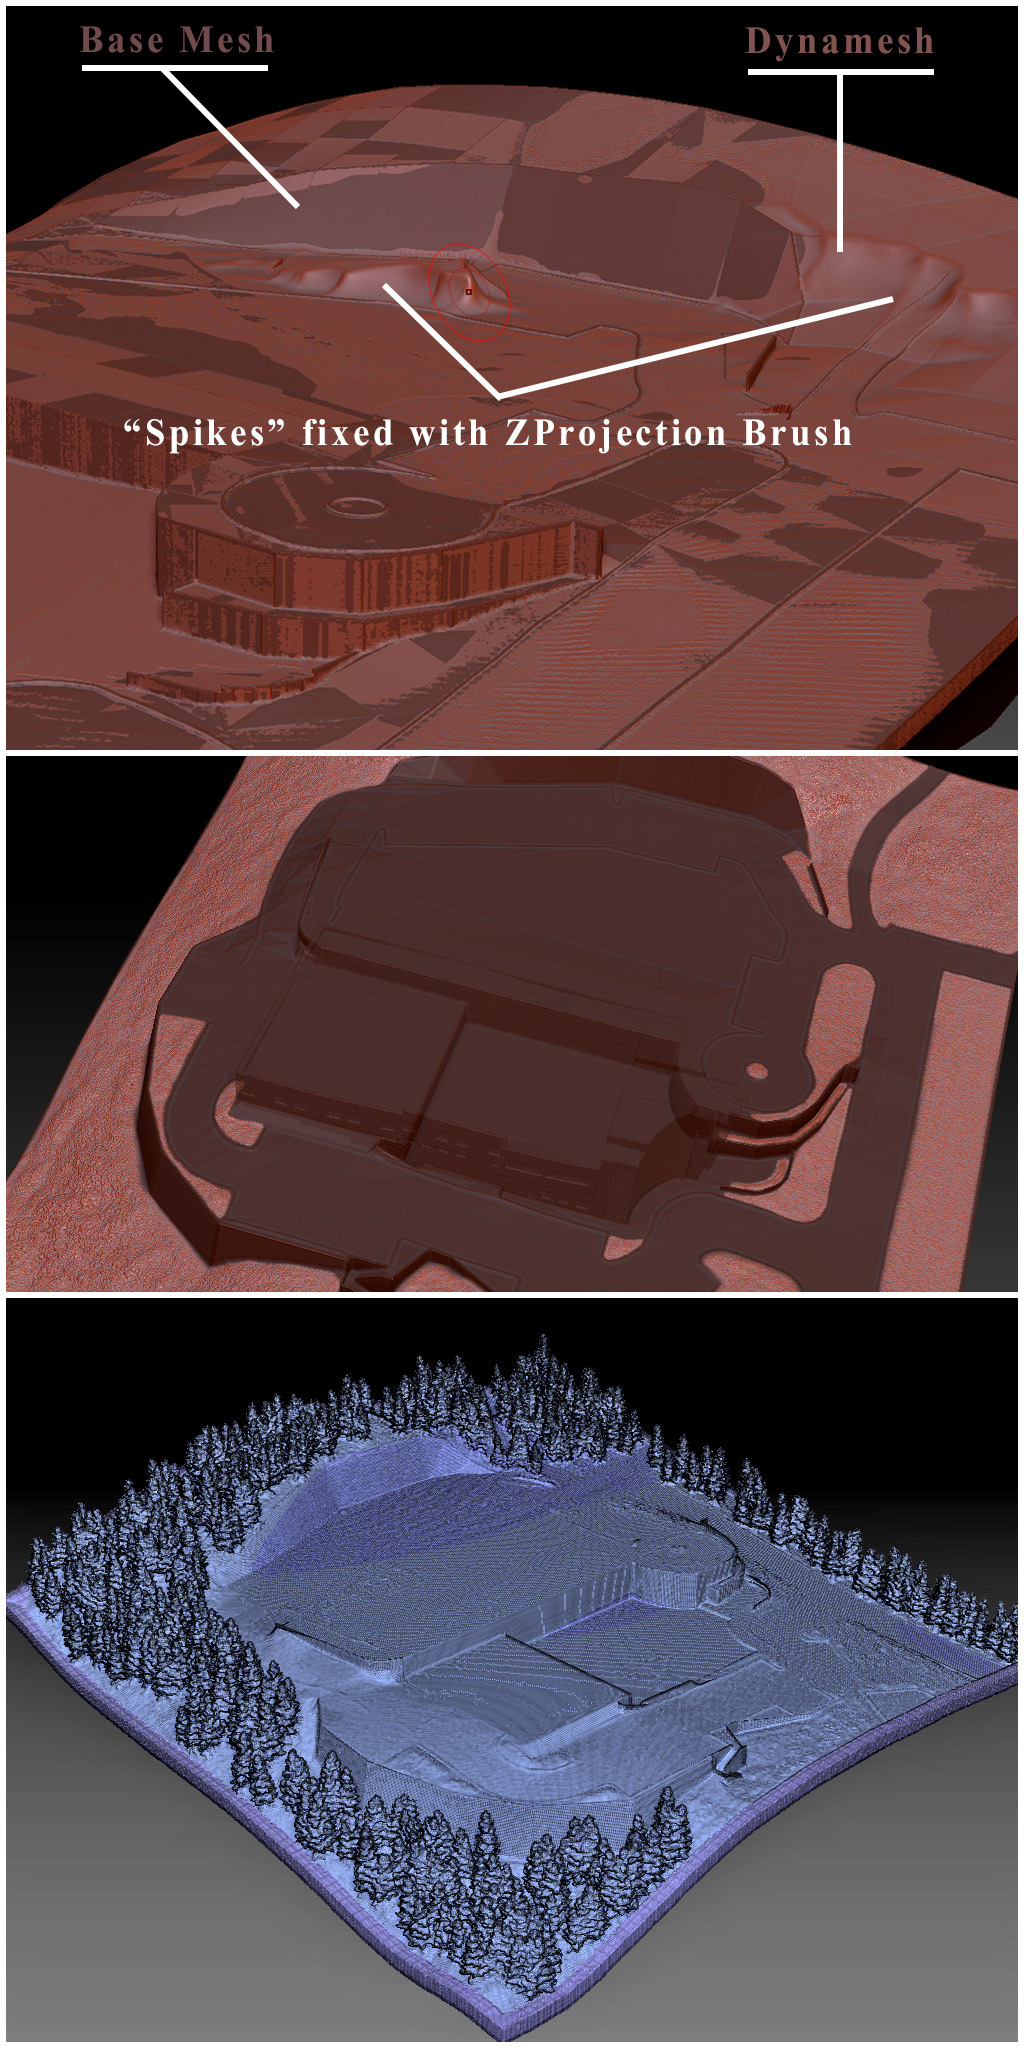
These are all screenshot of the Coquille site in Zbrush. Notice the two congruent models in the first image. The base mesh was imported as an .obj from Max. The .obj contained multiple objects exported together, such as the lofted curb and retaining walls. The base mesh layer was then duplicated in the Zbrush Sutool palette and the copy was Dynameshed at a fair resolution. The second image shows the hardscape mask and a little noise deformation. Lastly, the trees were scattered using Forest from Itoosoft. Any scatter command would do the trick here but "Forest" makes controlling the boundary easy. Notice the tight edge loops and seamless mesh compliments of Dynamesh. The method I used for establishing a printable tree model was the same used for the car library (more on that later).
*Important* On occasion Dynamesh will return a less than ideal result. The spikes on this screenshot were a result of yours truly leaving too many open edges on the base mesh. In this case it was an easy fix and I used the ZProjection brush to conform the remaining Dynamesh topology. Other methods of fixing problem meshes abound. A favorite of mine for more complex geometries is to Remesh or Dynamesh a duplicate layer at a lower resolution, store a Morph Target, Project to the base layer and use the Morph brush to remove the spikes. You can repeat these steps as necessary and build resolution as you go. Also, I have found that subtractive booleans behave more predictably when separated into individual operations. Use the Groups Split function on models of multiple parts to re-separate .objs that were exported as a single file. And finally, cap the holes of your models before exporting them to ZB.
Building a base and cost cutting measures.
Printing two models at 6"x 6" and 4"x 4.5" respectively for $500 is a stretch, but with a little ingenuity it can be done. Costs among the factories seemed generally competitive; I chose Shapeways in New York to print my models after running off a few small prototypes and receiving them quickly. Shapeways charges for the volume of material used and not the space you're model occupies on the print bed. So, shell you're model.
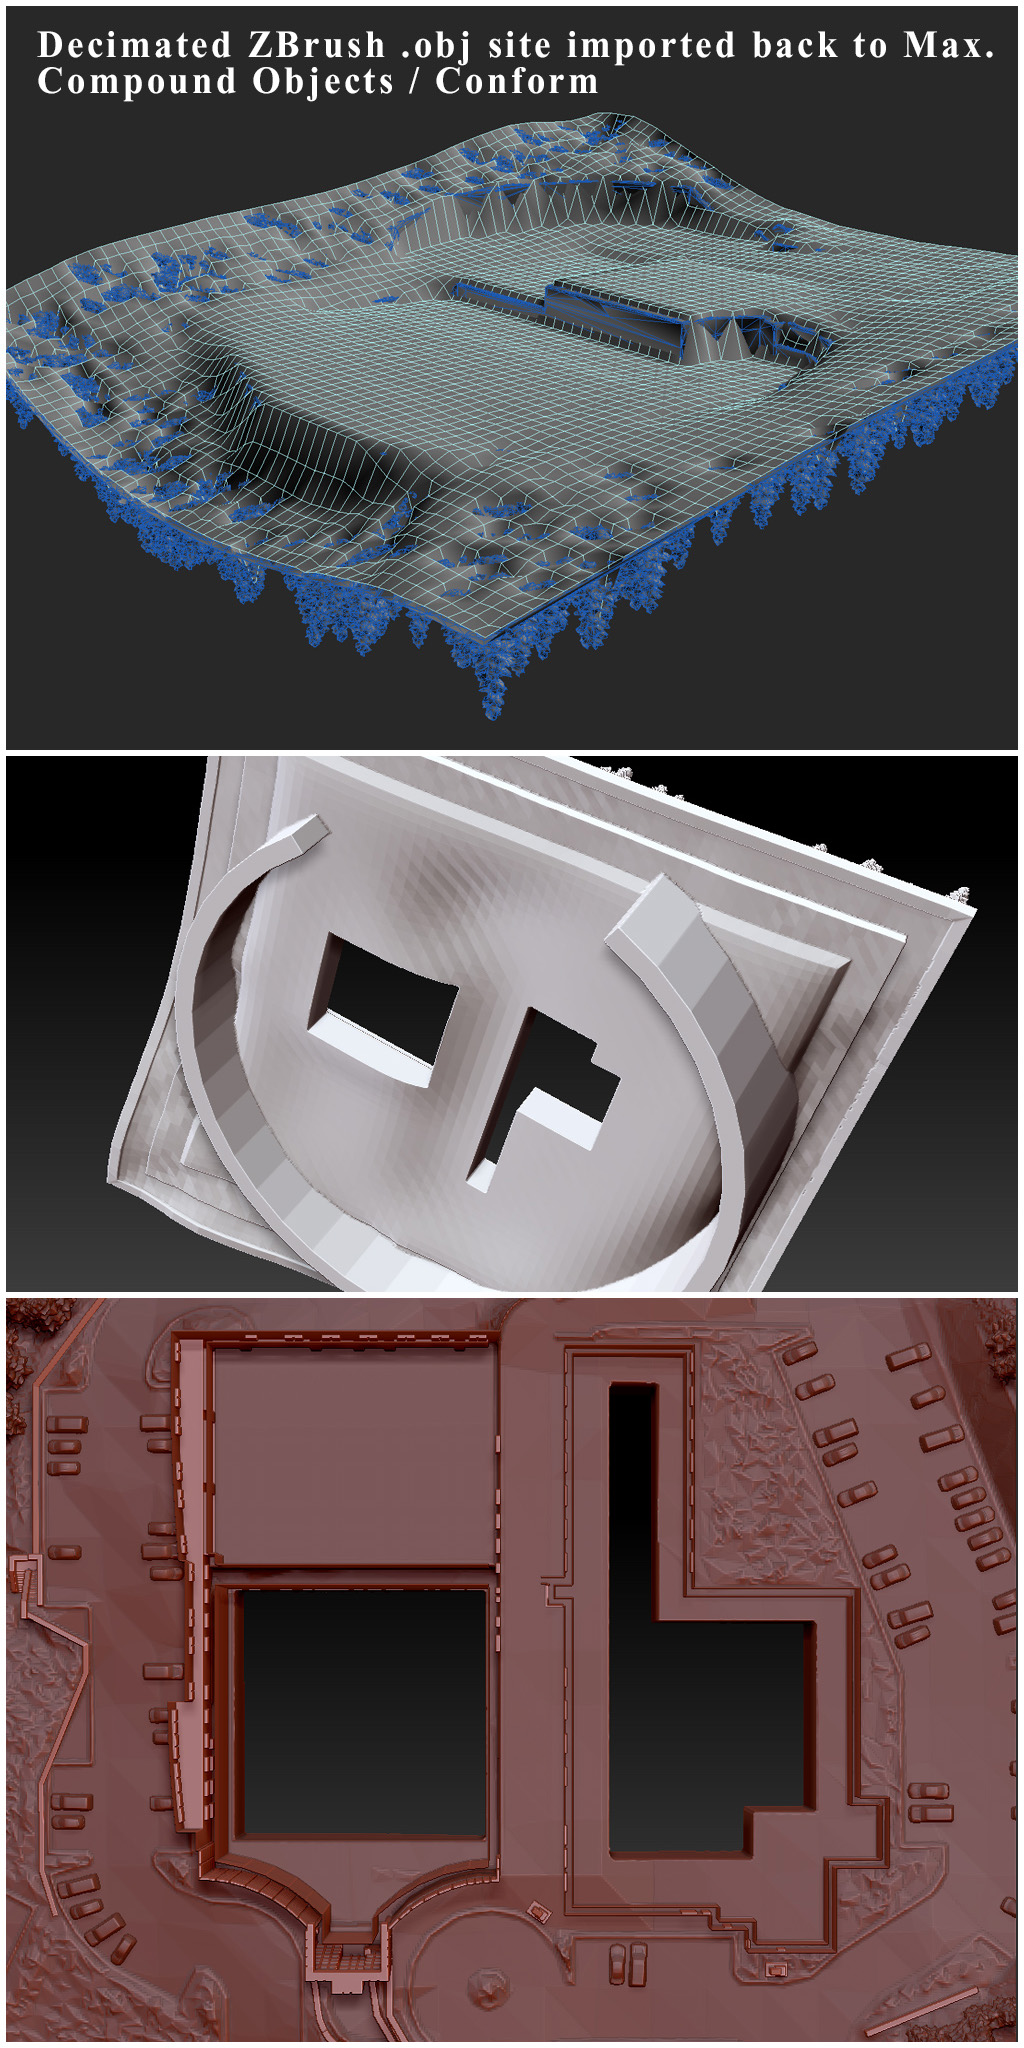
In order to use less material and build the cheapest model stand possible I created the low wall of the stand from the floor of the site. In a nutshell, after importing a decimated version of the site into Max I conformed a plane to the models belly. Next, I relaxed the mesh a little and offset the plane according to the design guidelines and established a printable thickness. Newly created Max parts were added to the completed Dynamesh site and stand. Notice the large escape holes above the building footprints. The holes were created by a Dynamesh Boolean subtraction using extruded shapes.
Last Looks:
I wanted a lot full of autos but my model library is more suited for car commercials than printing a .5mm bump of plastic. So, the simplify theme continues.

The highlighted car detail will result in .stl check rejection (based on my printing scale and material selection). *Note – the red box visible between the wheels extends the length of the car and intersects the wheels and undercarriage. The box connects the car to the site and is intended to alleviate the Clearance tolerance per the design guideline. The Charger model, like all the others, was stripped of mirrors, tailpipe, antennas, door handles, etc, and then exported from Max as an .obj to Zbrush. Once in ZBrush the entire model was converted to Dynamesh at a resolution of 512. The polycount as shown is over 700K. After Decimating the model in ZBrush down to around 5K polys we have a watertight asset that can be easily replicated around our scene. For the Coquille print I created a library of just 4 cars and the process took about an hour.
Conclusion:
Netfabb is a .stl checker that offers a free version of its flagship product. The UI is simple to learn and the program auto-magically fixes manifold edges and other annoyances.
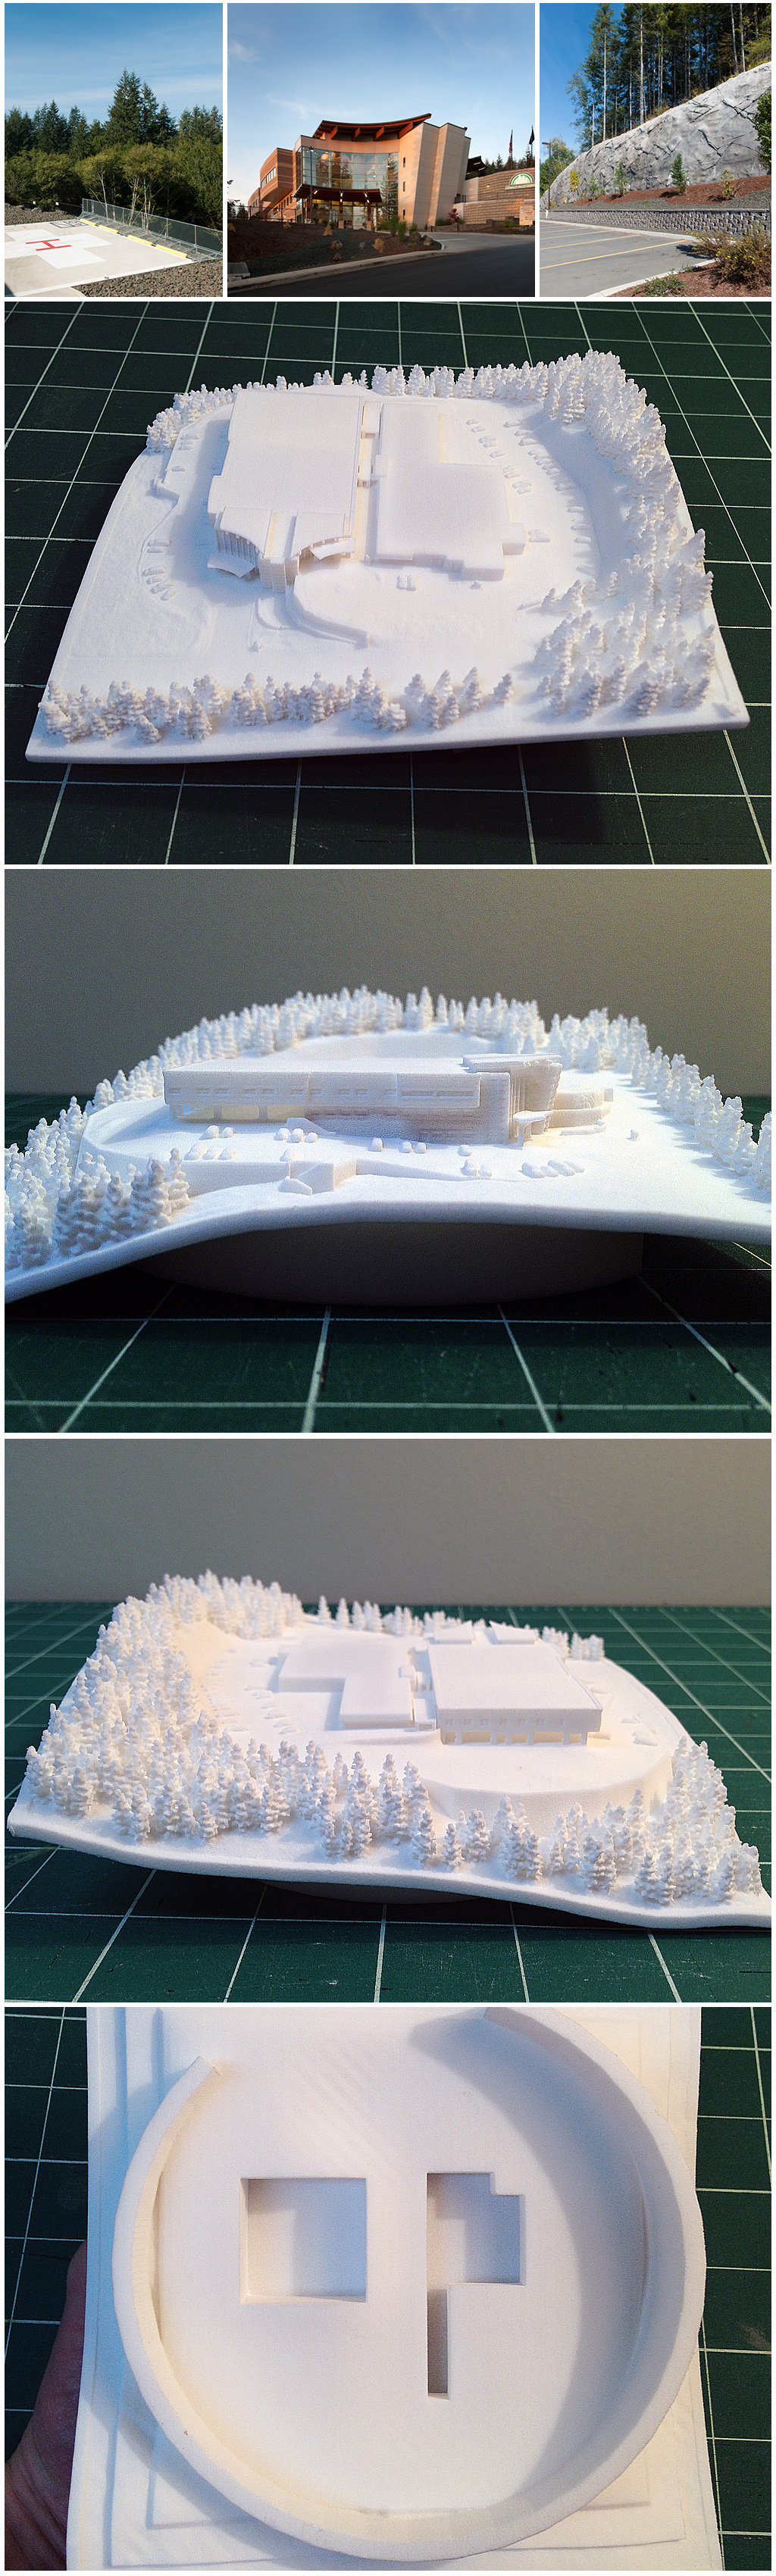
$175 later. On time and under budget...you get some bad Iphone Pics
")