White Natural Versatile Plastic


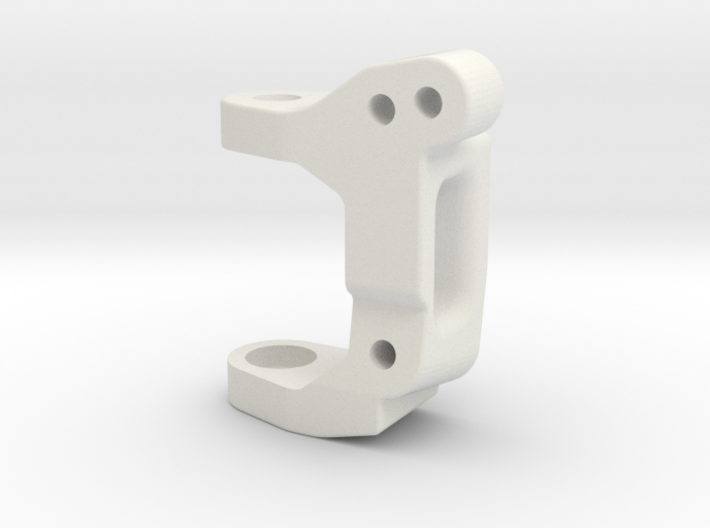
Tamiya Terra Scorcher 10deg Caster C-Hub Left
Made by
Print With Shapeways
 Choose Your Material
 Choose your color and finish
$10.69
Have a question about this product?
contact the designerYou must be logged in and verified to contact the designer.
Product Description
This C hub replaces parts C3 on the Tamiya Thundershot, Thunder Dragon, Terra Scorcher and Fire Dragon, original and re-releases. It is stiffer than the original and has 10 deg of caster built in to make the steering less twitchy and more predicatable. It also has two mounting holes for the upper camber link to give tuning options. If you have an original Thundershot (58067) or Thunder Dragon (58073) these lower the top arms and raise the roll centre like the later models and Rereleases to improve the handling.
Pre-requisites:
This has to be used in a used with the Right Hand C hub http://shpws.me/QO6O
This only works with DF03 front uprights parts C5 and C6 from Tamiya part number 51250
Longer ball screws either Tamiya 54208 or 9805611
Camber link top arms (already on the Terra Scorcher). This will not work with the kit plastic blue top arms
2 x 850 metal bearings per c-hub Tamiya 9805185 or 850 bearings.
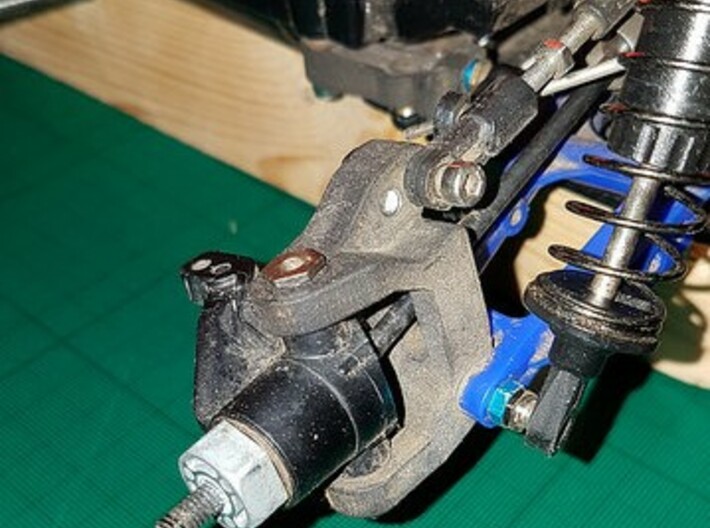
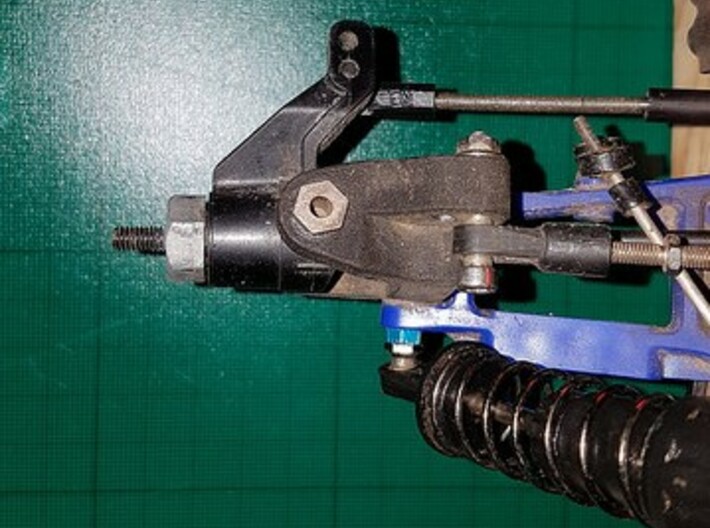
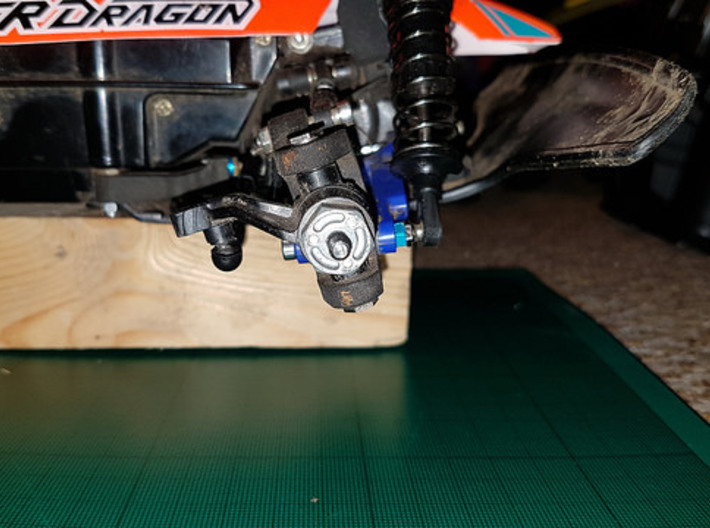
Drill out all the 3mm holes with a 3.1mm drill to clean them out. Press the 850 bearings into the top and bottom housings in the c hub. Remove the original C hubs and steering upright and install this part angled towards the rear of the buggy. Use the screwpin installed with the head towards the rear of the buggy (opposite to the kit).
The DF03 knuckles require modification. Drill all the way through the threaded holes on the steering axis with a 4mm or (if you have one) a 4.2mm drill. Now tap a thread all the way through using an M5 tap. Install the 1150 bearings from the Thundershot/Dragon uprights in the DF03 uprights, or use new bearings. DF03 uprights upside down (as shown in the photos) with the longer thread ball screw and a 3mm spacer underneath (either the plastic 3mm spacer from the damper sprues or aluminium) . This prevents bumpsteer. Reuse the kit kingpins.
The Terra Scorcher comes with camber links to allow these to fit. For all other models in this series, to make suitable top camber links you can use any combinations of Tamiya rod ends and ball nuts or collars and some M3 threaded rod, but the following will give you adjustable turnbuckles.
Parts:
9805780 3 x 23mm turnbuckles
50591 Ball collars
50596 Rod End Adjusters
7mm spacers from rear CVA shock sprue or any spacer with 3mm internal diameter
M3 x 12 cap head screws x 2
5mm Ball Nuts 9804206
Tamiya 53601 low friction adjuster ends
Remove the blue top arm. Keep the screwpin from the inboard end. Install an open rod end on one end of the turnbuckle and a closed end adjuster on the other. Press one of the 50591 into the open end and install at the inboard end with the spacer using the screwpin. Starting with the inboard top hole on the c hub, push the M3 x 12 cap head screw in from the rear, and install the ball nut on the front. Press the closed end adjuster onto the ball nut. First setup suggestion is 16mm exposed turnbuckle between the ends of the adjusters.
The turnbuckles themselves come in a kit of 4, and you get more ball nuts, collars and rod ends than you need so if you double up on spacers for the inboard end and M3 x 12 cap head screws you can make some turnbuckles for the rear of your Thundershot, Thunder Dragon or Fire Dragon too.
Pre-requisites:
This has to be used in a used with the Right Hand C hub http://shpws.me/QO6O
This only works with DF03 front uprights parts C5 and C6 from Tamiya part number 51250
Longer ball screws either Tamiya 54208 or 9805611
Camber link top arms (already on the Terra Scorcher). This will not work with the kit plastic blue top arms
2 x 850 metal bearings per c-hub Tamiya 9805185 or 850 bearings.
Drill out all the 3mm holes with a 3.1mm drill to clean them out. Press the 850 bearings into the top and bottom housings in the c hub. Remove the original C hubs and steering upright and install this part angled towards the rear of the buggy. Use the screwpin installed with the head towards the rear of the buggy (opposite to the kit).
The DF03 knuckles require modification. Drill all the way through the threaded holes on the steering axis with a 4mm or (if you have one) a 4.2mm drill. Now tap a thread all the way through using an M5 tap. Install the 1150 bearings from the Thundershot/Dragon uprights in the DF03 uprights, or use new bearings. DF03 uprights upside down (as shown in the photos) with the longer thread ball screw and a 3mm spacer underneath (either the plastic 3mm spacer from the damper sprues or aluminium) . This prevents bumpsteer. Reuse the kit kingpins.
The Terra Scorcher comes with camber links to allow these to fit. For all other models in this series, to make suitable top camber links you can use any combinations of Tamiya rod ends and ball nuts or collars and some M3 threaded rod, but the following will give you adjustable turnbuckles.
Parts:
9805780 3 x 23mm turnbuckles
50591 Ball collars
50596 Rod End Adjusters
7mm spacers from rear CVA shock sprue or any spacer with 3mm internal diameter
M3 x 12 cap head screws x 2
5mm Ball Nuts 9804206
Tamiya 53601 low friction adjuster ends
Remove the blue top arm. Keep the screwpin from the inboard end. Install an open rod end on one end of the turnbuckle and a closed end adjuster on the other. Press one of the 50591 into the open end and install at the inboard end with the spacer using the screwpin. Starting with the inboard top hole on the c hub, push the M3 x 12 cap head screw in from the rear, and install the ball nut on the front. Press the closed end adjuster onto the ball nut. First setup suggestion is 16mm exposed turnbuckle between the ends of the adjusters.
The turnbuckles themselves come in a kit of 4, and you get more ball nuts, collars and rod ends than you need so if you double up on spacers for the inboard end and M3 x 12 cap head screws you can make some turnbuckles for the rear of your Thundershot, Thunder Dragon or Fire Dragon too.
Details
What's in the box:
Thunder Dragon 10 deg C Hub Left V6

Dimensions:
Success Rate:
First To try.
What's this?
Rating:
Mature audiences only.

