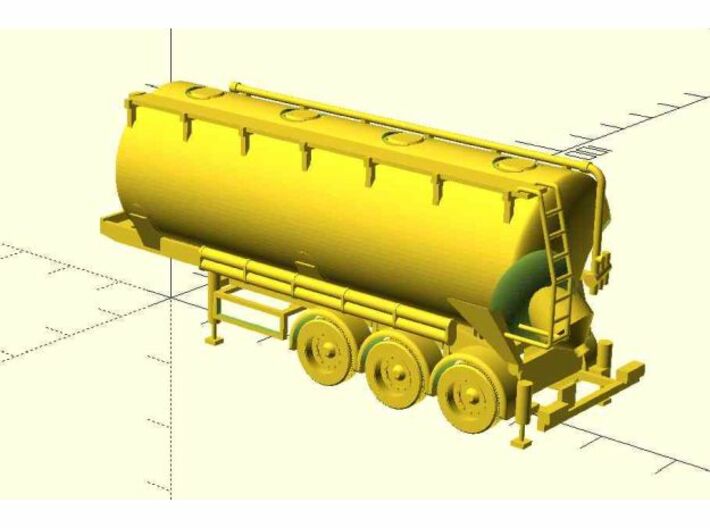


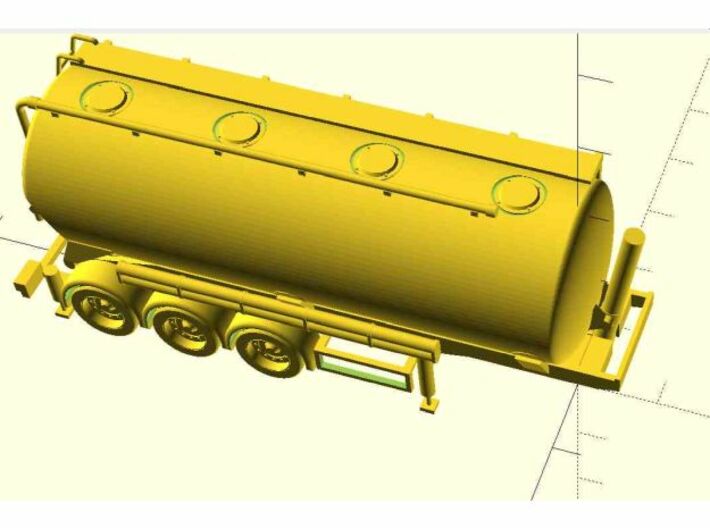


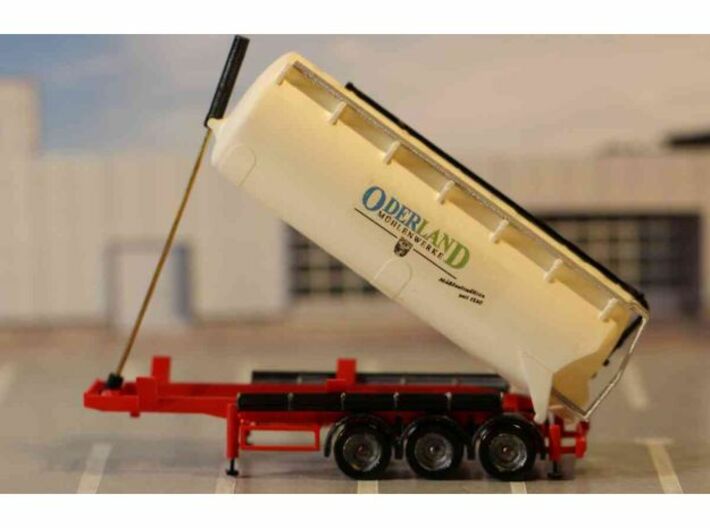
Siloauflieger / bulk trailer
Made by
Print With Shapeways
 Choose Your Material
 Choose your color and finish
$58.37
Have a question about this product?
contact the designerYou must be logged in and verified to contact the designer.
Product Description
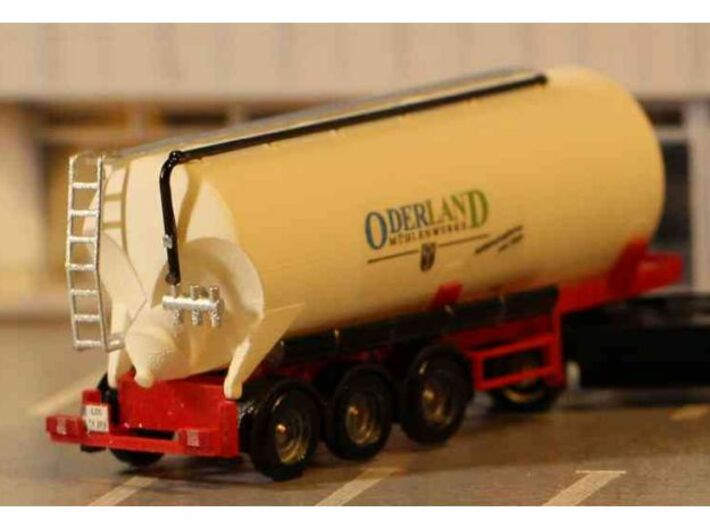
DE: Dies ist das Modell eines modernen Siloaufliegers für Lebensmittel und Baustoffe in flüssiger, körniger oder pulverförmiger Form. Es wird unmontiert und unlackiert sowie ohne Decals und ohne Zugmaschine geliefert. Eventuell in den Bildern zu sehende weitere Modelle dienen nur der Illustration.
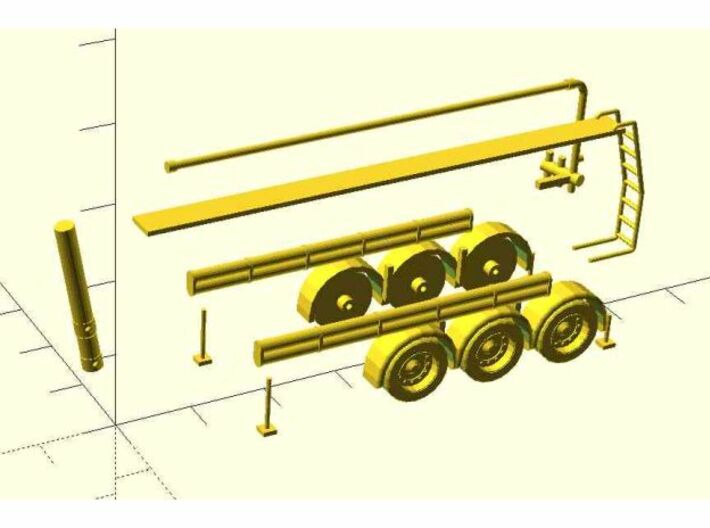
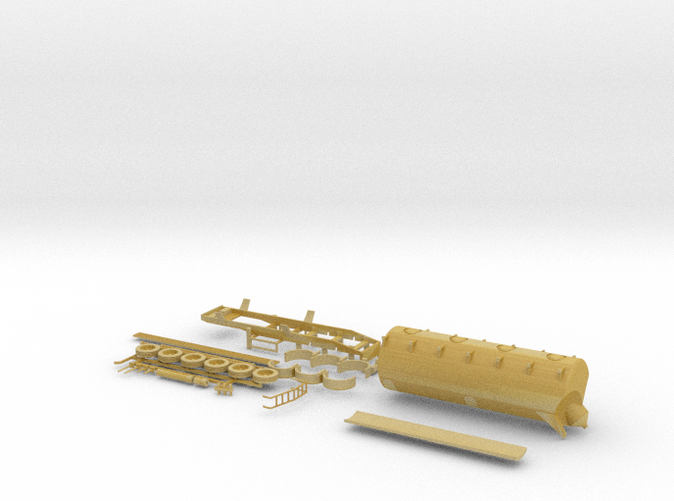
Bauanleitung: Trennen Sie die Teile mit einem scharfen Skalpell vom Träger. Lackieren Sie die Räder, Rohre, Schläuche, Hubzylinder und Stützen schwarz, Tritte, Leitern und Armaturen silbern und das Chassis und den Behälter in den Farben des gewünschten Vorbilds.
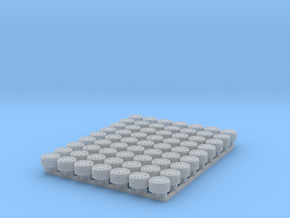
Kleben Sie die beiden Teile des Silobehälters zusammen. Stecken Sie den unteren Teil des Hubzylinders ohne Klebstoff in die dafür vorgesehene Aussparung im Rahmen, den oberen Teil in die entsprechende Führung am Silobehälter. Lassen Sie die Drehpunkte am hinteren Teil des Silos in die entsprechenden Öffnungen am hinteren Teil des Rahmens einrasten. Bohren Sie die Achsführungen am Rahmen vorsichtig mit einem 0.8-mm-Bohrer auf, ebenso die Hubzylinder und die Achsführungen an den Rädern. Bohren Sie die Führungen der Stützen zunächst mit einem 0.6-Millimeter-Bohrer und anschließend mit einem 0.7-mm-Bohrer auf. Die Stützen werden nur eingesteckt und bleiben so beweglich. Es sollte aber genug Reibung vorhanden sein, dass diese nicht herausfallen. Schneiden Sie Achsen passend zu. Stecken Sie die Achsen in die Achsführungen des Rahmens, geben Sie einen kleinen Tropfen Klebstoff in die Achsführungen der Räder und stecken Sie diese auf die Achsen auf. Auf diese Weise sollten die Räder drehbar bleiben. Kleben Sie entsprechend der Bilder Rohre, Armaturen und Tritte am Behälter bzw. am Rahmen fest. Detailieren Sie das Heck mit einem Kennzeichen aus Papier und indem Sie die Rückleuchten mit Permanentmarker auftragen.
EN: This is the model of a modern bulk trailer for food and building materials in fluid, grainy or powdery form. It is delivered as a kit, unpainted, without decals, and tractor. Images with several vehicles or buildings in them merely serve as illustrations in which settings the model could be used.
Building instructions: Please remove all parts carefully from the sprue or separate them from each other with a scalpel. Carefully clean an decrease the surfaces, suggested method is by bathing them in unscented detergent for 24 hours, then thoroughly rinsing them and lightly brushing them with a toothbrush. Paint the wheels, tubes and hydraulic supports black, ladder, fixtures and gangway silver, and the chassis and the bulk tank in the colours of your desired prototype.
Glue the two parts of the bulk tank to each other. Clip the lower part of the lifting cylinder into the corresponding opening at the front of the frame, the upper part into the corresponding opening at the front of the tank. Clip the pivot points of the tank into the corresponding openings at the back of the chassis. Bore out the axle bearings in the frame very carefully with a 0.8 mm drill, likewise the lifting cylinders and the axle bearings at the wheels. Bore out the cylinders of the hydraulic supports first with a 0.6 mm drill, then with a 0.7 mm drill. The supports will only be shoved into the cylinder (not glued) and remain moveable. There should be enough friction for them not to fall off. Cut axles from round brass material. Bore out the axle bearings on the wheels, add a tiny drop of glue to them and push the axles through the bearings on the frame. Then stick the wheels onto the ends of the axles. Thus, the wheels should be able to turn. Glue pipes, tubes, fixtures, ladder and gangway to the tank or to the chassis according to the images. Detail the rear end by painting the rear lights with permanent marker and creating registration plates out of paper.
Bauanleitung: Trennen Sie die Teile mit einem scharfen Skalpell vom Träger. Lackieren Sie die Räder, Rohre, Schläuche, Hubzylinder und Stützen schwarz, Tritte, Leitern und Armaturen silbern und das Chassis und den Behälter in den Farben des gewünschten Vorbilds.
Kleben Sie die beiden Teile des Silobehälters zusammen. Stecken Sie den unteren Teil des Hubzylinders ohne Klebstoff in die dafür vorgesehene Aussparung im Rahmen, den oberen Teil in die entsprechende Führung am Silobehälter. Lassen Sie die Drehpunkte am hinteren Teil des Silos in die entsprechenden Öffnungen am hinteren Teil des Rahmens einrasten. Bohren Sie die Achsführungen am Rahmen vorsichtig mit einem 0.8-mm-Bohrer auf, ebenso die Hubzylinder und die Achsführungen an den Rädern. Bohren Sie die Führungen der Stützen zunächst mit einem 0.6-Millimeter-Bohrer und anschließend mit einem 0.7-mm-Bohrer auf. Die Stützen werden nur eingesteckt und bleiben so beweglich. Es sollte aber genug Reibung vorhanden sein, dass diese nicht herausfallen. Schneiden Sie Achsen passend zu. Stecken Sie die Achsen in die Achsführungen des Rahmens, geben Sie einen kleinen Tropfen Klebstoff in die Achsführungen der Räder und stecken Sie diese auf die Achsen auf. Auf diese Weise sollten die Räder drehbar bleiben. Kleben Sie entsprechend der Bilder Rohre, Armaturen und Tritte am Behälter bzw. am Rahmen fest. Detailieren Sie das Heck mit einem Kennzeichen aus Papier und indem Sie die Rückleuchten mit Permanentmarker auftragen.
EN: This is the model of a modern bulk trailer for food and building materials in fluid, grainy or powdery form. It is delivered as a kit, unpainted, without decals, and tractor. Images with several vehicles or buildings in them merely serve as illustrations in which settings the model could be used.
Building instructions: Please remove all parts carefully from the sprue or separate them from each other with a scalpel. Carefully clean an decrease the surfaces, suggested method is by bathing them in unscented detergent for 24 hours, then thoroughly rinsing them and lightly brushing them with a toothbrush. Paint the wheels, tubes and hydraulic supports black, ladder, fixtures and gangway silver, and the chassis and the bulk tank in the colours of your desired prototype.
Glue the two parts of the bulk tank to each other. Clip the lower part of the lifting cylinder into the corresponding opening at the front of the frame, the upper part into the corresponding opening at the front of the tank. Clip the pivot points of the tank into the corresponding openings at the back of the chassis. Bore out the axle bearings in the frame very carefully with a 0.8 mm drill, likewise the lifting cylinders and the axle bearings at the wheels. Bore out the cylinders of the hydraulic supports first with a 0.6 mm drill, then with a 0.7 mm drill. The supports will only be shoved into the cylinder (not glued) and remain moveable. There should be enough friction for them not to fall off. Cut axles from round brass material. Bore out the axle bearings on the wheels, add a tiny drop of glue to them and push the axles through the bearings on the frame. Then stick the wheels onto the ends of the axles. Thus, the wheels should be able to turn. Glue pipes, tubes, fixtures, ladder and gangway to the tank or to the chassis according to the images. Detail the rear end by painting the rear lights with permanent marker and creating registration plates out of paper.
Details
What's in the box:
AI3M_feldbinder_bausatz_neu
Dimensions:
Success Rate:
First To try.
What's this?
Rating:
Mature audiences only.

