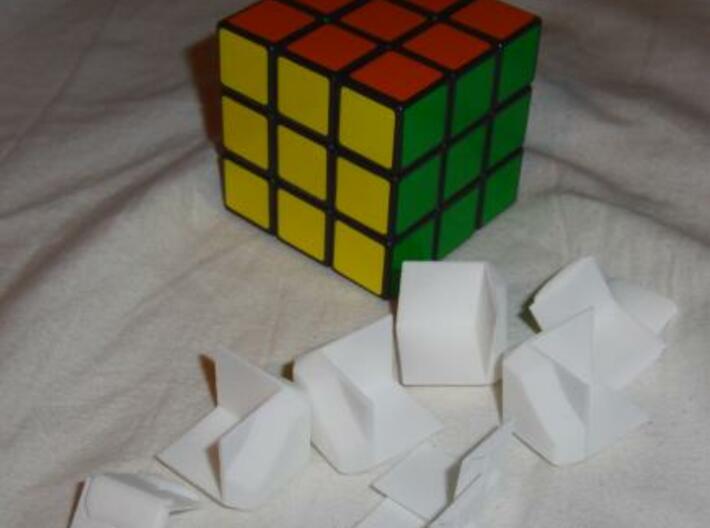
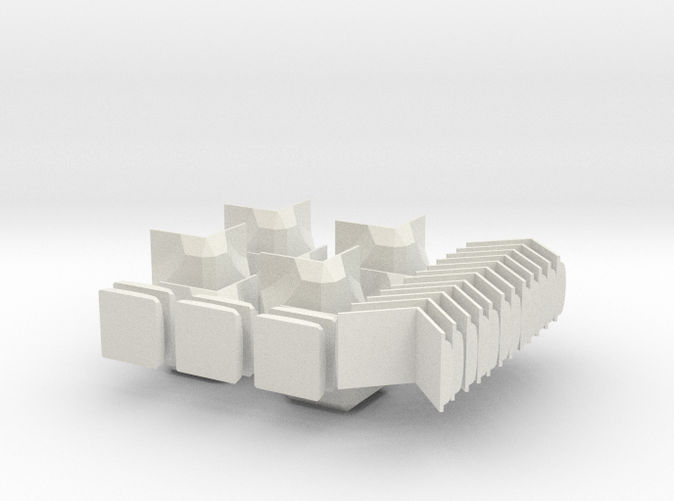
Here's the White Strong & Flexible parts, next to the Offical 3x3 Rubik's Cube.


Companion Rubiks Cube Kit -v1a
Made by
Print With Shapeways
 Choose Your Material
 Choose your color and finish
$104.78
Have a question about this product?
contact the designerYou must be logged in and verified to contact the designer.
Product Description
This is a complete set of components to turn a normal Rubik's Cube into a Companion Rubik's Cube. You'll need Rubber Cement and Acrylic paint. Neither of these will chemically effect the "White Strong & Flexible" (WSF) material. Other glues and paints might. WSF is Nylon based, so anything that dissolves Nylon will destroy the WSF parts.
You'll need:
Rubber Cement (preferable with Applicator, like Testor Corp. 3507C Quick Dry Cement w/Applicator)
Acrylic Paints to match your Preferred color Scheme (you should figure this out BEFORE painting)
One - Winning Moves - Rubik's Cube 3x3 (roughly 18.5mm per sub-cube, 56mm total)
THIS KIT MAY NOT WORK WITH OTHER CUBES! Measure to be sure!
I take no responblity if you glue your cube together, have the wrong size Rubik's Cube, or mess up the Cube in any way. Plan it all out in advance. Read my instuctions and advice carefully! Put some peices on without glue, test how well it fits. Maybe Rubik's made some size changes over the years, get a new cube if you have to. Measure, check, double check, triple check! I almost ruined my own cube twice, so BE CAREFUL!
If you plan on Airbrushing or Spray-painting the pieces, do so BEFORE you glue them on, and DO NOT paint the underside of each piece. Paint on the inside of a piece might prevent the glue from sticking.
Here are the steps for construction:
#1. Add a layer of Rubber Cement to the inside of all of the WSF parts BEFORE attaching them to the Cube. This will fill in the micro-holes in the Porous WSF material. If you don't, the part will absorb the glue and fail to stick. Set them aside and allow them to dry for 2 hours. The glue must be given time to soak in.
#2. Peel off all of the stickers on the outside of the Rubik's Cube
#3. Glue on the Corners first! The corners will help guide you when you apply the edges and middle later on. Only glue and attach ONE piece at a time!
#4. Apply glue to all 3 surfaces of each corner of the cube itself, not the WSF part. Make sure not to apply too much. Keep about 1/8th inch, or about 4mm from the edges. You don't want to glue the cube together! Excess glue will go over the edges, and potentially destroy the Cube itself. USE CAUTION!
#5. Push the WSF piece on and hold for about a minute. If you do not apply pressure, the glue might not set.
#6. After a minute, carefully rotate the cube and make sure glue hasn't gone over the edges, and gotten between the sub-cubes. If it has, try to wipe off the excess. Be careful not to pop off the part you just glued on. I was able to wipe off excess glue between the sub-cubes within the first few minutes without problems. After putting on the Corners, allow the glue to dry for 2 hours.
#7. Level out the Rubik's Cube with a flat surface, like a table. Make sure all of the Sub-cubes are aligned. If you don't, you will have trouble getting the edge pieces on correctly.
#8. Using the Corner WSF pieces as a guide, evenly glue on the edge pieces just like you did with the corner. Attach one at a time, keep the glue away from the edges, use small amounts of glue, hold after gluing for a minute, and then check for glue over the edges. It's best to only attach 4 edges at a time, allowing 2 hours for the glue to set in between.
#9. After all pieces are glued and dried, use the same care when applying the paint. Make sure you don't get paint between the the sub-cubes, or inside the gaps of the cube. Doing so will impair, or might even destroy, the ability of the cube to function. If you wish the Cube to be a functional puzzle, use different colors on the inner surfaces of each side. Leave the edges white to maintain the Companion Cube's appearance. Then paint matching Heart logos on each of the center buttons.
#10. Pat yourself on the back, brag to friends and family! You're amazing and you have the cube to prove it.

Details
What's in the box:
Companion Rubiks Cube Kit -v1a
Dimensions:
Success Rate:
First To try.
What's this?
Rating:
Mature audiences only.

More From This Shop
$7.00


$15.73