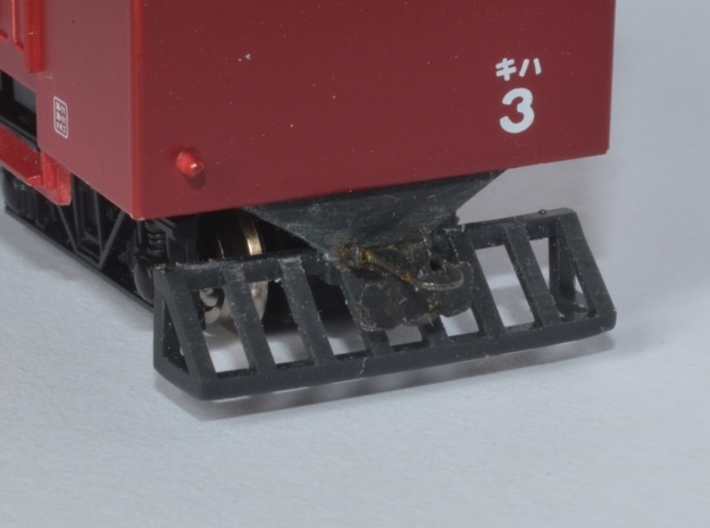
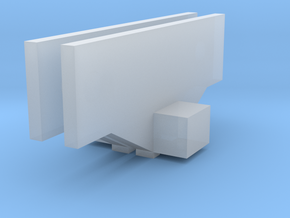
Pilot installed with modified Greenwich coupler


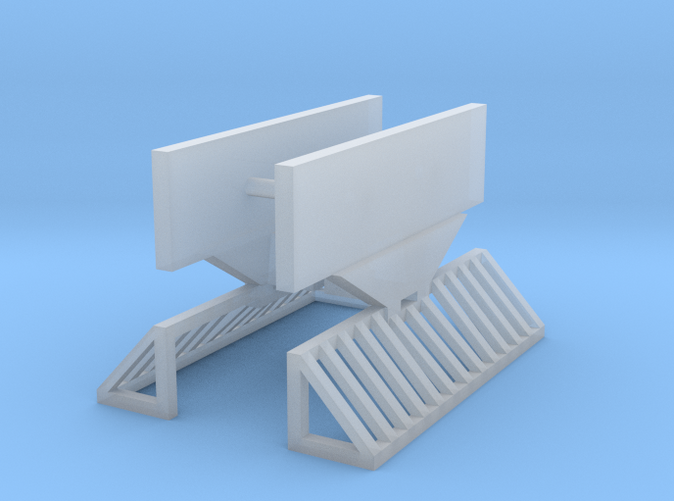
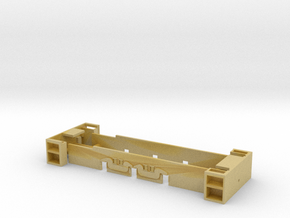
HOn30 Tomytec railcar coupler mounting - "square"
Made by
Print With Shapeways
 Choose Your Material
 Choose your color and finish
$9.94
Have a question about this product?
contact the designerYou must be logged in and verified to contact the designer.
Product Description
TOMYTEC RAILCAR BODY-MOUNT COUPLER SUPPORT AND PILOT - "SQUARE" VERSION
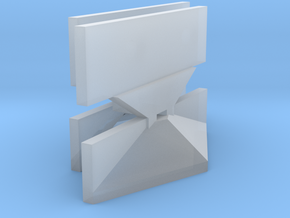
UPDATED VERSION - now with thinner rungs (photos show old version).
This is a coupler mounting support and pilot ("cowcatcher") for the Tomytec "Nekoya Line" HOn30/OO9 internal combustion railcar designed to allow easy conversion from truck (bogie)-mounted couplers to body-mounted couplers This part is designed to be pressure-fitted between the frame and the body and to accept a (modified) Greenwich coupler. One part contains two mountings, enough to convert one (1) railcar. Although designed for the Tomytec railcar, resourceful modellers will easily find other applications for it.
ASSEMBLY INSTRUCTIONS:
- Open package (yes, yes… :-D) and check part for integrity and imperfections. If by any chance there are any printing defects please contact Shapeways Customer Service.
- Using a pair of nippers or sprue cutters carefully separate the two mountings from each other. Sand, file or scrape remaining sprue marks until a smooth surface is obtained;
- Test fit mountings onto railcar. Slip one of the mountings between body and chassis and slide chassis until mounting is locked in place. Without releasing the previously placed mounting, raise the opposite end of the chassis and slip second mounting in place, replacing chassis in position at the same time. Although the designer has made every effort to ensure that the part will work out of the box, dimensional variations in the body, chassis or mountings might mean some filing and fitting will be required;
- After fitting test has been completed remove mountings from railcar. Assemble Greenwich couplers as per instructions. Test fit couplers. If magnetic uncoupling is required, crank coupler loop leg until it fits between the rungs of the pilot. Alternatively, just cut loop leg off or omit it completely. If a closer mounting position is desired, locate and drill a new hole in coupler shank at this moment.
Using a small drill bit of you choice, open up hole in coupler mounting block located on the back of the pilot and tap for screw size of choice. The coupler mounting block and mounting hole in the pilot face might might require some filing to ensure that the coupler will enter smoothly and sit straight.
TIP: when the designer assembled his version he secured coupler to the pilot using one of the spare nails included in the coupler package – open starter hole in couple mount using a 0.5mm drill, widen the hole in coupler shank (or drill new one to suit desired coupler length), install coupler and then slip nail in. Trim excess nail length using a set of pliers. The nail will slide fit into the hole however the designer recommends if necessary adding a dab of white glue to ensure that it will not accidentally drop off.
- At this stage you might consider finishing the mounting supports. Lightly sand/file all surfaces, prime parts and paint according to personal need. Let parts dry thoroughly. After dry, screw/pin coupler into position, cut excess shank off and fit pilot using manner described above. Enjoy. :-)
(Railcar and Greenwich coupler in photos NOT included)
Details
What's in the box:
Tomytec_Railcar_coupler_support_narrow_4 (repaired
Dimensions:
Success Rate:
First To try.
What's this?
Rating:
Mature audiences only.