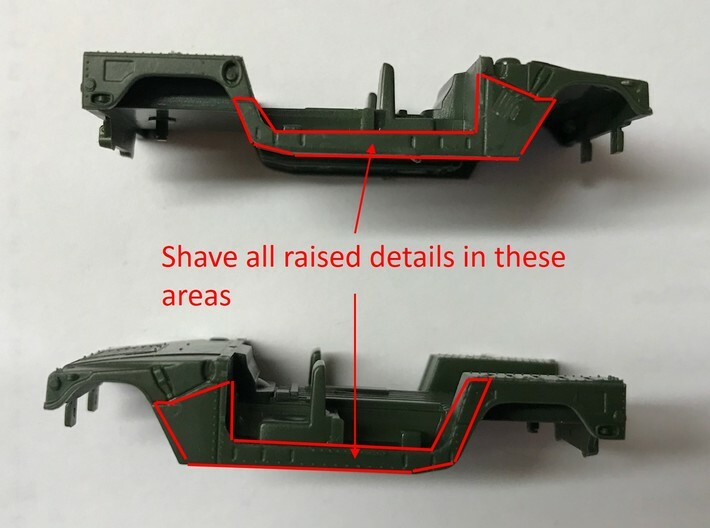
Shave raised details as shown


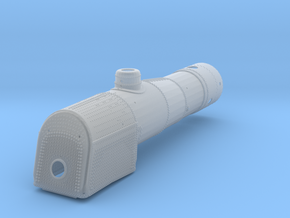
M1151 Humvee Armor w/ Objective GPK
Made by
Print With Shapeways
 Choose Your Material
 Choose your color and finish
$23.13
Have a question about this product?
contact the designerYou must be logged in and verified to contact the designer.
Product Description
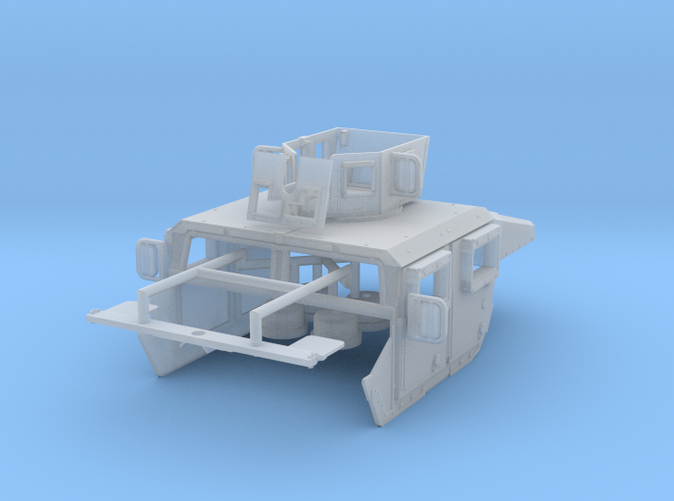
This conversion kit includes parts to convert a Roco Minitanks Humvee into a more modern, armored variant. You will need a Roco/Herpa humvee kit as a starting point. Parts included are: main body armor (with slant back and OGPK turret), front grill, raised intake, now rear bumper, and four new 24 bolt wheels.
To use this kit, start by cutting the pieces from the sprue. Clean and paint all parts in accordance with Shapeways guidance for detailed plastics. Be careful - especially around the side mirrors, as these parts are delicate.
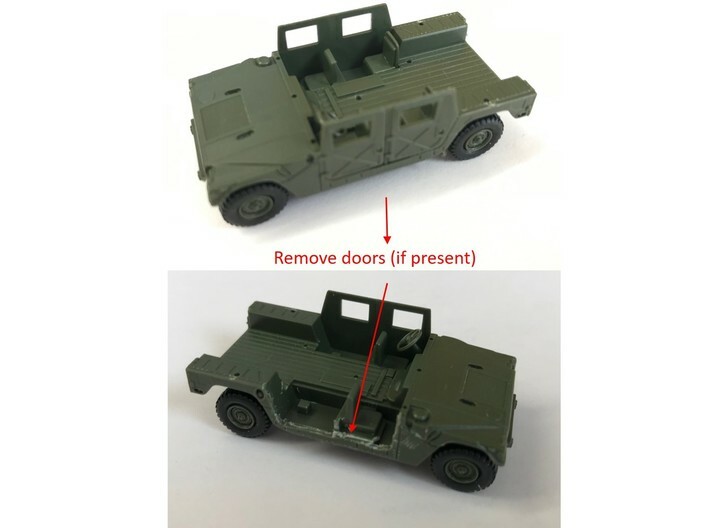
Main body - you must first shave the area outlined in the attached photo of all raised details such as the rivets, hinges, and air vents. There are also three raised details on top of the bed sides immediately adjacent to the tailgate that need to be shaved. If you are using a Roco body with doors molded on those must also be removed. There is hole provided at the back, passenger side corner for an antenna. The area is designed to allow the complete Roco antenna and base to be glue in from the inside. If desired, you could also fill this hole from the inside using a scrap piece styrene (a .08” strip will fit perfectly). The body armor then fits over the Roco body. Clear plastic sheet can be glued to the inside of the body for the windows if desired. If so, I recommend painting the body parts and gluing on the clear plastic prior to gluing to the Roco body.
Front grill - simply use the new front grill in place of the kit’s front bumper (this also holds the frame the the body).
Extended air intake - simply glue this to the existing air intake.
Rear Bumper - glue this to the existing rear bumper, lining up the holes for the pintle hook. Either of the Roco pintle hooks (open or closed) can be used with this bumper.
New wheels - Make sure to thoroughly clean all support material from inside the axle holes (I use a dental pick type tool). If this is not done, the axles will not insert fully into the wheels. Once this is done, the wheels simply replace the originals, using the existing rubber tires as well and axles.
To use this kit, start by cutting the pieces from the sprue. Clean and paint all parts in accordance with Shapeways guidance for detailed plastics. Be careful - especially around the side mirrors, as these parts are delicate.
Main body - you must first shave the area outlined in the attached photo of all raised details such as the rivets, hinges, and air vents. There are also three raised details on top of the bed sides immediately adjacent to the tailgate that need to be shaved. If you are using a Roco body with doors molded on those must also be removed. There is hole provided at the back, passenger side corner for an antenna. The area is designed to allow the complete Roco antenna and base to be glue in from the inside. If desired, you could also fill this hole from the inside using a scrap piece styrene (a .08” strip will fit perfectly). The body armor then fits over the Roco body. Clear plastic sheet can be glued to the inside of the body for the windows if desired. If so, I recommend painting the body parts and gluing on the clear plastic prior to gluing to the Roco body.
Front grill - simply use the new front grill in place of the kit’s front bumper (this also holds the frame the the body).
Extended air intake - simply glue this to the existing air intake.
Rear Bumper - glue this to the existing rear bumper, lining up the holes for the pintle hook. Either of the Roco pintle hooks (open or closed) can be used with this bumper.
New wheels - Make sure to thoroughly clean all support material from inside the axle holes (I use a dental pick type tool). If this is not done, the axles will not insert fully into the wheels. Once this is done, the wheels simply replace the originals, using the existing rubber tires as well and axles.
Details
What's in the box:
M1151 Window Turret No Spare
Dimensions:
Success Rate:
First To try.
What's this?
Rating:
Mature audiences only.

