White Natural Versatile Plastic


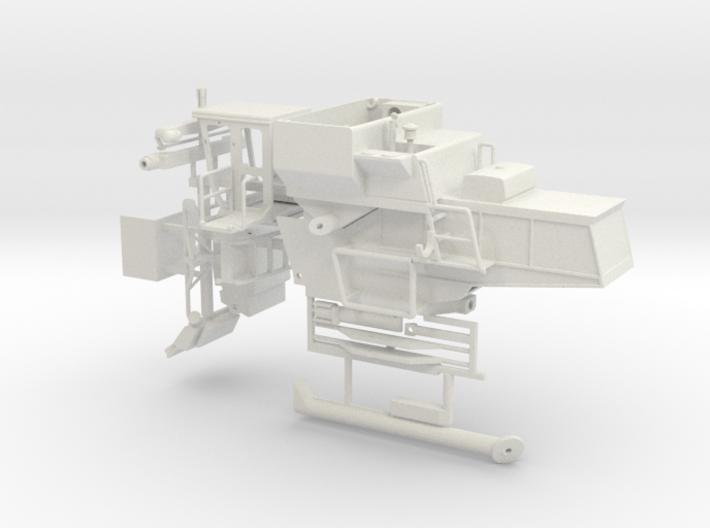
L2 L3 L4 combine 2wd (read description)
Made by
Print With Shapeways
 Choose Your Material
 Choose your color and finish
$90.51
Have a question about this product?
contact the designerYou must be logged in and verified to contact the designer.
Product Description
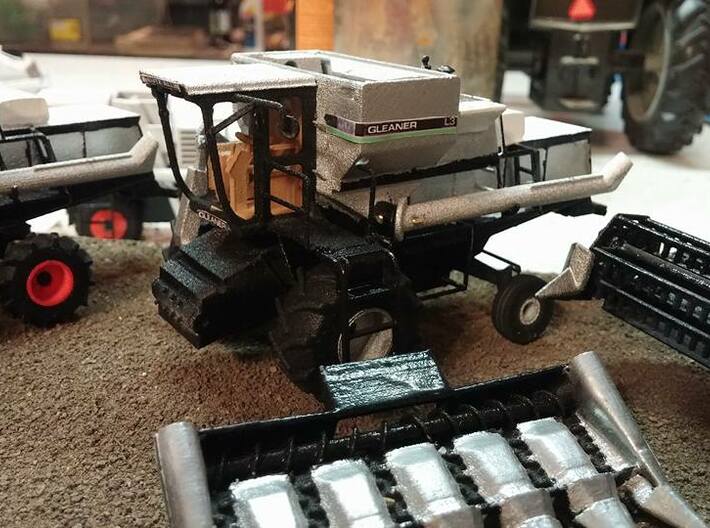
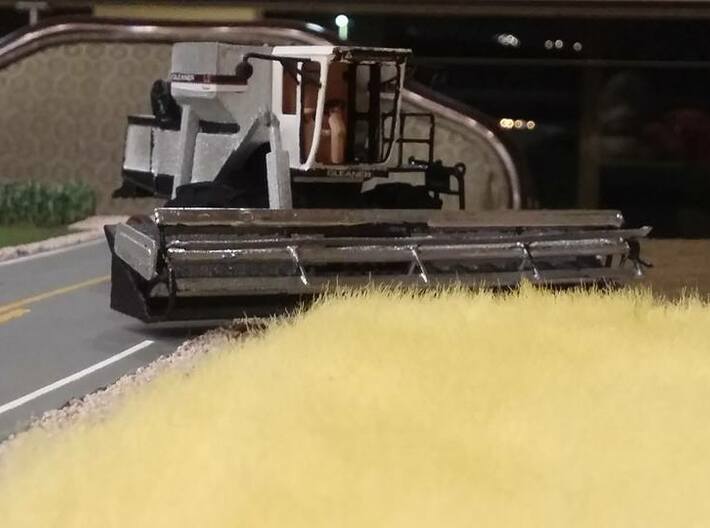
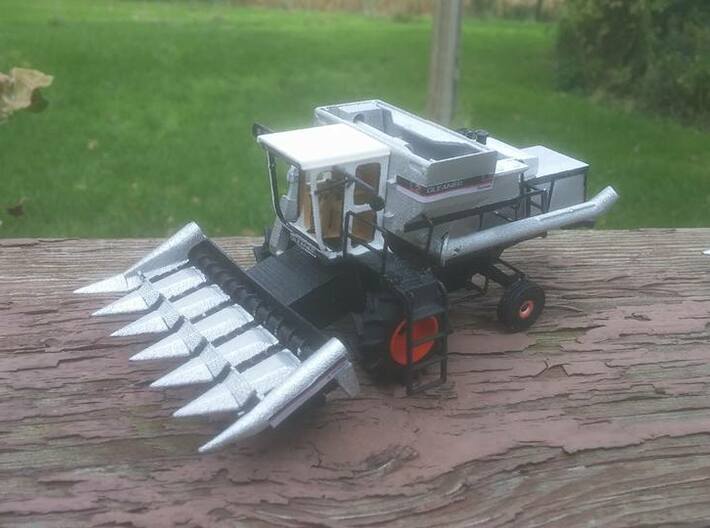
Gleaner L2 L3 L4, Whatever your crew desires.
equiped with a 2wd
TIRES NOT INCLUDED
Heads not included
Alternative options sold separate,
Side hill air saver system
Yes the L4 did exist. it was made in mexico in 1991, equiped the the 5.9 cummins power plant.
The L3 and L2 came with these options,
Tires drive, 23.1-34, 24.5-34,30.5-34, also TRACKS
steer tires, 11L-16,
corn headers, 830,630,538,438
Flex headers, 22, 20,18,16,15,13............. 22,18,15 are available,
Rigid headers, 24,22,20,18,16,15,13 24, 20 and 15 are available
there are cage frames on the side, small screen if you have it would work great for the cages.
paint recomended,
aluminum best copies galvanized, and flat aluminum looks like it was sitting in the weeds for 10 years.
white for fuel tank, black for most of the frame
Assembly is required and would recomend to have handy,
Dremyl, sand paper, files, exacto knife, drill bits, needle nose pliers, small guage wire, 22 to 26 guage. wait for kit to show up before getting wire to please your preference.
anything on the accessory bar, grab firmly with needle nose or whatever pliers you have, and break of.
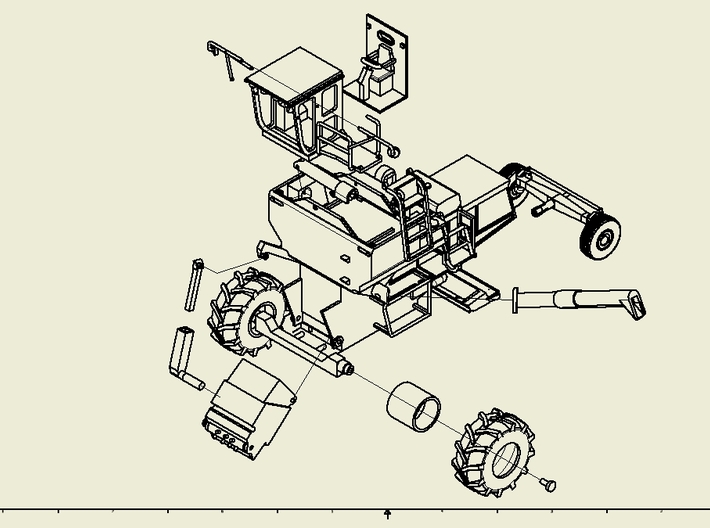
the accessory bar out front contains
1. 2 pins, bigger one is for the feeder house.
smaller one is for the tank auger, ( assemble first for easiest access) DONT PAINT PINS TILL ASSEMBLED TO AVOID NOT FITTING
From the top down on the front, everything on this bar would be black in color, except the cab depending on the model and same with interior. paint then snap off for easier painting
1. rear axle, plug into hole under the tail
2 front axle, plug into the 2 holes under where feeder house goes. make sure axle hubs are up, not down, the combine should smile when assembled.
3 back folding ladder for catwalk
4 pins for front axle to hold wheels on
5 mirrors, holes pre drilled in cab
6 Feeder House, you can attempt at using supplied pins, 1/16 inch hole , brass rod recomended or any other stronger piece.
7 ladder
8 cab
9 cab interior
Bottom bar, all to be aluminum in color
1 grain tank auger, use tank auger pin on front parts setup to assemble into tank.
2. return elevator, plugs into the knob on the discharge of the return elevator
3 tank extention, rear, tab goes inward, hole towards elevator side
4 tank extention, front, tab goes inward, hole towards elevator side
5 return elevator slide, bottom of discharge, round part plugs into right side of feeder house. line up with top piece to operate like the real deal
6 unload auger for cashing in, use 1/16th pin for pre drilled hole on auger, also pre drilled on combine,
equiped with a 2wd
TIRES NOT INCLUDED
Heads not included
Alternative options sold separate,
Side hill air saver system
Yes the L4 did exist. it was made in mexico in 1991, equiped the the 5.9 cummins power plant.
The L3 and L2 came with these options,
Tires drive, 23.1-34, 24.5-34,30.5-34, also TRACKS
steer tires, 11L-16,
corn headers, 830,630,538,438
Flex headers, 22, 20,18,16,15,13............. 22,18,15 are available,
Rigid headers, 24,22,20,18,16,15,13 24, 20 and 15 are available
there are cage frames on the side, small screen if you have it would work great for the cages.
paint recomended,
aluminum best copies galvanized, and flat aluminum looks like it was sitting in the weeds for 10 years.
white for fuel tank, black for most of the frame
Assembly is required and would recomend to have handy,
Dremyl, sand paper, files, exacto knife, drill bits, needle nose pliers, small guage wire, 22 to 26 guage. wait for kit to show up before getting wire to please your preference.
anything on the accessory bar, grab firmly with needle nose or whatever pliers you have, and break of.
the accessory bar out front contains
1. 2 pins, bigger one is for the feeder house.
smaller one is for the tank auger, ( assemble first for easiest access) DONT PAINT PINS TILL ASSEMBLED TO AVOID NOT FITTING
From the top down on the front, everything on this bar would be black in color, except the cab depending on the model and same with interior. paint then snap off for easier painting
1. rear axle, plug into hole under the tail
2 front axle, plug into the 2 holes under where feeder house goes. make sure axle hubs are up, not down, the combine should smile when assembled.
3 back folding ladder for catwalk
4 pins for front axle to hold wheels on
5 mirrors, holes pre drilled in cab
6 Feeder House, you can attempt at using supplied pins, 1/16 inch hole , brass rod recomended or any other stronger piece.
7 ladder
8 cab
9 cab interior
Bottom bar, all to be aluminum in color
1 grain tank auger, use tank auger pin on front parts setup to assemble into tank.
2. return elevator, plugs into the knob on the discharge of the return elevator
3 tank extention, rear, tab goes inward, hole towards elevator side
4 tank extention, front, tab goes inward, hole towards elevator side
5 return elevator slide, bottom of discharge, round part plugs into right side of feeder house. line up with top piece to operate like the real deal
6 unload auger for cashing in, use 1/16th pin for pre drilled hole on auger, also pre drilled on combine,
Details
What's in the box:
L2 L3 L4 combine 2wd (read description)

Dimensions:
Success Rate:
First To try.
What's this?
Rating:
Mature audiences only.
