
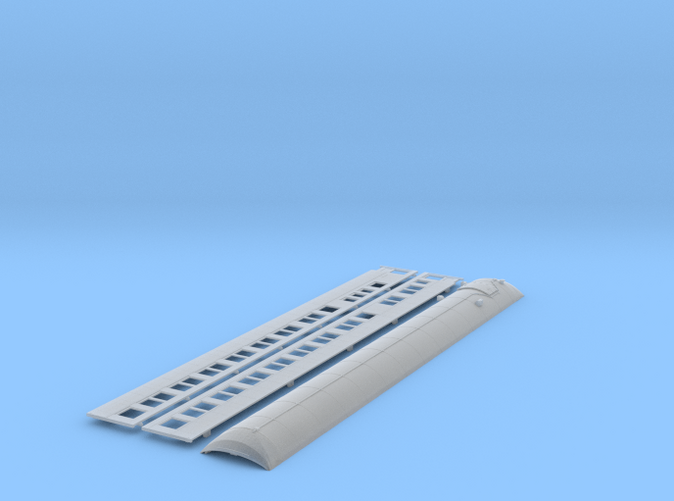
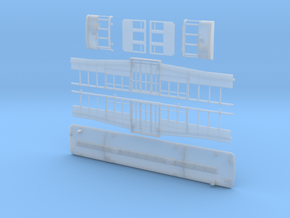
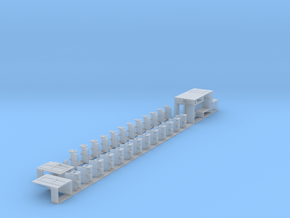
Southern Pacific 75CS Lounge Car Roof and Sides
Made by
Print With Shapeways
 Choose Your Material
 Choose your color and finish
$130.09
Have a question about this product?
contact the designerYou must be logged in and verified to contact the designer.
Product Description
Air-Conditioned SP 75CS Lounge Car
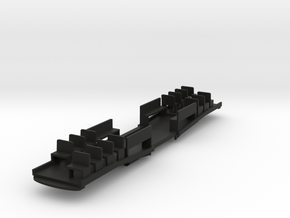
Note that the floor and ends, and interior kit, are sold separately to allow choice of material (smooth or smoothest) on the parts that are most visible, however "smooth" is generally good enough for all components in most cases and I do not find that the "smoothest" to be worth the extra cost. Still, I leave that up to you in case you want a slightly smoother roof and sides.
Floor and ends for this kit are here
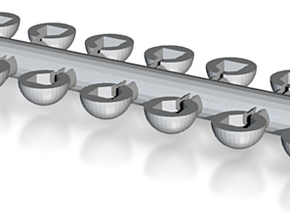
Interior for this kit is here
Shopping list to complete model:
.010 wire for grab irons and .015 wire for brake rods (tichy phosphor bronze is recommended)
Flat stock to fab into stirrups, or commercially available products, should you choose not to use the printed ones.
Diaprhragms (those shown on the prototype can be ordered from Coach Yard via "The Original Whistle Stop"
Walthers 920-2203 trucks
Couplers of your choice, with boxes.
Decals (those on the prototype model shown are available from Thinfilm, set 160)
Paint - "Southern Pacific Dark Olive Green" and "Black" available from TruColor, and whatever interior color you like.
2/56 screws, 1/8" for screwing floor to body, and 1/4" for attaching trucks and couplers and a drill/tap.
Clear styrene sheet for windows
Paper of whichever color is desired for window shades (often grey or dark green).
CA Glue (superglue) - Zap green label is what I use (red label is too runny for my taste)
Weights - some space is left between the top of the floor and the bottom of the interior components to allow for car weights. I use sheet lead available on amazon.
Prep, Paint and Assembly Instructions
1. Tap all floor-to-body and truck mounting holes with 2/56 tap.
2. Carefully but dilligently scrub all parts with undiluted Simple Green and an electric toothbrush, then rinse in water that is as hot as possible without burning your hands while continuing to scrub. Allow to dry fully and check to make sure that no waxy residue is left on the parts. It may be necessary to use a toothpick to gently scrape away the waxy spots below overhanging parts like roof vents, etc. Repeat the washing and drying if necessary until all waxy spots are gone.
3. Bend .010 wire to insert into pre-drilled grab iron holes. It may be necessary to use a #80 bit to clean wax from the holes. I use a MicroMark bending tool for this. Consult the photos to see locations. Use superglue to secure.
4. Bend .015 wire and insert into brake beam pre-drilled holes.
5. Attach your diaphragms to the end sections now if you wish to paint them with the car, or do this after the painting step. Measure, drill, and tap for your couplers and ensure they do not foul on the diaphragms. Cut the stirrups and truck-mounted generator (if equipped) from the underside of the roof and save them for installation later.
6. Optional but recommended - Prime, paint, and decal your parts now before assembly. This saves an enormous amount of time in masking and such if you can stand having more evident seams at the ends of the car.
7. If you just painted your parts, install your window glazing and shades, then glue the interior into the recesses in the car sides. Add whatever you choose to light the car with into the roof at this time. I use LED self-adhesive strips with a homemade capacitor rig for constant lighting, many designs of which can be found in the Model Rail Hobbyist archives.
8. Make sure the alignment holes in the roof edges are clear enough to insert the side's pegs without much force. Clean them with a drill bit as needed to allow for an easy fit. Insert a side into the roof, being sure to correctly place the end with the AC hatch over the correct end of the car. Use a toothpick to spread dabs of CA glue along the seams while holding pressure to keep the seam closed (take care not to glue yourself to the model!), then repeat with the opposite side.
9. Test fit the ends, noting that there are little triangular spots on the tops of the end walls that fill a small gap between the top of the sides and the roof. Be sure these pop into their spots, and make sure the interior bulkead (on cars so-equipped) align properly with the bulkhead in the roof. Take care to ensure that no grab iron tails are protruding into the area where the ends glue into the body and trim them as needed. Spread the side slightly away from the end and smear a small amount of CA glue along the mating areas with a toothpick, then hold the parts together until set.
10. If equipped, rough up the corner of one of the truck sideframes to give some tooth to glue on the truck-mounted generator. I use canopy glue for this so it can withstand some handling.
11. Add trucks and couplers. The bolsters are designed to put the carbody at the right height with standard kadees and boxes. A washer will likely be neccesary to hold the trucks in place with the screw.
12. Glue stirrups (if applicable) carefully to their mounting locations without accidentally gluing the removable car floor in.
13. I have found that a dusting of Monroe weathering powder, especially on the roof, helps to lessen the 3D print textures and gives the car a very nice used look that is virtually indestinguishable from injection molded.
Note that the floor and ends, and interior kit, are sold separately to allow choice of material (smooth or smoothest) on the parts that are most visible, however "smooth" is generally good enough for all components in most cases and I do not find that the "smoothest" to be worth the extra cost. Still, I leave that up to you in case you want a slightly smoother roof and sides.
Floor and ends for this kit are here
Interior for this kit is here
Shopping list to complete model:
.010 wire for grab irons and .015 wire for brake rods (tichy phosphor bronze is recommended)
Flat stock to fab into stirrups, or commercially available products, should you choose not to use the printed ones.
Diaprhragms (those shown on the prototype can be ordered from Coach Yard via "The Original Whistle Stop"
Walthers 920-2203 trucks
Couplers of your choice, with boxes.
Decals (those on the prototype model shown are available from Thinfilm, set 160)
Paint - "Southern Pacific Dark Olive Green" and "Black" available from TruColor, and whatever interior color you like.
2/56 screws, 1/8" for screwing floor to body, and 1/4" for attaching trucks and couplers and a drill/tap.
Clear styrene sheet for windows
Paper of whichever color is desired for window shades (often grey or dark green).
CA Glue (superglue) - Zap green label is what I use (red label is too runny for my taste)
Weights - some space is left between the top of the floor and the bottom of the interior components to allow for car weights. I use sheet lead available on amazon.
Prep, Paint and Assembly Instructions
1. Tap all floor-to-body and truck mounting holes with 2/56 tap.
2. Carefully but dilligently scrub all parts with undiluted Simple Green and an electric toothbrush, then rinse in water that is as hot as possible without burning your hands while continuing to scrub. Allow to dry fully and check to make sure that no waxy residue is left on the parts. It may be necessary to use a toothpick to gently scrape away the waxy spots below overhanging parts like roof vents, etc. Repeat the washing and drying if necessary until all waxy spots are gone.
3. Bend .010 wire to insert into pre-drilled grab iron holes. It may be necessary to use a #80 bit to clean wax from the holes. I use a MicroMark bending tool for this. Consult the photos to see locations. Use superglue to secure.
4. Bend .015 wire and insert into brake beam pre-drilled holes.
5. Attach your diaphragms to the end sections now if you wish to paint them with the car, or do this after the painting step. Measure, drill, and tap for your couplers and ensure they do not foul on the diaphragms. Cut the stirrups and truck-mounted generator (if equipped) from the underside of the roof and save them for installation later.
6. Optional but recommended - Prime, paint, and decal your parts now before assembly. This saves an enormous amount of time in masking and such if you can stand having more evident seams at the ends of the car.
7. If you just painted your parts, install your window glazing and shades, then glue the interior into the recesses in the car sides. Add whatever you choose to light the car with into the roof at this time. I use LED self-adhesive strips with a homemade capacitor rig for constant lighting, many designs of which can be found in the Model Rail Hobbyist archives.
8. Make sure the alignment holes in the roof edges are clear enough to insert the side's pegs without much force. Clean them with a drill bit as needed to allow for an easy fit. Insert a side into the roof, being sure to correctly place the end with the AC hatch over the correct end of the car. Use a toothpick to spread dabs of CA glue along the seams while holding pressure to keep the seam closed (take care not to glue yourself to the model!), then repeat with the opposite side.
9. Test fit the ends, noting that there are little triangular spots on the tops of the end walls that fill a small gap between the top of the sides and the roof. Be sure these pop into their spots, and make sure the interior bulkead (on cars so-equipped) align properly with the bulkhead in the roof. Take care to ensure that no grab iron tails are protruding into the area where the ends glue into the body and trim them as needed. Spread the side slightly away from the end and smear a small amount of CA glue along the mating areas with a toothpick, then hold the parts together until set.
10. If equipped, rough up the corner of one of the truck sideframes to give some tooth to glue on the truck-mounted generator. I use canopy glue for this so it can withstand some handling.
11. Add trucks and couplers. The bolsters are designed to put the carbody at the right height with standard kadees and boxes. A washer will likely be neccesary to hold the trucks in place with the screw.
12. Glue stirrups (if applicable) carefully to their mounting locations without accidentally gluing the removable car floor in.
13. I have found that a dusting of Monroe weathering powder, especially on the roof, helps to lessen the 3D print textures and gives the car a very nice used look that is virtually indestinguishable from injection molded.
Details
What's in the box:
Flat SP Lounge Car V3 roof and sides
Dimensions:
Success Rate:
First To try.
What's this?
Rating:
Mature audiences only.
