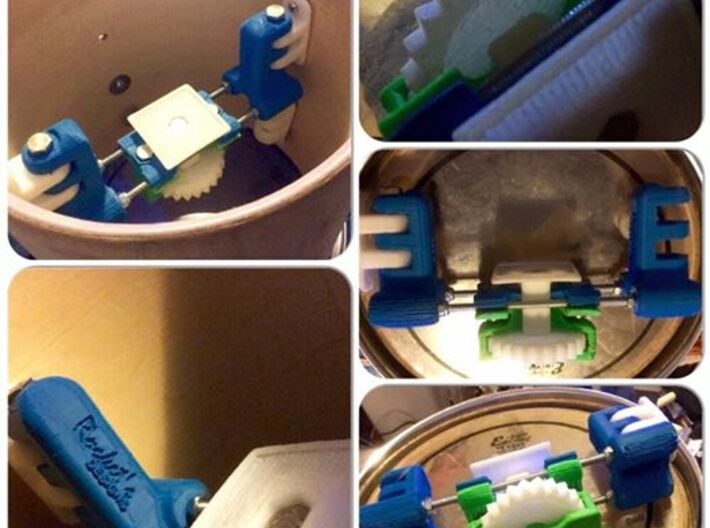


EDrum Rocket Trigger System (Shell Fitting)
Made by
Have a question about this product?
contact the designerProduct Description
This Part is one component of the adjustable trigger mounting system, want the whole set??
2X  + 2X
+ 2X  +
+  +
+  +
+  +
+ 

The Rocket Trigger is an adjustable trigger mounting system to use inside a traditional accoustic Drum.
You do not need to drill any hole into your expensive drum kit, this system is designed to mount through the same screw holes as your current drum Lugs.
This set will allow you to keep the look of your traditional drum kit, but trigger electronic and midi sounds via your drum brain or computer exactly the same way an electronic drum kit works
This System used several Printed components:
1x Bottom Clamp
1x Top Clamp
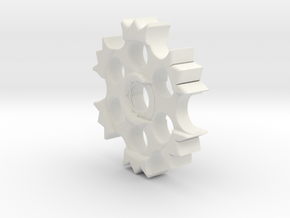
1x Tensioner wheel
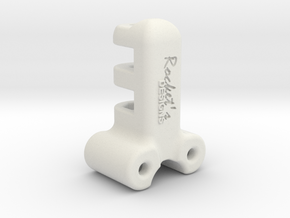
1x Trigger Platform
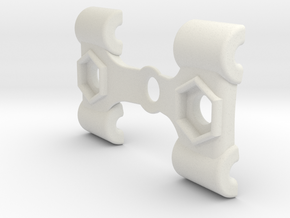
2x Rod End Fittings
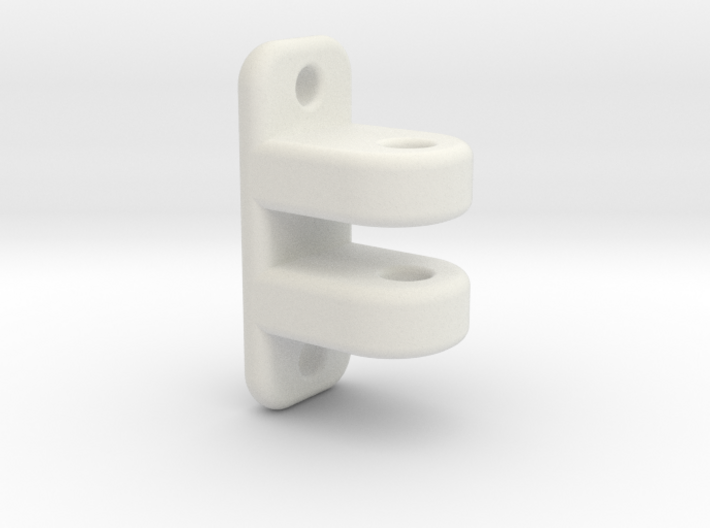
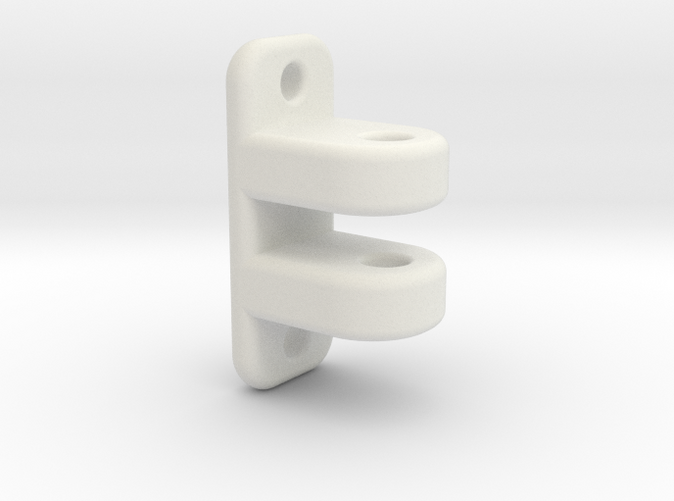
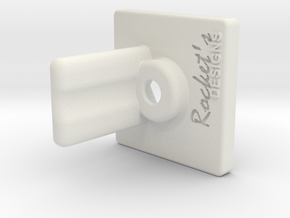
2x Shell Fittings
This system also requires a couple of hardware components from your local hardware store:
2x 16mm M6 Bolts
3x 55mm (or longer) M6 Bolts
7x M6 Nylon Locking Nuts
4x compression springs
2x lengths of 3/16 threaded rod long enough to span accross your drum
8x 3/16 Nylon Locking Nuts
Electronic and specialty components to complete peizzo trigger:
1x 39x39x39mm foam or soft rubber block (Originally designed for use with the 'decoupler' sold by r-drums)
1x 39mm Foam or rubber trigger cone (similar to roland or any other brand)
1x 39mm Peizzo pressure sensor
1x 1/4 inch screw mount socket
Wire to connect electronic components
Assembly:
- The Printed Shell Fittings are bolted to the inside of your drum Shell using the existing mounting hardware on your drum
- Two lengths of threaded rod should be cut approximateley 40mm shorter than the inside diameter of your drum.
-screw one of the 3/16 nylon locking nuts approximatley 40mm onto the threaded rod and push the short side through the printed part "rod end fitting" through one of the two CIRCULAR holes at the bottom, the rod should now protrude out of the HEX shaped hole.
- slide a spring onto the rod on the HEX side, and then screw a 1/16 nut onto the HEX side behind the sping.
Repeat this process for a seccond length of rod in the seccond hole of the "rod End Fitting"
- you can now repeat this process on the other side of the rod's using the 2nd "rod End Fitting" printed component.
- test the length, and make sure your rod end fittings will tightly compress the spring when they are slotted into the "Shell Fittings" on both sides of the drum, if they are not, tighten or losen the nuts evenly on the HEX sides untill you get a tight snug fit against the springs, and the nuts lock themselves inside the rod end fittings with minimal rod protrusion on the shell side.
-once these adjustments have been made, you can place the two M6 nuts in the appropriate location on the "rod end fittings".
-the rod end fittings can now be slid into place and locked to the "shell fittings" using the 55mm M6 Bolts on each end, and tightened secureley. This assembly should be oriented with the rods spanning BENEATH the drum lug, not above it.
- if all looks well, you can now tighten the remaining visible 1/6 nuts to firm up against the "rod end fittings" (do not over tighten or you will cause the rod to bow, just enough to prevent movement).
-now, you can drop an M6 nut into the center of the printed part "Adjusting whee"l.
-next, slide the Adjusting wheel into the opening on the printed part "Bottom Clamp", it will only slide in one way, so look for the side that has a thiner slit to get it to fit, this will be a tight fit.
- you can now place the printed part "Top Clamp" above the rods, and the two 35mm m6 bolts into the outer holes.
- next place the bottom clamp assembly below the rod, and secure it to the top clamp using the m6 nuts.
- next, place the last 55mm m6 bolt through the nut trap on the printed part "mounting tray", and firmly tighten an M6 Bolt on the bottom side
- slide the bolt and tray assembly into the hole through the top clamp, and lower it until it can e tightened into place by the adjusting wheel.
The printed components are now assembled correctly
Peizzo Trigger Assembly
- Next, the 39mm foam cube "decoupler" can be stuck to the mounting plate (this is designed to absorb any resonance from the shell of the drum to avoid false triggers.
- if you have pre-built trigger cones, stick them to the top of the foam decoupler, if not, first, stick a peizzo on the bottom of a foam trigger cone, and then stick this asembly to the top of the decoupler
- connect the wire ends of the peizzo to the jacks of your 1/4 socket (according to the requirements of your drum brain), and mount this into the existing air pressure hole of your drum kit.
-secure all lose cables with cable ties or tape so there are no rattles
Final setup
- wind the adjuster wheel one way or the other untill you get the top of the foam cone to protude 5mm past the top of the bearing edge of your drum, you can place another locking nut on the bottom of the "botom clamp" to add extra security if you like, but it should maintain a solid hold just fine without it.
- assemble your mesh head of choice, and connect 1 1/4 jack to your drum brain, or interface of chouce, and away you go
All set, repea for all your other drums and then go play some beats!
Details
