
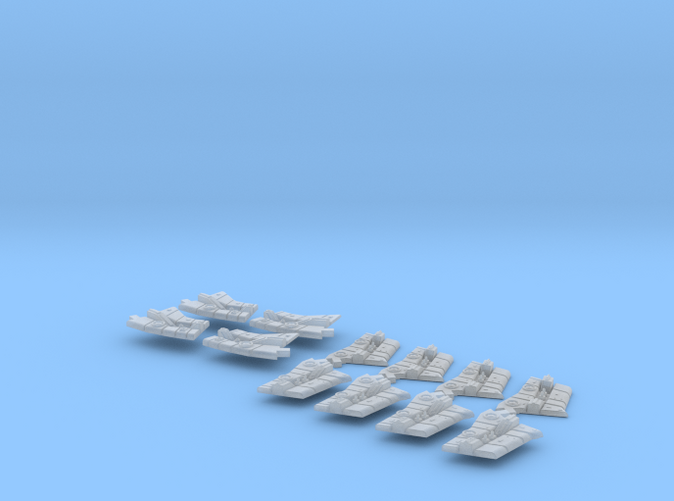
Battlestar Pegasus Arm Face Assembly
Made by
Print With Shapeways
 Choose Your Material
 Choose your color and finish
$51.53
Have a question about this product?
contact the designerYou must be logged in and verified to contact the designer.
Product Description
These attach to the arms on the Moebius Pegasus model to supply a more detailed look to this otherwise superb model. Moebius left the arms undetailed, and these are intended as direct to the model add on parts. I do not claim them to be perfectly accurate to the CAD model seen onscreen in the TV show, but they’re as close as my meager skills can make them.
First, a few suggestions...
1. Test fit the arms faces to the kit arms. You may wish to tack the arm/landing bay assembly to the ship with Elmer’s Glue, for example, to check for alignment and ensure that the arm faces are attached the way that you want them. Do your best to line up the panel lines on the arm faces with the ones on the model. They may not line up perfectly depending upon how tightly you clamped up the arms before attaching the arm faces, warpage, etc. Like I said, I’m not claiming that these are perfect, only that they’re close.
2. Do any finish sanding necessary. For example, the little tabs that slot into the recesses in between the upper and lower bays may fit loosely or tightly, depending upon how well you clamped down on the landing bay assemblies. If you find that an arm face is slightly small, its likely that the arms weren’t clamped together tightly enough, thus making the face appear too small in the vertical plane, Consider lightly sanding the kit’s arm corners to ease them into the arm face, in that case. You’ll also note that the arm faces have a small rectangle cutout of them on their back sides where the faces meet the actual landing bay. This is meant to slot into the little raised detail on the model. You may wish to chisel away this detail on the model if you discover that the arm faces don’t quite mount as flush as you’d like in that area. I made this little slot on the arm faces as deep as possible while still being printable, but I’ve found that sometimes it matches up really nicely, and other times not. I suspect that’s due to the underlying shape issues on the model since 3D printed parts should all be the same everytime. You’ll want to remove the glue seam between the upper and lower kit arms and ensure that the resulting faces are smooth and perfectly flat. Otherwise, the arms may not attach flat to the arms. Also, check the edge of the arms faces that meet up with the model’s main hull. The entire assembly should fit snugly, but you may desire to sand (LIGHTLY!) that edge if it protrudes slightly too far an interferes with the entire landing bay assembly mating with the main hull. Again, how you position the arms may impact this mating.
4. Once you’re satisfied with the arms faces’ alignment and fit, take a deep breathe and go ahead and glue them into place one at a time, being sure to use some nice clamps to get them aligned and flush with the arm surfaces. Detail plastics can be fragile and brittle, so consider using plastic modeling clamps of low to moderate tension. You’ll want to get the arm faces flush to their gluing surfaces, but not crush nor deform them. If there is a small gap or step between the arm faces and the kit arms, some Mr. Surfacer or liquid putty can be used to fair the transition between the two.
Details
What's in the box:
Battlestar Pegasus Arm Face Assembly
Dimensions:
Success Rate:
First To try.
What's this?
Rating:
Mature audiences only.

More From This Shop

$40.00