CN switchstand HO assembly instructions

Discussion in 'Tips and How-tos' started by GWMT, Apr 14, 2012.

  1. GWMT
    GWMT Active Member
    UPDATE: an Adlake switchlamp with two 9 inch reflectors has been added to the kit and a new set of assembly instructions written to cover the changes: https://www.shapeways.com/forum/t/cn-switchstand-racor31b-r3-ho-assembly-instructions.101514/

    Product is available for purchase here:
    CN switchstand Racor31B R3 in HO
    -10 pack $30.00US (priced at $3.00US per switchstand) https://shpws.me/SHoe
    -20 pack $50.00US (priced at $2.50US per switchstand) https://shpws.me/SHG4

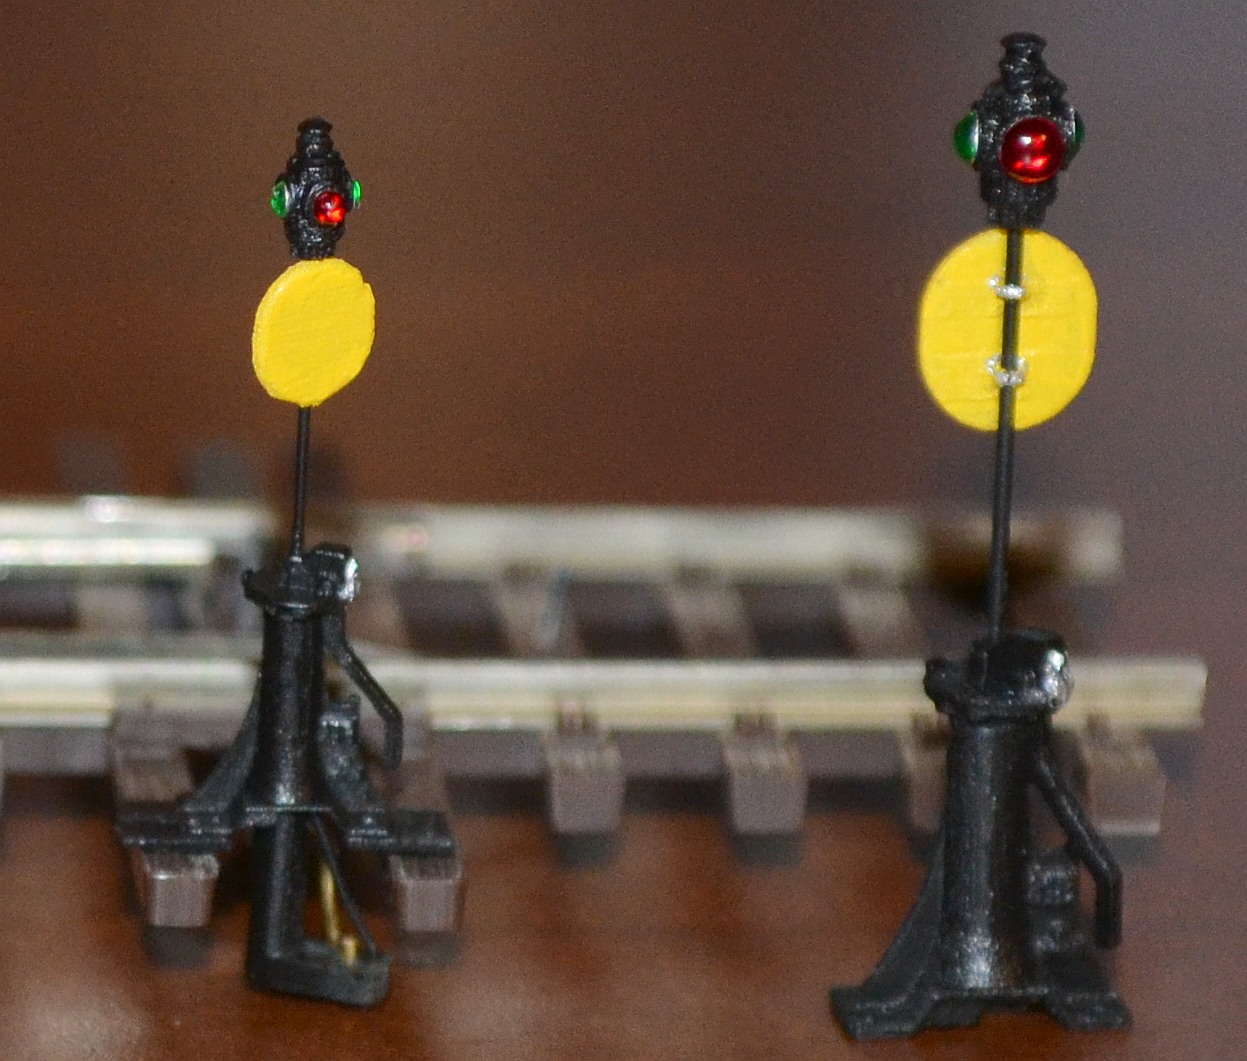
    This post will explain how to assemble the HO scale model of a Racor 31B switchstand. The kit includes a lantern and targets for Canadian National, BC Rail, Algoma Central and Ontario Northland modelers.

    The mast and handle rotate 90 degrees and a crank is included to hook the mast to the turnout throwbar so the switchstand target and handle rotate when the turnout is thrown.

    The kit is now available for sale at The Credit Valley Railway Company ( https://www.cvrco.com/index.htm ) and was modeled from the real switchstand at the front of the store.

    Please post questions here or send me a Private Message (you'll need to create a free Shapeways account first).

    To start here's a photo of an assembled and painted HO switchstand and lantern set on an Atlas turnout next to an assembled S scale model.
    CN Switchstand S and HO Lanterns Painted.jpg
     
    Last edited: Jun 4, 2021
  2. GWMT
    GWMT Active Member
    First we'll look at cleaning the parts. If you purchased your parts at a hobby shop they were likely cleaned before you bought them and are ready for assembly and painting. If not go to the local dollar store and buy the cheapest nail polish remover they have; you want one that's pure acetone with no additives (additives could discolor or stick to the parts).

    The parts are printed with a waxy support material that melts away at low heat. Most of the wax material was removed before the parts were shipped by Shapeways - if necessary place your parts on a paper towel and set them on a heat source that feels hot but doesn't burn your hand. The dashboard of a car in the sun or the top of a gas fireplace work great - about 30 minutes with frequent turning does the trick:
    FUD oven cheap.jpg

    A one-ounce glass paint bottle works great for cleaning one switchstand; larger blocks of switchstands should be placed in larger containers. The pictured 90x140x40mm tall container has a snap-on lid to keep the odor of acetone out of the house and has a 50 piece block of switchstands soaking in it.

    Pour enough acetone into the container to fully submerge your parts and let them soak for about 10-15 minutes. If you leave them in longer than that (30 minutes plus) they can become rubbery and some parts may come loose from the sprues. Don't panic - carefullly remove the parts from the acetone, rinse them in water and let them dry (make sure they are properly supported to keep them from being deformed). Once they fully dry they will become rigid again.
    CN Stand Lantern Assm Cleaner.jpg
     
  3. GWMT
    GWMT Active Member
    Here's a shot of the tools I use to assemble switchstands.
    CN Stand Lantern Assm Tools txt.jpg

    The micro sprue cutter is absolutely necessary - nothing larger will fit into the gaps around the parts. I use one from Intermountain Railway Company; Micro Mark also sells the same tool ( http://www.micromark.com/tweezer-sprue-cutter-despruing-twee zer,8012.html ).

    A magnifier like the Optivisor makes it easier to see what you're doing. The file will remove any burrs if a part wasn't cleanly cut from the sprues (the micro sprue cutter will leave no burrs if you place the flat end against the part when you cut it).

    The pin vise and drill bits will clean any support material out of holes in the parts and open the holes a couple thousandths of an inch so the mast fits easier; the reamer works better for cleaning out the hoops on the back of the targets than the drill bit - you need to be VERY GENTLE (no pushing) if you use the drill bit or you'll break off the hoops. There's a groove printed in the back of the targets so you'll have something to help align the parts if the hoops do break off.

    The pliers and calipers are used for bending the 0.015" wire for the mast; set the calipers to 1.5mm, bend the tip of the wire 90 degrees with the pliers and make sure it just fits into the 1.5mm gap in the calipers (cut off some wire if necessary). reset the calipers to 20.5mm and cut off the mast so it just fits into the gap.

    Dip the wire in the chemical blackener rather than painting it black; it'll make it easier to slide the targets onto the mast without breaking the hoops or scraping off black paint later on.
     
  4. GWMT
    GWMT Active Member
    Finally here are a series of illustrations showing which parts to cut and assemble in order - just follow the alphabet. Images A and B apply only if you have several blocks of switchstand parts still attached to each other; if you bought a single switchstand you'll start at image C.

    Paint the targets (yellow, red or green) and lantern (black) separately from the switchstand (black) before you glue them together. If you are going to airbrush the switchstand glue on the base shims (image N) and/or crank (image P) and paint all of the base black before you install the large target (image M). Take a very, very fine brush and paint the switch lock and the hoops on the back of the targets silver if you want.

    If you have any questions be sure to leave a comment or send me a Private Message.
    CN Stand Lantern Assm 1.jpg
    CN Stand Lantern Assm 2.jpg
    CN Stand Lantern Assm 3.jpg
    CN Stand Lantern Assm 4.jpg
     
  5. slicker
    slicker Member
    Was trying to locate your racor 31B switchstand, at the CVRC but cannot tell which one you had in your article on cn switchstand instructions. could you point me in right direction, appreciate it and thanks Rick