My first 3D printed steam engine in 3 different scales

Discussion in 'My Work In Progress' started by rkapuaala, Apr 2, 2015.

  1. rkapuaala
    rkapuaala Well-Known Member
    Aloha,
    I'm currently working on a 3D print project involving 3 different scales; HOn3, 1:20.32 (g scale NG), and 7/8ths scale. I have already printed several parts in stainless steel for the g scale and the 7/8ths scale with success and I have printed 1 FUD HOn3 scale engine with pretty cool results though some parts were broken.
    What I'm hoping to do is create 2 live steam engines which incorporate a lot of stainless steel printed parts and 1 FUD HOn3 scale model of the hole engine.
    The prototype is OR&L's engine #6 Kauila. Kauila was the first loco to do a passenger run on Oahu. It was originally an engine that was commissioned by the Kingdom of Hawaii to work in the quarries. The president and founder of the OR&L railroad had ordered 3 engines slated to arrive on the Kings 50th Birthday in 1889. The engines were late, and to help the president of OR&L full fill his promise of a birthday ride for the King the King sold him Kauila which hadn't even been uncrated having arrived at the docks a week earlier.
    I completed the 3D model about a month ago and textured and animated it. Here are some renders.
    loweredgainraisedshaderate.jpg
    a short animation can be found here. https://www.youtube.com/watch?v=ViXwW9Nd_Yg
    While I have the frames, drivers and rods for both the g scale and 7/8ths scales model so far I have been focusing on the 1:20 scale model. Here is an image of the 1:20 scale models progress so far. Only the wheels and the chassis are printed. The rods are not installed yet as I still need to fabricate and mount the journals.

    finaladjustmentofdrivers.jpg
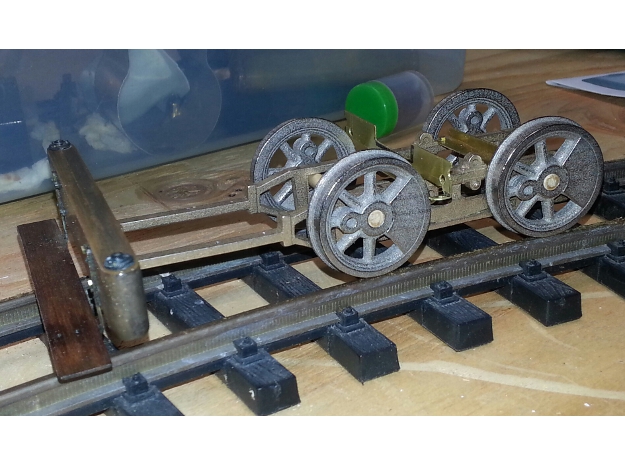
    You can follow this build at https://forums.mylargescale.com/18-live-steam/42906-erection- drawings-0-4-2-t.html
    I have also test printed the HOn3 version. Here is an image of it.
    ho1stprint.jpg
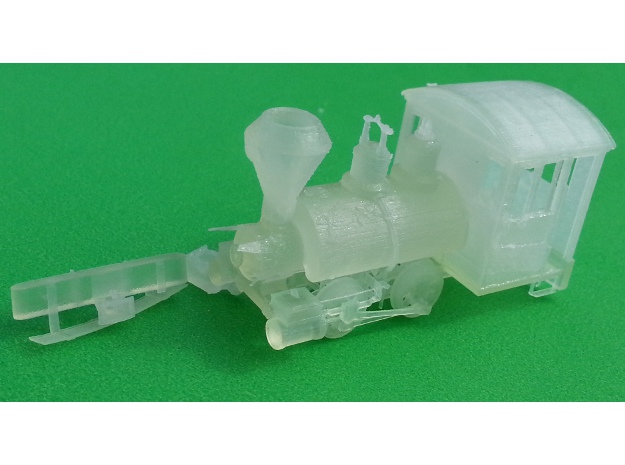
    I have corrected some of the weak areas of the model and I am currently printing another model out to see if I can keep the front beam on as well as recover some of the back-head detail that is missing from this one. To tell the truth I was surprised it printed at all.
    The HOn3 version of this engine as well as all the stainless steel parts are available on my shop
    https://www.shapeways.com/shops/ScaleHumans
    I am currently converting some more parts for printing in Stainless steel. The include (so far):
    The Johnson bar and assembly
    The reversing lever
    The valve timing cranks
    The tops and saddles of the domes
    The rear coupler
    And the front coupler
    I am also printing some of the other parts to use as templates to fabricate the other parts from brass stock.
     
  2. coaster
    coaster Well-Known Member
    Cool stuff.Keep us posted on project,very interesting.

    Cheers
     
  3. rkapuaala
    rkapuaala Well-Known Member
    With only 2 holes left to tap on the 1:20.32 scale frames my 00-90 tap busted. I had to order another, but while I was waiting I decided to move on to the 7/8ths scale frames.
    seframesboilertestfit.jpg
    I set the frames on the axles and placed the stock copper tubing on the boiler to get an idea of what it would look like. While I'm having some doubts about doing the 1:20.32 scale model in Live steam I have non about doing the 7/8ths in live steam.
     
  4. coaster
    coaster Well-Known Member
    Wheels been polished?Looks good.What did you use?

    Cheers
     
  5. rkapuaala
    rkapuaala Well-Known Member
    Sorry, the 7/8ths scale wheels are not prints. I had bought these a year or so ago from a guy who made them from steel on a cnc machine. They were such a close match and the price was half of what the 7/8ths scale prints would cost so I just wint with them. In a way though they are still 3D since the CNC machine worked in all 3 dimensions :)
     
  6. coaster
    coaster Well-Known Member
    Oh I see.Keep us updated tho,a very interesting project.
    Cheers
     
  7. rkapuaala
    rkapuaala Well-Known Member
    Thanks I'll do that. BTW I like your 120 scale vehicles. Very well done.
     
  8. sbhunterca
    sbhunterca Well-Known Member
    That is nice work, in both scales!

    Just a quick question. Is the steel material machinable, and will it conduct electricity as well as parts machined from steel (or stainless) rod?

    Eventually, I'm planning to create parts for a Prince Edward Island Railway Hunslet 4-4-0T, and this would be good to know.

    I've been thinking about using steel for the wheel centers and turning tires from stainless steel, but I don't know how well the axle and crankpin holes will machine for a press (or shrink?) fit.

    It will be a while before I start the Hunslet, but this would be good information for the planning process.

    Thanks!

    Steve Hunter
     

    Attached Files:

  9. rkapuaala
    rkapuaala Well-Known Member
    While I haven't provided any tests concerning conductivity, I can tell you they are totally attracted to magnets, which should mean they are also conductive.
    I can also tell you that they are very machinable, with the following restrictions.
    - Drilling holes, large or small diameters is difficult, but not impossible. Slow drill speeds, carbide bits and 3 in 1 oil seem to do the trick. HSS bits and cutting fluid just bounce right off.
    - Tapping the holes afterwards you can use cutting fluid and standard HSS taps with no problem at all.
    - Machining is easier than drilling holes, but you still need carbide to cut the material
    I would love to see how your wheel project goes. I considered the same to save money on printing the Wheels out whole, but decided against it because my tiny lathe was not able to turn the tire sizes I needed and I am too poor to get a bigger one.
    I really like the way the hubs print out. They look almost casted if you remember to include the filets on the model.
     
  10. sbhunterca
    sbhunterca Well-Known Member
    Thanks, this is great info!

    I have cobalt drills and carbide tooling for my lathe, so cutting the material shouldn't be an issue. My lathe is a small Craftex 7" swing X 12" bed machine from Busy Bee. Machining the wheels won't be an issue. Very nice machine, although (of course) I'd like to have something bigger and better:

    http://www.busybeetools.com/products/lathe-mini-7in-x12in-1- 2hp-cx-series-csa.html

    It will be a while before I can start building the Hunslet, but I'll be sure to start a thread when I do.

    Steve
     
  11. rkapuaala
    rkapuaala Well-Known Member
    You'll need carbide drill bits not colbalt. Colbalt doesn't even scratch the surfaces. I can't wait to see your project progress.
     
  12. sbhunterca
    sbhunterca Well-Known Member
    Thanks, I'll invest in carbide bits before I try drilling the stuff!

    :)

    Steve
     
  13. rkapuaala
    rkapuaala Well-Known Member
    Progress is slow this week as I am working on doing a 3D Print of the smoke box pedistal. I did manage to make a set of journals for the 7/8 scale print.
    FinishedJournals.jpg
    I was hoping to have sprung wheels, but the printed weys are so rough and hard to machine that I will have to settle for fixed. No matter though on I am going to update the current frames so that the weys are slots for weys instead. That way I can have sprung drivers if I build another.
     
  14. sbhunterca
    sbhunterca Well-Known Member
    Rather than machining the pedestal jaws (ways), would grinding work and allow you to use the parts as planned?

    Steve
     
  15. rkapuaala
    rkapuaala Well-Known Member
    It is too tight to do it accurately. It'll be fine as a fixed journal, I will just plan the next one out better.
    [​IMG]
    I uploaded the model for the smoke box pedistal this evening. I've only got enough money in paypal account to pay for the 1:20.32 scale model. I've made a committment to only use money I make selling models to complete this project. It may take a month or two to pay for the other parts I want to print.
     
    Last edited: Apr 11, 2015
  16. rkapuaala
    rkapuaala Well-Known Member
    [​IMG]
    I've been slowly converting the 3D objects to printable 3D objects. I redid the domes though after finding a better image of the prototypes domes. These are much closer to Kauila's original domes. As soon as I get a little cash I'll print them out in 1:20 and SE.
    20150416_134446.jpg
    Oh, and my HOn3 print came out really good this time. I update the model though in hopes that I would be able to preserve the foot irons that were broken off during cleaning.
     
    Last edited: Apr 19, 2015
  17. rkapuaala
    rkapuaala Well-Known Member
    [​IMG]
    The vavle covers are also available now :)
     
  18. rkapuaala
    rkapuaala Well-Known Member
    [​IMG]
    I recieved my first prints of the 1:20 scale smoke box pedistal this afternoon. I'm so glad that SW made the U.S.P.S. an option for shipping. The U.S.P.S. always delivers on time if not sooner.
    The print was very crisp and was only .005" smaller in width than the original dimensions.
    I printed out a WSF print as well to compare the accuracy of the stainless steel.
    [​IMG]
    While it is hard to tell from the photo the WSF was not only accurate dimensionally, it did print the details of the bolt heads. These are both keepers.
    I'm also working on the cab. I will print out at least one cab in 1:20.32 scale. Neither of the two models is going to be live steam so heat is no consideration.
    [​IMG]
     
  19. stonysmith
    stonysmith Well-Known Member Moderator
    Come on.. go for the live steam !! <grin>
    Looking good here..
     
  20. rkapuaala
    rkapuaala Well-Known Member
    Thanks Stony.
    finishedcylinderassembly1.jpg
    The cylinders block assembly is much closer to the prototype now. I may print this out in whole for the plastic 1:20 scale model.
    finishedcylinderassembly2.jpg
    These I will print out in 1:20.32 scale in stainless and in plastic I think.
     
    Last edited: Apr 26, 2015