Poor quality

Discussion in 'My Shapeways Order Arrived' started by 414125_deleted, Sep 20, 2013.

  1. This is my first time using Shapeways and I'm disappointed. Was I expecting too much?

    I used Frosted Detail Plastic (FDP) and have the following issues with the model that arrived:

    - it is oily. I thought that the oil was supposed to have been cleaned off in a sonic bath. Does that not do a thorough job? It can't be painted as is;

    - all over, the object is like very fine sandpaper which I guess is just the characteristics of FDP (which I would not describe as "high smoothness" as per the web page), but in places the model is very rough, like a rasp;

    - my design is of inter-connected, hollow pipes. In a few places where the pipes join, they are blocked. These are not narrow, the diameter of one of the blockages is almost 1cm. I've re-checked the STL file and there are no such blockages.
     
  2. mkroeker
    mkroeker Well-Known Member
    I have not tried the FD/FUD material myself, but the oil/wax residue issue has been reported by many others here in the forum.
    It would indeed help if shapeways mentioned it on the materials page, which quite to the contrary seems to emphasize the thoroughness with which models are cleaned. (And the "high smoothness" might be a bit misleading for people not used to printed plastics - it is probably much finer grained
    than the WSF, but still not as smooth as one would expect from experience with "normal" (injection-molded) plastic household items)
    Check the Post Production Techniques forum for tips on cleaning and painting FD/FUD models - the most recent three pages already contain several pertinent threads. A "typical" procedure seems to be to remove the oil/wax with warm soapy water or bestine (heptane), then either scrape off the rough bits with a modeler knife or coat it with filler and sand it down before painting with acrylics.
    Can you take pictures of the rasp-like roughness (possibly print lines?) and the blockage ? (The latter might be leftover wax, if so you can try to melt or dissolve it). If you post pictures here, people more knowledgable than me could offer further advice. If you email them to service, they will reprint the model for you if what you got is sub-standard.
     
  3. Thank you. Your post was helpful.

    The blockages are plastic, not wax. The rasp-like roughness is also an aberration of the printed plastic, not wax.

    It's hard to show the blockages in a photo. My model is a knot of veins and the blockages are between some of the tributary veins where they join the main veins. What has happened is the printing of the inside walls of the main veins have continued over the openings to the tributaries to create a flap. You can only tell some are blocked by trying to push a wire down. It looks to me like a problem in interpreting the STL somehow whereby the model was changed so that it no longer recognised that a tributary pierced both the inside and outside walls of the main vein that it joins. It's definitely okay in the STL file I uploaded.

    I've been in contact with customer services and we'll see what they do.
     
  4. stonysmith
    stonysmith Well-Known Member Moderator
    When you say that the STL was okay, did you check it in Netfabb?
    Often an STL file "looks" okay, but it it contains missing faces (holes). When the Shapeways software cleans up those holes, they often get sealed over in such a manner as to cause the kind of blockage you seem to be describing.

    Imagine a long cylinder without the endcaps. The Shapeways software does not know whether to turn it into a soda straw, or into a solid cylinder like a pencil. The software tends to favor making solids, rather than leaving voids.
     
  5. No, I didn't use NetFabb and I didn't see any reference to it when placing my order.

    Using your terminology, my model comprises of many inter-locking 'straws' Each of these have an inner and outer surface with a join between the two - in other words, solid straws. I spent a lot of effort checking the seal between straws and joining all of them into a single object. My original model was designed in Rhino 3D. I run a couple of Rhino commands to check the model and also pulled apart parts manually to check it. When I exported it into an STL file I then re-loaded it and pulled it apart again to check.

    What was printed had some of the straws with thin flaps over just one end of the straws so that one end was open - as per design - but the other end blocked.

    If NetFabb is a requirement or even just a recommendation then it ought to be part of the Shapeways ordering process.

    And irrespective of the blockages there shouldn't be rasp-like roughness in patches.

    But thanks for bringing this to my attention. I will seek out NetFabb and give it a go.
     
  6. stonysmith
    stonysmith Well-Known Member Moderator
    I'm referring to Netfabb Basic.. www.netfabb.com It is not part of Shapeways, but it's a very helpful program to have in your collection of drawing tools.

    One of the best reasons to use the basic version is that Shapeways uses Netfabb Pro (a very expensive version) as the base of their upload/repair software named Mesh Medic.

    You will likely find that the ends of the "straws" are not properly closed. If you could share the STL here (or send it over via PM) then I could take a look for you.
     
  7. That's extremely kind of you. I'm just looking at my model now in NetFabb Basic. I don't notice anything but I'd need time to learn this new package. There is a large exclamation mark on the screen which seems to refer to something to do with collision detection - whatever that means.

    If this software is what is a version of what Shapeways uses, is free and potentially spots problems that packages like Rhino 3D don't, then even more reason for Shapeways to recommend customers use it before ordering a print job.

    I hate to bother you with this but since you offered I'd be grateful to learn something and if you have time would welcome your views. I'll PM you the model. Thank you.
     
  8. I can't PM it to you as it is too large (31 megs). Here's a zipped version (14 megs).
     

    Attached Files:

  9. stonysmith
    stonysmith Well-Known Member Moderator
    Click the Red + sign to go into "repair" mode and you'll see outlined in yellow the 29 holes that are in your model.
    Rhino did a bad job of the joins. I'm not a Rhino user, so I can't help you on that side, but a couple of these problems can be fixed within Netfabb Basic.

    What is unfortunate is that Rhino itself sealed up a couple of the passageways.. those can't reasonably be fixed within Netfabb, and you may be better off resolving those before you try to fix anything with Netfabb.

    I would recommend using the sliders on the far right in Netfabb to view slices of your model. Follow the geometry of each passageway by itself, and you should be able to determine the blockages that I'm referring to.

    Attached is a screenshot of one area that will cause you problems.. Rhino didn't open the two vessels upon each other correctly.
     

    Attached Files:

  10. Thank you for taking time to look into this.

    Having spent a little time with NetFabb and back in Rhino again, I've discovered the following:

    - there were still some, what Rhino calls, 'naked edges' in my original Rhino 3D model. The checks I had made didn't pick these up. There was another check I now know that I should have done;

    - Rhino 3D did not block the orifices, they were definitely fine, it's just that the model had naked edges, ie it wasn't totally sealed. Ultimately, that was my fault. There are only two blocked ends and these were put there deliberately by me in my original Rhino design. The several unexpected ones were put there when NetFabb 'repaired' the model;

    - NetFabb picked up the problem right away but couldn't repair the naked edges properly. It tries to connect a polygon on one side of an orifice around which there is a naked edge and connect it to a polygon on the other side, thus making a polygon of infinite thinness across the orifice. You can see the before and after when choosing the repair command in NetFabb.

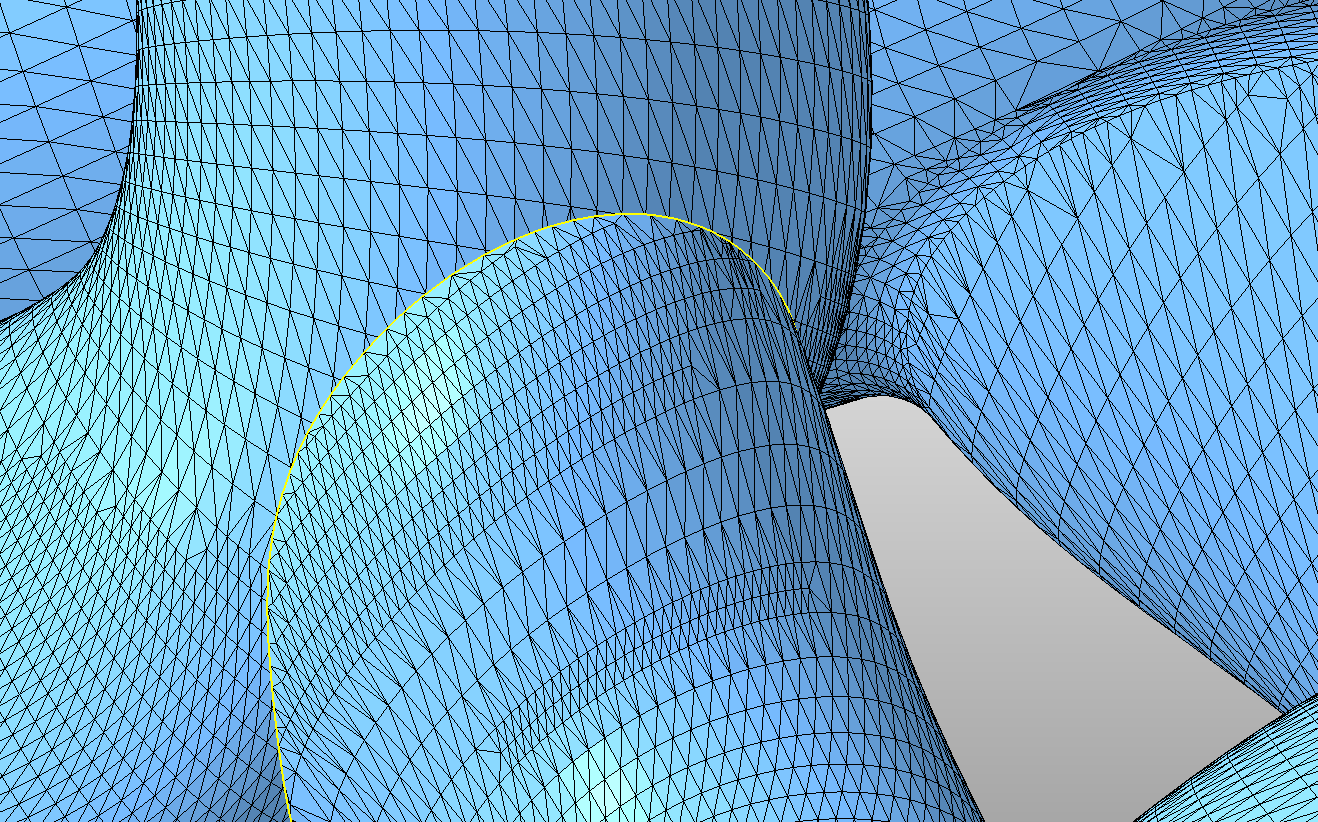
    'Untitled.png' is a piccie of the naked edge that was identified by Netfabb. I can now see it in my original Rhino model.

    Untitled.png

    'Open.png' is an image from Netfabb that shows an open orifice before Netfabb touched it. You can see the line denoting the naked edge.

    open.png

    'Closed.png' shows the orifice after either a 'simple' or 'default' auomatic repair - both produce the same results. Note how the orifice now has a triangular skin blocking it. This is one polygon.

    closed.png

    So it seems that someone in Shapeways saw the problem, clicked repair but didn't then realise what the repair had done. Instead, they should have rejected the model and told me to fix it. To be fair to Shapeways it's quite an intricate model.

    Again, I thank you for helping me. In future, I'll use NetFabb as another layer of checking before submission.

    I have two recommendations for Shapeways:

    a) tell all customers to check their models with NetFabb Basic before placing an order;

    b) if Shapeways finds a problem, and if they 'repair' it, they should give it back to the customer to check it before committing it to the printer.
     
  11. mkroeker
    mkroeker Well-Known Member
    a) see the Tutorials section of the webpage.
    b) this was almost certainly the result of the automated run of "mesh medic" immediately after upload of your model, not some manual intervention
     
  12. mkroeker. it doesn't matter whether it was a manual or automatic intervention. The model was altered without checking with the owner.

    According to the FAQ: "We will check every design upon ordering and you will receive detailed feedback if there's an issue with it."

    I'm dealing with Customer Services and I'm sure that they'll take care of it. I have merely given some feedback of my opinion on how some things could be improved.

     
  13. stonysmith
    stonysmith Well-Known Member Moderator
    The other small issue is that not everyone works with STL files. There are a number of designers here that work with WRL, DAE, X3D and other formats, and Netfabb only works with STLs. In particular, you need WRL or DAE if you want to work in color, because STL has no color information. Therefore, advising "everyone" to use Netfabb first would be a bit of a mis-direction.

    But, I'll mention it to The Powers That Be.
     
  14. stonysmith
    stonysmith Well-Known Member Moderator
    In Netfabb:
    - click on Repair
    - click on "Add Triangles"
    - select one of the yellow-hilighted vertexes, turning it blue
    - move the mouse to a face on the "other side" of the open tube face (note the green area in the picture

    This will add face(s) that go the "proper" direction rather than blocking the tube. If you can turn two open loops into a C-Shape, then the "Close Holes" function will close the holes properly without blocking the tubes, but, you must first supply these "hints" on EVERY open tube end or the "Close Holes" function will seal up the tubes you have yet to correct.

    Image3.jpg
     
  15. Again, very kind of you, thank you.

    I've actually gone back into Rhino 3D and am re-trimming and re-joining objects to clear the problems at source. Taking me hours. I appreciate the help with repairing with NetFabb though as it may come in handy if there are any small problems in the future. I'll certainly use it as a final check before uploading again.

    Of course none of this is related to the rasp-like roughness in places. One bad patch is on one of the sides of one of the two main veins that come up from the base. It looks like it was printed upside based on the very slight ridges on the top of the topside veins - which would make sense for stability for printing. If these ridges had been on a horizontal surface I might have understood the roughness, but they're not very much off the vertical. I'm hoping that someone in Shapeways will take back the object, inspect it and tell me whether they consider this as within spec or not. I don't think a photo will help much though I might give it a try. It's difficult without any sense of scale and I'd need one or two extra pairs of hands to hold a ruler in the right place.
     
  16. Just to let everyone know that Shapeways has given me a refund. I'll correct my model and re-print. Hopefully I won't get the roughness this time either.
     
  17. Youknowwho4eva
    Youknowwho4eva Well-Known Member
    The oil is more than likely from the sonic bath itself, which uses an oil much like baby oil to clean the support material off the model. It's fairly hard to remove all the oil, especially with your model having hollow tubes.

    The rough areas are probably from where the support material was attached. There are some methods for removing this in the post production section.
     
  18. According to the description on Shapeways site, there are two sonic baths for Frosted Detail Plastic: the first is with oil to remove the supporting wax; the second is with water to remove the oil. The tubes are quite large diameter: around 5mm to 10 or more so there is plenty of space for oil to escape. The main structure is 10cm cubed. The oil residue was on the outside. My guess is that there was a slick of oil on the water bath that was not skimmed off before the model was extracted, thus coating the model with oil.

    The rasp-like roughness is not wax; it is plastic. The support structure is supposed to be wax. If the rough texture is due to the wax, then there is an issue with how the two interface with each other when printing. The only way to remove the roughness is by sanding. The only warning on the page for this material is about where the plastic interfaces with the supporting metal base of the printing device. That level of detail is negligible compared to this.

    Not sure if this photo does the issue justice but...

    Untitled.png
     
  19. Youknowwho4eva
    Youknowwho4eva Well-Known Member
    Your part should not arrive that oily, that is for sure. But I have been told, it's hard to remove all the oil.

    The part does look a little rough. Lets see how the reprint comes out, and we can dissect any issues with it.