Missing parts after uploading Sketchup Model

Discussion in 'General Discussion' started by eriban, Feb 25, 2012.

  1. eriban
    eriban Member
    Hi,

    I just had some problems uploading a model. I used Google Sketchup to create the model, and exported it to .dae format. Before doing so, I checked the model using the Solid Inspector plug-in, and all seemed fine. Nevertheless, some parts were missing after upload. What was especially strange was that some of the missing parts were unaltered copies of groups/components and some of these copies showed up fine. They only differed in location and orientation.

    I am still not sure what the problem was, but after some trial and error, I found a way to fix it. Simply "exploding" the groups that did not show up and regrouping them made them show up after upload.

    Just posting this in case anyone else is experiencing similar problems.

    Cheers,
    Erwin
     
  2. 9694_deleted
    9694_deleted Member
    Hey eriban, thanks for sharing.

    Sketchup is a great (FREE!) tool, but it's not without its shortcomings. Having seen lots of beginners mess around with Sketchup, and being one myself, I know how tricky things can get when it comes to how the software interprets orientation.

    How long have you been using Sketchup for?


  3. 92024_deleted
    92024_deleted Member
    Hi,
    make a quick check if the missing parts were grouped. Grouped parts of a model sometimes went apart... Ungroup them and then it could work. But ungrouping the part has also sometimes a side effect to the other parts of the model...

    cu
    Ingo
     
  4. bluelinegecko
    bluelinegecko Well-Known Member
    I've used sketchup for almost all of the models I've made through shapeways. Despite having several other free and commercial 3d cad programs I find myself usually designing in sketchup because it is so intuitive and fast to model things accurately through it.

    Somethings I've learned so far.:

    1. As you discovered, exploding groups and components is very important. Sketchup maintains the original dimensions and 3d locations on items that have been modified after they were grouped. If you change the scale, orientation, location, etc after grouping it usually causes problems when exporting the file to .*.dae or *.stl for uploading. You can explode everything ad regroup it, but I find it easier just to explode every group/component before exporting the file and leave them ungrouped.

    2. Google needs to adjust the program's code to allow smaller curve radiuses. Right now trying to draw radius's under 1.5mm usually will not work. The solution most people use it to draw at a larger size and scale everything down at the end, This however sometimes causes crashes on large complicated models. It also sometimes alters the model's geometry because the program has to estimate the location of faces/edges/vertices that it can't calculate correctly. An easy fix is to draw everything at 1000x scale, and use the free STL exporter plug-in to upload the file to shapeways. When you create the STL file and the program asks for the scale, choose "meters". When you upload the file to shapeways select "millimeters" for the scale. No need to rescale the file through sketchup and risk crashing the program and your file will have the exact geometry you modeled.

    3. If you are having problems with non-manifold meshes you can try importing the file into meshlab or using some of the free plug-ins. I find it very easy to go to sketch-ups "view" tab and under the edge style settings; turn of "edges" and turn on "profiles". This will draw a thick black line around any holes in your mesh that you might have missed. zoom around and you will quickly find them all. Even very tiny missing faces usually stand out pretty well this way.

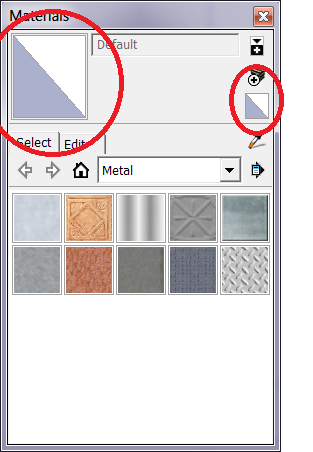
    4. If you are getting "empty output" error messages you probably have mis-matched "normals". If you have a large model its probably best to try to fix them through meshlab, blender, or some other program. If it is just a few faces there is an easy way to find them. Select your entire mode, open the materials settings and select the default material. This material has a white face for one side and a gray face for the other. Shapeways' software doesn't care which side is used for the inside or outside of your model but your goal is to make sure your model has the same color all over. All you have to do is select the faces that are the wrong color, use the right mouse button, and select reverse faces. Once all the faces (or alteast the majority) are the same it usually uploads without a problem. I find it easiest to model in the default material the entire time so I can correct any flipped "normals" as they occur. It saves a lot of time later.

    material.png

    5. If you export the file using sketch-ups built in *.DAE option the view that will end up being the front view when it is uploaded to shapeways is the "bottom" view in sketchup. You can go to "camera-standard views" and select bottom to orient your model correctly. If you use the STL exporter in tip #2, the "ISO" view usually ends up being the front view after it its uploaded to shapeways.

    Hope this helps. Sketchup is pretty popular on shapeways. Others have posted some more great tips too. Search the forum and you will find a wealth of knowledge.
     
    Last edited: Feb 28, 2012
  5. eriban
    eriban Member
    I have been using SketchUp for just over a month now, and to be honest, I find it a user-friendly modeler. I have used various other free 3D modelers, and like this one the best. I have no experience with commercial modelers though. Given that 3D modeling in only a hobby for me, it does not seem worthwhile to spend money on an expensive commercial tool (I'd rather spend it on 3D printing :))

    Nevertheless, good to no what the shortcomings are of SketchUp in order to work around them...

    Cheers,
    Erwin
     
  6. eriban
    eriban Member
    I did some further investigation, and changing the orientation seems to spoil things. Having copied groups and components is fine (even copies of copies), but as soon as I rotate them, they disappear when uploaded to Shapeways. They do still show up in the exported .dae though when I view it locally, so that is confusing. Anyway, exploding groups before exporting fixed it for me.

    Cheers,
    Erwin
     
  7. eriban
    eriban Member
    Hi bluelinegecko,

    Thanks for those tips.

    I also bumped into issue 2, and so far down-scaled before exporting to work around this. I have not yet experienced crashes while doing so, but will give the STL exporter a try.

    In fact, the other issues you mentioned I also bumped into and managed to work around. Good to see these documented together with ways to solve them.

    Cheers,
    Erwin
     
  8. 92024_deleted
    92024_deleted Member
    Hi,

    I work a lot of with a radius of 0,5 mm (smaller doesn't work with sketchup) without any problems. You also can work with a radius of 0,5 an rescale them smaller, it works also.-)

    cu
    Ingo
     
  9. 7777773
    7777773 Member
    The shapeways uploader will automatically remove problem areas, but won't tell you what the specific problem was - it just wants to make the model printable.

    Before uploading, I recommend running your model through the Netfabb application. This will highlight things like inverted normals and call attention to things that will cause print problems. There is a fix option in the free Netfabb, or you can use the (usually better) cloud.netfabb.com web service (also free) to fix the model.

    One other thing that could cause features to disappear in the Shapeways uploader is scale... if pieces are too small to print they may be deleted. The Netfabb desktop app also allows an easy way to resize your model.

    ***NOTE*** I am not associated with Netfabb in any way but I have found it to be an indispensable tool for 3D printing. There are tutorials in the Shapeways FAQs that will show you these functions (it's how I was introduced to the program)