Tron LightCycle

Discussion in 'My Shapeways Order Arrived' started by Psychobob, Nov 17, 2011.

  1. Psychobob
    Psychobob Member
    This is the second time I've had a 3D model printed out. This another gift I made for a friend who happens to be a big Tron fan.

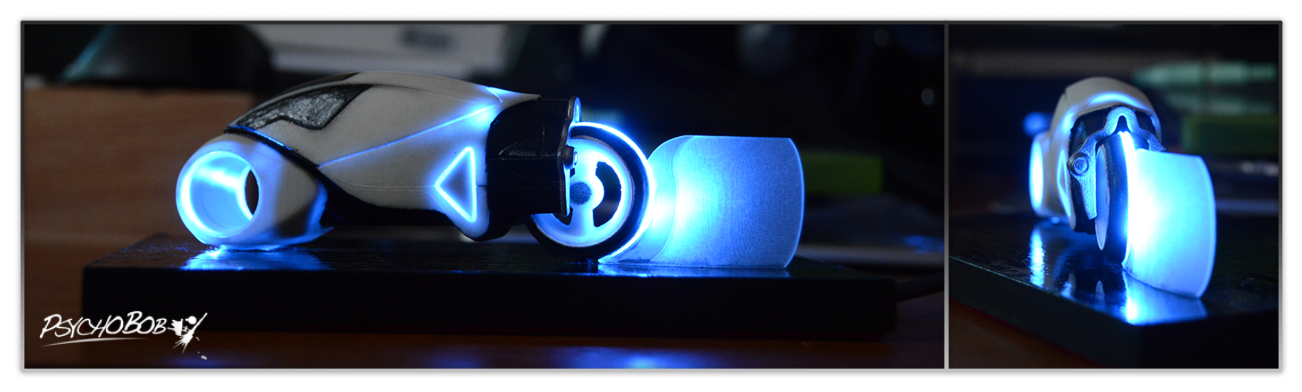
    Just like my Dead Space helmet(https://www.shapeways.com/forum/index.php?t=msg&th=4689), I took an old USB cable and hooked it up to some resistors and LEDs.

    I had it printed in Frosted Detail (for the transparent sections) and WSF polished (which was really good, I will definitely be using this in the future).

    Even though the fine detail seemed to come out even after polishing, it looks like one side of the model was less pronounced, this looks to be from the alignment during printing rather than polishing I would think (I remember some of the chaps who came down to the London Shapeways meetup talking about it). Can anyone point me to a thread that explains how the alignment affects printing?

    Heres some pics of the finished product

    Shapeway upload 1 - Non-Lit.png

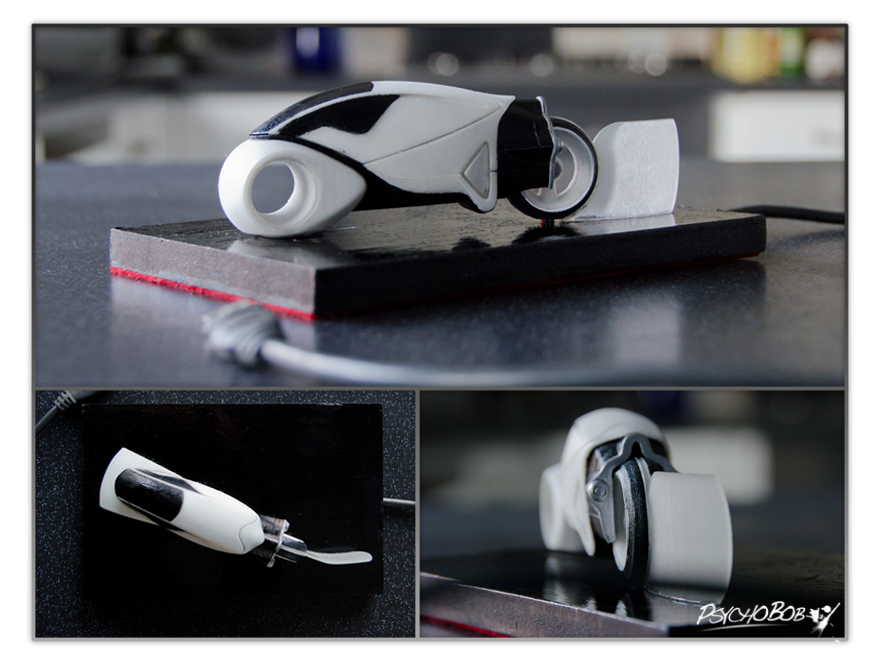
    The base is a bit of MDF where I chisselled out some sections in the base for the wiring, I then covered it all up with some red felt. The top of the MDF was then painted with some black outdoor gloss paint I had in the garage.

    I used some regular humbrol enamel paint for the model.

    Of course, here's some shots when it's lit up :)
    Shapeway upload 2 - LED-Lit.png

    I made some mistakes when putting things together (paint wise), but at least I'll learn from this and try not to repeat them.

    Well, enough prattling on :)
     
    Last edited: Nov 18, 2011
  2. 24776_deleted
    24776_deleted Member
    Looks amazing, great job!
     
  3. Youknowwho4eva
    Youknowwho4eva Well-Known Member
    This is EPIC!
     
  4. Alex_ADEdge
    Alex_ADEdge Member
    Very, very cool :D Awesome work

    Good use of the material thickness to get the light to shine though more in certain places :)
     
  5. Wow , nice combination of material and light! Very nice effect!
     
  6. Psychobob
    Psychobob Member
    Thank you all for your kind comments, you never quite realise how much you appreciate comments like these until you see them :)

    This project did teach me something and I thought I would share it with you all in case it saves someone running into the same issues I did.

    If your model is going to remain mostly white (but you will be painting some parts) and you also print it in WSF; make sure you still prime it with some white primer (it also helps stop the non-white paint you use from getting absorbed into the plastic and "bleeding" around the edges). I ignored this rule that so many other people follow, and I learned the hard way why this is always a good idea.

    The reason is that the WSF colour is more an off-white creme but close to white. So if you ever make painting mistakes and need to cover them up with white paint, it won't be obvious you've gone over the mistake with additional white paint. If you don't have it primed and try and cover the mistake with white paint, it's obvious you've done so as the WSF is more an off-white and the paint you use to cover it up will be an actual white colour.

    Now all I need to do is figure out how I can make it nice and glossy. I hear clear coat is good but from what I've seen on youtube this is an epoxy and is only something that can be used on flat objects (i.e. paintings). Maybe there's a spray can equivelant?
     
    Last edited: Nov 18, 2011
  7. Here's the clear spray acrylic that I use. It takes about 8 coats on unpainted WSF before it turns glossy.

    Lightcycle turned out great!
    .
     
  8. Psychobob
    Psychobob Member
    Thanks for the clear spray link. After 8 coats and it's completely dry, does it feel rubbery or sticky at all?

    Cheers
     
  9. Nope, just feels like hard plastic. It has a little texture because of the porous nature of WSF - so not completely smooth.

    Cheers,