Heat Colouring Stainless Steet Prints

Discussion in 'Finishing Techniques' started by Whystler, Jul 29, 2010.

  1. Whystler
    Whystler Member
    So, I got to thinking... I know that some folks use a blow torch to put some, what I thought was random, colour on their metal work. I've seen it on steel and copper.

    After a little research, I found that this works on a number of metals, including steel, copper, titanium especially, and often gold if there is copper in the gold alloy. I noted black, blue, purply, coppery orange, brown, light and dark gold colours were possible.

    I also found out that the colours actually depend on the temperature of the metal heated, and I even found a chart that shows the colours that steel turns at certain temperatures. Here it is:

    [​IMG]

    NOTE: these temperatures and colours are not for stainless steel. As written by GlenG in this post ( https://www.shapeways.com/forum/index.php?t=msg&th=1514&a mp;start=0&S=66cf1a686f2ea56e0b17facb211f4988), stainless steel takes higher temperatures to achieve the various colours.

    So, I tried it on a spare faery ring I had printed in stainless steel. I used a little butane kitchen torch, meant for burning creme brule and such.

    firecolour-fairyring-pic01.jpg

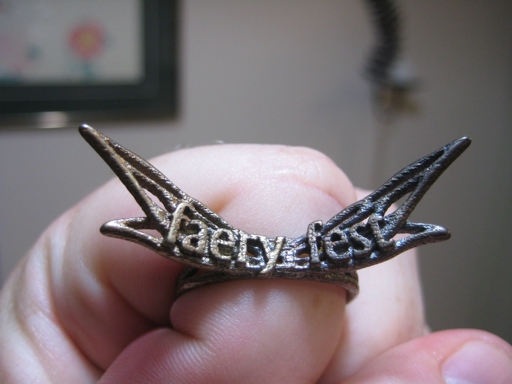
    I had no idea what I was doing, but I did make sure that the piece was held by plyers and not my bare hand and you should too if you try it. I'm sure that a vice would also work.

    I heated one side until the metal on the right wing went cherry red. Very pleased with this, I then decided to quench it in some water. The result was not very exciting as in the inadequate light and no knowledge of what to expect, I just thought the metal got darker and attributed it to soot.

    I washed the ring, and inspected it in good light and got excited. You'll notice, using the chart as reference, that the right wing turned quite blue, and the left wing gold! I read about the tempoerature and relative colours later, and so I now know that the left wing turned gold because it wasn't directly heated and so had a lower temperature than the hotter right wing. Cool huh?

    (read on to the next post, for the next experiment and picture, since i can only upload one picture per post, apparently)

    -Whystler

     
    Last edited: Jul 29, 2010
  2. Whystler
    Whystler Member
    After learning about the whole temperature and colour thing and having seen this chart, I tried again, aiming for the gold colour only. Using the torch, I carefully heated another ring:

    firecolour-armillary-pic02.jpg

    I mean .. I tried to heat it carefully :) And the gold came slowly but went quickly! But I did get a nice coppery bronzey colour that looks a lot like the "bronze finish" offered by Shapeways. Notice that there is some variation of colour here too, which I think is pretty cool. Down near the area I held the piece, the bronzey-copper fades to a beautiful straw gold.

    I definately recommend trying this. I love the colours available to you from the yellow to the copper-orange to the blue! The randomness and variation in colour on one piece is quite attractive. Apparently a butane lighter is also adequate.

    (read on in the following post about the next experiment)

    -Whystler
     
  3. Whystler
    Whystler Member
    So then ... after more reading, I find out that this guy heat colours his steel armour in the oven to a nice dark coppery purple. And later I read in this forum that GlenG has done some oven work with stainless also.

    With these experiences in mind, I tried the oven on some rings. Now, I started this process before reading more in depth, including GlenG's words. So the process that made these colours changes from the intended 60 minutes on 240 degrees to:

    very important: I cleaned the pieces fastidiously before I heated them, because I learned any finger oil or debris will produce undesired effect. Every thing I've read stresses this
    +
    10 minutes on 240 F degrees after seeing colour chart...
    +
    20 minutes on 350 degrees F after finding out the oven usually needs a hotter tempoerature to achieve the desired colours...
    +
    30 minutes on 450 degrees F after reading GlenG's post and noticing little to no colour change
    +
    30 minutes on 500 degrees F after noticing little colour change
    +
    2 minutes in the freezer on a plate to cool them.

    Really, I think you can achieve what I achieved in a solid uninterupted hour on 450-500 F

    And here you see the result of the ring baking. I've placed the same kind of ring in unbaked stainless next to each baked ring to show you the difference:

    firecolour-rings-pic01.jpg

    The one thing I probably didn't do well, is making sure the rings dried after washing so that no trace of moisture was left. I towelled them dry, but didn't think I needed to do more. In retrospect, I should have left them out on the counter to air dry for a while, because as you can see on the baked bauble ring (second from the right), the inner areas where moisture may have remained, did not colour as brightly.

    And here you see the tellurion pendant I made. The left one is unbaked, and the right one is baked. Actually, the picture does not show the true yellow-ness of the baked version. It's not quite as yellow as the gold plating, but it definately contrasts to the white-greyness of the unbaked version:

    View attachment 4351

    Hope this is useful to you !

    -Whystler
     
    Last edited: Jul 29, 2010
  4. 20201_deleted
    20201_deleted Member
    Bravo Whys,
    Great initiative here! You have discovered just how subtle and transient this process (heat patina) can be.
    It is kind of like learning how to catch a wave, riding the surf then stopping the action at a perfect moment. The more you play around with this process you will learn how to control the flow of heat through the mass of a part.

    As you discovered, it is easier to control an oven than a hand torch. To get good repeatable results with a torch requires slow, even application of heat. The equipment at hand definitely factors in here. A torch that can produce a soft diffuse flame is more suitable for heat patina than a welders torch.

    If you try this process on other types of metal, such as sheet steel (plain or stainless) or on copper or bronze sheet, you will notice that the sequence of colors will always be the same but the heat gradients can be quite different.
     
  5. Tommy_2Tall
    Tommy_2Tall Member

    Truly inspiring work and even though it was trial and error at the time you've done an excellent job documenting it for us Shapies. :D
     
  6. 30597_deleted
    30597_deleted Member
    Great experiments with heating SS metal for various color effects. I was wondering, how deep does the color effect go?

    I am thinking of heat darkening an SS object, then inlaying sterling silver. Then I would sand down the silver so it's flush with the steel, but is there a risk of sanding off the color as well?
     
  7. 20201_deleted
    20201_deleted Member
    The color is angstroms thick and it will not stand up to sanding. Inlay silver first then heat color. Use fine silver instead of sterling and it might stay white. Not sure if you intend to inlay by traditional engraving methods or if you intend to solder on silver bits? Either way, fine silver is much softer than sterling and works MUCH better for inlay work. It is also somewhat more oxidation resistant so the color might not be effected by the heat color process. Good luck with this!
    I have wondered about simply flowing silver solder into printed grooves then sanding everything down flush. This will take some serious testing! Keep in mind, there will always be a contrast between the print metal and whatever metal you add/inlay to it.

    -G
     
    Last edited: Aug 18, 2010
  8. 30597_deleted
    30597_deleted Member
    Good ideas to noodle on, contrast is what I was looking for. I'd probably have my cut-lines modeled into the SS, as I read the metal has some serious hardness if I tried engraving it.

    I wonder if there's a way to clean up the bumpy steel lines with gravers or needle files (without totally ruining the files).

    I could heat-color it, add my silver inlay, then smooth out the silver and steel bumps (leaving any colored steel low-spots as a contrast-y decorative element) But even polished steel and silver would make for interesting color variation...
     
  9. 20201_deleted
    20201_deleted Member
    Yes this material is hard, it is also highly abrasive. It behaves like cast iron, only harder. Carbide burs and diamond coated tools/abrasives are the only practical way to work the surfaces. It will eat swiss files in short order! Standard abrasive wheels, al-ox , sil-car do not hold up well to this material. Zirconia or the newer class of "ceramic" abrasive wheels fair better, but not by much. Diamond is the path.

    -G
     
  10. virtox
    virtox Active Member Moderator
    Since I was in the post-production neighborhood:

    I also did a few experiments with heat coloring.

    Slowly "burning" the steel prints in a gas flame on the stove gave a really nice and dark color. Darker than the bronze shapeways offers.

    I also put a few (throughly cleaned) items in the (forced air) oven, at 250C for two hours, no real results yet, only a palish blue-green hue.
    (Not sure if the oven or the forced-air is the problem..)
    So I need to find myself a small oven to experiment some more with.

    Funnily enough, I always seem to do my post-processing on the same weekday, nicknamed Alchemy Friday ;)

    Cheers.