Weekend contest #14 Post Production

Discussion in 'General Discussion' started by Youknowwho4eva, May 31, 2013.

  1. Youknowwho4eva
    Youknowwho4eva Well-Known Member
    [​IMG]

    Michael Muellers bleach patina silver snake ring

    We started something new this week. What we call Maker Materials. Starting with the new Elasto Plastic. These Maker Materials give us a better opportunity to learn from you! To a shopper Elasto Plastic may look dull and useless, but to our creative community, well we wait to see what you guys do with the stuff. Much like dying WSF and polishing it, and other post production methods that are now standard options here. We get these techniques from you guys. Most everyone probably doesn't have their own Elasto yet, but we want to know your favorite post production techniques on any material. Maybe something we can offer in the future! So bust out your Post Production kit and show us what you can do.

    Enjoy!

    How to Enter

    Do any sort of post production work, share what you did with results. Deadline is Wednesday evening, midnight.

    What's the prize?

    $25 to use towards your creation, or any other Shapeways purchase.

    That's all?

    What else would there be? Have fun!
     
    Last edited: Jun 3, 2013
  2. bartv
    bartv Member
    Bumping this thread to make sure everyone sees it!

    Bart
     
  3. MrNib
    MrNib Well-Known Member
    There was no notice on the blog so many people likely missed this, as did I. When exactly is the deadline? Midnight at what longitude?
     
  4. bartv
    bartv Member
    Argh, you're right! Sorry about that.. Let's extend the deadline with two days then - how does Wednesday evening, midnight sound?

    Bart
     
  5. leorolph
    leorolph Member
    Ill post a couple of items and the processes i used to finish them.

    The hollow ring, ordered in gold plated SS. Using a dremil and sanding tube I sanded it back to steel, the hand sanded it first with 400 grit wet and dry sand paper them with 1200 grit, and finally polished on a polishing wheel. I had to use a pipe cleaner to get the polishing abrasive off the inside of the ring.

    Untitled-2.jpg


    Leo.
     
  6. leorolph
    leorolph Member
    another ring.

    This one was made in silver. First I tarnished the ring in bleach, just left the ring in straight bleach for 5 minutes, then I rinsed it. Next I sanded it with 400grit sand paper and finally a quick sand with the 1200.

    Untitled-22.jpg
     
  7. UniverseBecoming
    UniverseBecoming Well-Known Member
    Possible post process method for casting metals from Sandstone molds.

    This is a very simple process that I've thought of for making Shapeways' Sandstone material able to handle high temperatures.

    Steps:

    1 Design a mold cavity and have it printed in Sandstone.
    2 Impregnate the porosity of the Sandstone with sodium silicate.
    3 Harden the sodium silicate by placing the Sandstone mold in a container and saturating with carbon dioxide gas.
    4 Remove the cyanoacrylate binder by immersing the Sandstone mold in acetone. The mold is now held together by the hardened sodium silicate.
    5 Repeat steps 2 and 3 to further strengthen the sandstone mold and make it more refractory.
     
  8. AlexShorey
    AlexShorey Member
    Walnut veneer inlay. Tested it out Friday on my work's printer. I'm waiting for my order in silver to do it justice.
    Smash03.jpg
     
  9. leorolph
    leorolph Member
    nice.... what are you using to glue the veneer down?... i would imagine most glues would loose the stick after a while on a sweaty hand, getting wet and such.
     
  10. AlexShorey
    AlexShorey Member
    I actually started making rings by dremeling them out of solid chunks of wood, Later by looping veneers together. Cyanoacrylite (super glue) has been the perfect bonding agent as well as a crystal clear, rock hard finish that brings out the grain better than anything. Skin-safe is a big plus too. CA glue was used in WWII as a quick alternative to stitches.
     
  11. recklesstryg
    recklesstryg Member
    I had a case made for my iPhone 5: <a href="http://shpws.me/lvp7" target="_blank"></a>
    It was made in Violet Purple Strong & Flexible Polished
    I painted it with camo flat black and have been carrying it for a few months now.
    The edges wear off the paint exposing the purple under the paint and eventually the white plastic under that.
    [​IMG]
    [​IMG]
     
  12. virtox
    virtox Active Member Moderator
  13. bib993
    bib993 Member
    I create 3D fractal sculptures that I paint by taking advantage of the porosity of WSF polyamide or sandstone. Here are 3 examples.

    The top one is in WSF, it was a completely hollow shell with very thin walls (0.7mm). First I soaked it with cyanoacrylate glue to solidify the shell, let it dry 24 hours. Then I totally filled it with plaster, let it dry 2 days. It was weighting less then 20g and now almost 1kg! Finally I painted it with Humbrol paint (2 coats), matching the fractal iteration pattern to create a gradient.

    The middle one is in sandstone, soaked with yellow ink and manually painted with ink felt pens for the details and fractal gradient.

    The bottom one is in WSF, painted with 3 coats of red Humbrol paint, the details in gold Humbrol, and then kind of tarnished using a mix of acrylic varnish and black Humbrol paint to give it an antique look, like some sort of abstract chinese dragon.

    Tip: from my experience, the best paint color to make the details and geometry pop out is light or middle grey.

    [​IMG]

    Thanks!
     
  14. MrNib
    MrNib Well-Known Member
    I took a pen making course a year ago and found myself looking for new materials to use to use as pen blanks. Most people use wood or cast acrylic/polyester resin blanks, but anything that can be turned on a lathe has probably been tried by someone. I've been experimenting with many of the Shapeways materials so far except for metals.

    One of my experiments has been using the full color sandstone (FCS) process to design full color blanks with interesting patterns. If you are good enough at woodworking you might be able to do some multicolor designs by laminating various materials together but that's a lot of work. I don't have enough patience for that and I have limited access to a friend's woodshop equipment to develop new techniques.

    You might think that the FCS process wouldn't be so great for making pens, and while it has some limitations it turns out that it's a lot better than I expected. The outer surface of the FCS material is not so great with respect to handling. It doesn't like moisture and is a bit grainy. But sometimes more beauty lies just below the surface. The surface color pigment layer of FCS appears to be in the range of roughly 25 to 30 mils or so in thickness. If you remove about half of the surface pigment layer you end up with a nice colored material that can be sealed to form a nice pen body. It can be handled without damage as long as you don't beat up your pen by hitting it on hard corners or dropping it on the floor.

    One way to design your FCS tube is to make the outside diameter larger than the final dimension by roughly the thickness of the pigment depth (to remove half of the colored thickness on the lathe). The inside diameter is determined by the pen kit's brass tube outside diameter or process minimum wall thickness. It turns out that every pen kit out there likely has finished blank wall thicknesses that are less than the minimum wall thickness design rule for FCS. So you need to design the inner hole diameter smaller and then enlarge it. I use a round hand file and carefully rotate the blank as I file to evenly enlarge the hole and keep it centered on axis. If you go off axis you may machine through the color layer when you lathe your blank. I have been using the 8mm metallo pen kit available from Penn State Industries because it has a thicker finished blank wall thickness than most other pen kits. This pen has a clip on the prefabricated cap so there's no danger of the clip damaging the finish of the pen with use. A thicker pen blank wall also means less work enlarging the hole. It takes me about 15 minutes to manually enlarge the hole with the round file. At first I tried drilling a hole in a solid cylinder blank but I could not center the hole well enough, you must be VERY careful when clamping the blank while drilling, and the blank nearly doubles in price because of the extra material. It's not a good method in my opinion. Here's a photo that shows how the blank is prepared before turning on a lathe.

    blank_A0001_01.jpg

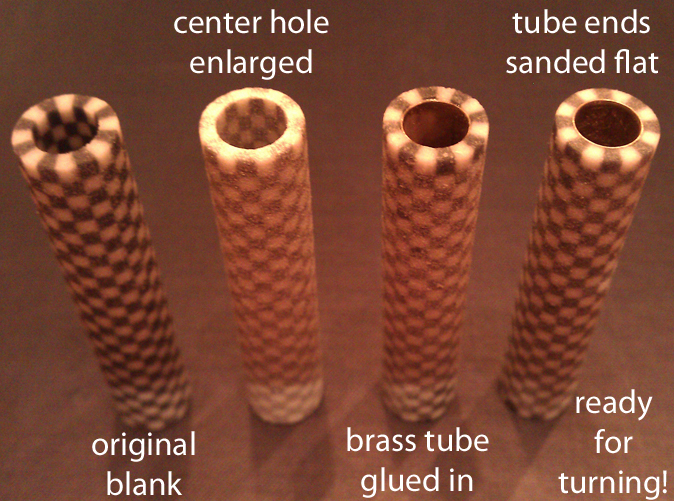
    I oversize the blanks by 10 mils on each end as an allowance for the sanding step. In addition I lengthen any color pattern on each end so that any regular repeating pattern is correct after sanding. An effort needs to be made to center the brass tube in the blank when gluing it in place. Use standard pen maker's CA glue or a two part epoxy. After the glue is dry the excess blank material on the ends of the blank need to be sanded down flat to the brass tube. I sand by hand using a sheet of 400 grit sandpaper and check my progress with a pen bushing for that kit to make sure that the sanding plane is perpendicular to the long axis of the blank. You could probably use a disk sander, pen maker's pen mill, or jig on a lathe to square off the ends of the blank after a bit of experimentation.

    If you're a pen maker you likely know what to do on the lathe. Briefly those steps are:

    1) Using bushings appropriate for your pen kit turn the pen blank down to the finished diameter as determined by the diameters of the pen bushings. I use an Easy Wood tools carbide radius cutter which is great for FCS and other Shapeways plastic materials.
    2) Dry sand the blank lightly with up to 600 or 800 grit sandpaper on the lathe. You can also use a micromesh product after sanding for a final finish if you do not plan on using any sealer as a protective finish layer. (I have made a pen with no protective finish but have not used it enough to determine long term ruggedness. A layer of pen maker's wax applied on the lathe may also be sufficient for decent protection from handling)
    3) Apply a standard CA glue finish, sand it, and micromesh finish it for a glass-like clear protective finish. I generally apply 5 to 8 layers of medium CA glue.
    4) Assemble your pen using a pen press. Follow the instructions that come with your pen kit. For FCS blanks I make sure to always use a bushing on the open end of the blank when pressing a pen part into the other end. This helps to protect the open end of the blank. If you don't have a pen press you can use a large C-clamp with wood or plastic placed on the clamping surfaces but you must be careful to not crush your pen parts.

    And here's an example of the finished product, which as far as I can tell must be uploaded to a separate post. To be continued!
     
    Last edited: Jun 5, 2013
  15. MrNib
    MrNib Well-Known Member
    Continued... And here's an example of the finished product:

    blank_A0001_03.jpg

    A word of warning if you try this. Sometimes the blanks are saggy and not round enough which causes the lathe process to machine right through the printed pigment layer on opposite sides of the blank. (The blanks are white below the pigment layer.) I've had a few clunkers that did this, perhaps 5% of color blanks I've tried.

    As far as what Shapeways can do to help is to give some pointers on what can be done in terms of design to keep the blanks rounder, if a specific orientation can be specified during production to limit sagging, or to check to see if the pigment depths can be increased on the printers. Alternately if Shapeways knows of a machine that could print color patterns on a cylinder made of WSF or other material using a color 3D CAD file you should buy it! There are lots of pen makers that would love to have access to such a service.

    That's all for now.
    MrNib signing out.
     
    Last edited: Jun 5, 2013
  16. MrNib
    MrNib Well-Known Member
    Here's another example of pen work using a 0.5 inch diameter alumide blank turned on a lathe with a slightly curved profile.

    [​IMG]

    The alumide finish is different depending on what you use to sand and polish it. I've found that sanding tends to darken the alumide, in addition to smoothing it. My favorite finish is to only use a carbide cutting tool (Easy Wood Tool with radius cutter) which gives a look similar to brushed aluminum.

    [​IMG]

    I just love using alumide for pen blanks. The best thing about using alumide as a blank is that it is extremely porous. This makes it possible to simplify the process of gluing in the brass tube by "gluing through the tube" instead of applying glue to the brass tube and then inserting it into the blank. With a slightly snug fit of the brass tube it can be carefully pre-positioned in place before gluing. To glue the two components together you simply need to drizzle thin CA glue over the assembly until it is saturated with glue. Alternately you can roll it in a puddle of thin CA glue and let the alumide soak up the glue. After the glue dries there is another bonus to this process: the alumide is sealed inside and out!

    Some words of warning. Be sure to use all precautions when using CA glue. The fumes can be noxious and of course you can glue things together including parts of your body. I've found that CA glue can damage or glue together latex and other types of rubber gloves. Clear transparent polyethylene food service gloves seem to be immune to the effects of CA glue. Remember, safety first!
     
  17. Youknowwho4eva
    Youknowwho4eva Well-Known Member
    You guys always like to make these contests hard to decide.

    leo rolph - I love the dual texture and color of the rings. Really enjoy the tire ring, the effect works perfectly for it.
    AlexShorey - Can't wait to see the final results on your silver piece! Can you share more about the process with us?
    recklesstryg - I like the how the violet is wearing through the paint. Reminds me of Halo or something with the way the colors are working.
    virtox - Unfortunately I have an electric stove :p.
    bib993 - Wow those Fractals looks amazing, The work sounds like a lot, but the end result is amazing.
    MrNib - Beautiful pens. Looks like you've been playing with these materials a lot to get different results.

    And the winner is...
    MrNib's Pens. It was really really hard to pick, but I feel that the amazing results are something that could be possible to implement as a post produced piece. Well done all around. Can't wait to see what you guys do with the Elasto material once you get your hands on it.
     
  18. MrNib
    MrNib Well-Known Member
    Awesome, I think I'll be sending out some elasto test pieces today!

    One thing I learned this week is how difficult it is to take photos of bright shiny things. It's time to work on a light box!

     
  19. recklesstryg
    recklesstryg Member
    Mr Nibs pens are awsome. It is a great way to customize an already custom pen. Nice work.