
Wow, we thought the first ever ready to wear, fully 3D printed article of clothing would get some attention, not only because it is a bikini, but also because of the innovative use of materials and software processes, but the response has been huge.
The N12 has been featured on MSNBC, Time, Wired, Gizmodo, cnet, dezeen and hundreds more blogs around the world with much excitement about the prospect of 3D printing clothes to fit.

It is important to note that the garment/fashion industry is one of the few remaining industries where mass produced items are still assembled almost entirely by hand. This means that although design may happen in the first world, production is often outsourced to the third world where labor is cheap and working conditions can range from questionable to appalling. The N12 3D Printed bikini may at first impression seem like nice story with little depth, but what it represents is a possible end to the sweatshop with a completely 3D printed garment pulled direct from a machine. This of course may not be about to happen with the material properties currently available to produce 3D printed fabrics but as the materials become more complex, stronger and more flexible with simultaneous decreases in wall thickness we will see 3D printed garments become increasingly viable.

Sweatshop project / marissaorton / CC BY-SA 2.0
We will follow up soon with more images of the N12 3D printed bikini
in use, how it responds to water and address questions about the comfort
of the fit and fabric, but for now we would like to go over the
fabrication process in a little more detail, to share how Continuum
Fashion designed the N12 and what might happen next.
For starters check out the intro video by Continuum Fashion
Much of the following text is provided by Jenna Fizel of Continuum Fashion with the full article available on their un-spell-checkably named continuuminum blog.. The following custom scripts were written for use in Rhino 3D modeling software which can run Python scripting.
With the N12.bikini, Mary and I are trying to reinterpret textile design through a computational lens. This is especially appropriate considering that textile design contributed greatly to the beginnings of computation. Jacquard looms were the first machines to use punch cards. They used these cards to create the complex woven patterns and texture of the final cloth. Charles Babbage used the idea of punch cards as the input mechanism of the un-built analytical engine, and punch cards were, indeed, used as an input method for computers in the mid 20th century. Now modern computers are used to control many types of textile production, such as commercial knitting machines. However, these methods are still mostly used to create traditional fabrics with weaves that could be achieved by hand. With the N12 system we are attempting to use the variability, continuity and precision of complex 3D modeling in combination with 3D printing to produce a textile with new and unique properties. I took the overall design ideas and system that Mary and I had decided on and turned them into working code. What follows is a fairly technical description of how I did just that.
General Motivation for the Pattern
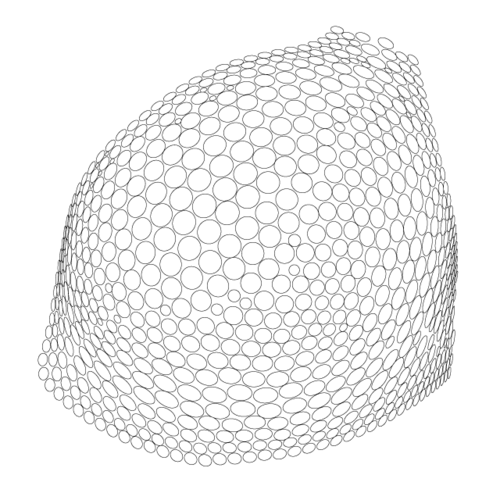
Mary and I knew we needed to subdivide our surface into small patches that could connect to each other by thin elements in order to achieve both the coverage and flexibility we were after. While triangles and other polygons are great for tiling flat surfaces, and even for approximating curved ones, this tends to result in a fairly wide range of aspect ratios, and thus the occasional very pointy piece. This problem is generally exacerbated if the pattern is trying to transition from one size range to another. Circles, however, don’t suffer from this issue. They are, of course, always perfectly round.Circle packing on two dimensional flat areas, is pretty well understood. Our requirements, however, were rather specific and complex. For one, the pattern is not flat, even though its initial calculation can be seen as “two dimensional” since each individual circle is flat to its own plane. Instead it lies on an arbitrarily doubly curved surface. We also needed the size of the circles to respond to curvature and edge conditions of the surface in order to create a smooth responsive pattern. Minimum tolerance values also needed to be maintained between circles. So, instead of a traditionally optimized algorithm that tries for maximum coverage, minimum size variation or similar metrics, we were looking for something quite different.
The patterning starts with a curved surface, some geometry to indicate edges and value ranges for the circles sizes and tolerance parameters. The pattern begins placing circles at a point near the edge. Each subsequent circle tries to stay as near to the nearest edge geometry at possible. The circle’s size is determined using this nearness and the local curvature of the surface. Curvier areas get small circles and flatter areas larger, both to help with accurately approximating the surface and to ensure flexibility where it is needed and efficiency of pattern where it is not.
Check out the video in Vimeo that communicates this process really well, unfortunately we can not embed it here due to weirdnes encountered with iFrames embedding in our blogging software.
Every time a bend or elbow is encountered in the surface edge a small
gap will be left in the pattern. Gaps will also occur near the middle
distances between edges where the placement of the next circle is less
certain. After the first level of pattern has been created these open
areas are infilled with smaller circles to ensure complete coverage. (necessary when 3D printing a bikini)Circles within a reasonable distance of a given circle are gathered and
connection paths between them are determined. If a path passes within
the radius of any other circle that connection is considered bad and
discarded. This process leads to a connection diagram between all
nearest neighbors. Connection intersections themselves are allowed.
These occur more often in the small regular packing near the edges,
leading to stronger and denser fabric there.
Of course, the placement, size and interconnectedness of the circle
pattern does not actually create a fabric. To do that, volumetric 3D
geometry needs to be created. There are two phases to this. The circles are first extruded at the minimum allowable thickness, copied and
offset out. The two resulting plates are connected through their centers
by a central cylindrical stalk. Although the earlier patterning steps ensure a minimum tolerance between
neighboring circles, due to the concavity or convexity of the surface
some plates may intersect each other. These intersections are checked
for and, if found, the radius of the offending plate is reduced.
Now that the non-intersection circle geometry is in place they need to be connected together. Using the connections calculated in the
patterning steps, 3D spiral curves and volumes are created which connect
the circle assemblies from central stalk to central stalk. The calculated connection curve is offset through the vertical center
points of the starting and ending circle assemblies. A simple helix
curve is draw around the result, leaving just enough space so that the
piped volume will not touch the circular plates, and instead will only
connect to the central stalks, giving the structure more flexibility.One of the goals of the circle patterning system is to be able to adapt
it to any surface, at any size. While the code and concept work well
enough at this we are, unfortunately, constrained by the physical
limitations of the printer itself. Anything that is to be printed must
fit within the bed size of the printer.Now, for a bikini for a rather small person, an entire model can just
fit. However, to print efficiently, or to make a larger size, or to make
garment larger than a swimsuit, the model will have to be bigger than
the size of the printer’s bed. How can this be achieved without
destroying the continuity and flexibility of our fabric system?
The circle pattern that you see on the outside can actually be thought
of as three parts. The outer and inner surfaces (what you see) are thin
circular disks. They are joined in the center by a stalk. The springs
which connect these disks together all dead end into the stalk. So, to
create a smooth seam in the fabric, I modified how these stalks are
created. Along each seam’s edge the disks are split from each other and
alternately separated out to one side or the other. The stalks are
divided in two, with one side receiving a hole and the other a pin. The
springs for each piece are directed either only at the top half, or
bottom half of these divided stalks as appropriate. The end result is a
sort of alternating snap configuration that joins together nearly
invisibly and keeps the integrity of the surface in tact.


A big thanks again to Jenna Fizel and Mary Haung for working with us on this project
Entoforms is a really interesting project by Dolf Veenvliet aka macouno using Python scripts in Blender to create a series of Future Fossils using 3D printing.Macouno is using IndieGoGo to crowd source funding to fully realize the creation, and exhibi
holla!
“a possible end to the sweatshop (insert sweatshop pic) with a completely 3D printed garment pulled direct from a machine” … ew.
The approach that’s taken on this post is overly hopeful in the wrong direction as I see it. Can the need for plastic based “clothing” be better aimed at (m) 3-D looms? It seems that a great deal of time (lol)/effort has already been invested on this sort of thing. Suppose that a machine can knit a sock swiftly and to the spec.s of a manufacturer, then why can’t a hobbyist (err, hm, “Maker”) not cough up a pair of knitted pants? Shorts even…
-a bikini does not make a fashion-
http://en.wikipedia.org/wiki/Loom