
Inspired by Mendel Heit, Martin Bauer and Jay Cousins we’ve been doing a lot of playing around with bioplastics. Here you can see the original post with a video that shows you how they made bioplastic. Additionally this video is quite helpful.

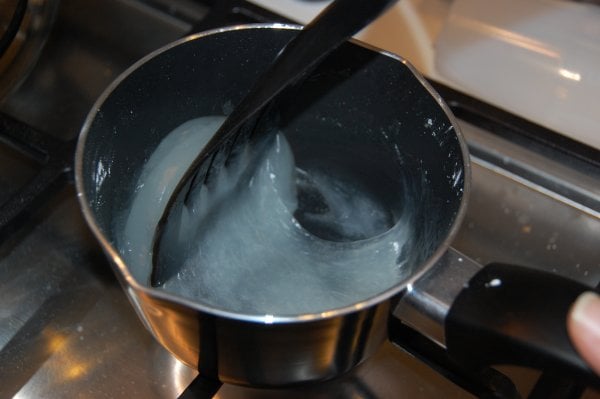
So why have I been spending every minute of my free time cooking bioplastic? Basically the idea is: make a biodegradable plastic in your own home. This will potentially be of big benefit for desktop 3D printing, personal production and also in reducing fossil fuel consumption and one’s carbon footprint. Make a material with easily obtainable biological products that you can in turn use to make lots of things. If we’re dreaming we can also then perhaps make a material that enables you the consumer to recycle the consumer products you make in your own home at home. I tried to test and replicate a number of recipes and also show you what results you can achieve by cooking bioplastics in the home, right now.
Theoretically home made bioplastics could be of great benefit to hobbyists and
hardware hackers. Such a material might actually also make a
fundamental impact on how certain people consumer things, make things,
buy things and live their lives (Makers and Green people). It might
additionally have profound effects beyond this limited group (bleeding
edge technology people, designers). Via this group and with significant
improvements it could go much wider (ie used by people drawn to
customization such as millennials). And an ideal version of this
material could even “change everything” (ie become mainstream and
fundamentally alter the distribution and creation of consumer goods).
Hi Joris
Great work, and great progress I think there is much we can learn from this experiment. Especially love your 3D process.
I think the next stage for us will be to create a wiki or ning group to share recipe results – it’d be great to get some more details on your mixes, especially extra ingredients like blackcurrants and their effects.
Props also due to Chris Doering (http://twitter.com/Chris_Doering).
Thanx man,
The blackcurrant stuff was a whim but it made it a nice pink/red color, clearer and harder. So thats weird because it just has a tiny bit of acid/sugar. For the rest I didn’t add much only played with the proportions of the basics.
How much cooking time do you guys use in total?
The mix for the microwave was by eye, but we used 30 second through to 1 1/2 minute bursts. until it was done enough to peel. Going to meet this week and be more scientific.
Hi Joris, everybody
We’ve just set up a bioplastics ning group for sharing recipes, photo’s videos and findings. Our aim is to make this a place where anyone can share their ideas, contributions, results and recipes – http://bioplastic.ning.com/
Seeing the interest in this thread is really inspiring, we hope you can join us in the ning so together we can advance our knowledge and experience with bioplastics.
Hello!
I tried to do this bioplastic and think about what is the use of water in adding to the starch?
Can anyone answer me?
Thanks a lot!:-)
Have you tried cooling a batch to room temp, then mixing in a high proportion of un-gelatinized starch powder? You should still end up with an extrudable mixture, and once you have your final form, you might be able to gently heat it to quickly gelatinize the embedded starch powder, giving a nearly solid gel. This seems like it might limit the shrinkage/warping wile still providing an extrudable starting mix.
Greg,
No I have not. What do you mean with, “un-gelatinized”?
When you say “7 parts water, 1 part vinegar, 1/2 part glycerine, 1 1/2 parts starch,” do you measure by volume or by mass?
I don’t know if it would matter here, but in baking, it’s recommended that you measure by mass, not volume, because the density of the ingredients can vary. It probably wouldn’t matter for water, vinegar, or glycerine, but starch is compressible.
Drew,
I initially just used teaspoons & cups. I used my digital scale once to make more accurate measurements and did not notice much of a difference.
Hi, Joris
Using more pure and less coarse starting materials might smooth (no pun intended) things along;
Starches come in two types: Amylopectins and Amyloses and most natural starches are mixtures of these two forms (20-25% amylose) [oh, wait – read this wikipedia article first:
http://en.wikipedia.org/wiki/Starch – it explains most of the things I wanted to inform you with.
So, basically you are trying to make “hard winegum” as a “plastic”.
Your product shows very rapid retrogradation (“staling” or “getting off-baked”),
which is a direct result from using plain corn-starch.
You might want to switch to “waxy” maize, almost exclusively consisting of amylopectin,
yielding a much more stable product. However, the plastic will still retrograde, because it will lose water. Therefore my second suggestion would be drying the paste by extruding it into an alcohol bath, separating out the resulting thread of goo and trying this as the feed for your 3D printer. Once printed the alcohol will evaporate faster and this proto-plastic should keep longer and “gunk up” your equipment less, or at least it can be flushed easily with alcohol.
In theory.
And using 100% vinegar acid instead of off-the shelve 3-10% watered-down junk will help.
Now you are just adding more water to the mixture.
I’m going to follow these experiments closely. As a Foodtechnician by trade and a foodhacker by vocation, with a side-interest in 3D printing (especially self-replicating robots).
Need help?
Good luck!
Aart van Essen,
B AS Foodtechnology & food-futurist
PS. Ik ben trouwens ook Nederlands
Aart,
That is fantastic!!
But, where would one get things such as 100% vinegar and the right kind of starch? What are the right brand names/stores?
We do need help and it would be great working with you.
You’re looking for glacial acetic acid if you want it without water. Obviously nastier stuff to work with.
As Frank Black sang with the Pixies: “Where is my mind?”
I feel *so* stupid! Above I’ve “explained” everything exactly the other way around 🙁
1. Since you are adding water anyway, you simply use more vinegar and less water to add more acid. You do *not* have to deal with more pure (and, yes indeed, more dangerous) vinegar.
2. You want to get rid of the amylopectins in your starch. Pure amylose would be ideal:
As stated in the video, Tapioca starch yields the best results.
So you don’t want to use “waxy” starches. Here’s why:
Undamaged starch granules are insoluble in cold water (the chains are bound together into granules by hydrogen bonds).
However, when you start cooking the starch, the temperature is raised to the “initial gelatinisation temperature”: water begins to be imbibed (at 55-70 °C. depending on the type of starch.) The granules swell and their internal bonds start to loosen,
until at around 100 °C. the viscosity (thickness) of the solution/suspension suddenly increases and it turns into a paste. These changes will already be familiar to you from cooking starch 🙂
If we would follow these changes in thickness for another hour and then cool it down, you notice the initial gelatinisation is a sharp, strong increase in thickness, but under further heating this thickness slackens rapidly again.
During cooling, thickness will increase again.
http://picasaweb.google.nl/lh/photo/GxPLANQv8_ttDghGlq1XKA?feat=directlink
It is this “end thickness” which interests us most here. The greater this is, the harder the plastic will be. Furthermore, the smaller the difference in thickness between the cooked paste and the cooled pasted is, the better it will be suited for extrusion-printing.
As you can see: Tapioca has a very high end thickness, but also the thickness of the cooked paste differs only slightly from the cooled paste. This makes Tapioca our optimal starch, so far.
The illustration also clearly shows why “waxy” maize is actually a very bad starch to work with… (Sorry for putting you people on the wrong track. I am ashamed.)
The reason for this is the structures of amylopectin and amylose.
Amylose, once unfolded from its granule form, consists of long, straight polymers, just like a plastic.
Amylopectin is branched, like a tree. Ideal for binding and holding water in a sause or pudding, but less so for giving structure to a plastic.
http://picasaweb.google.nl/lh/photo/hPlqX5j4kSonUrBp-J_Wqg?feat=directlink
So, amylose it is.
3. Natural (“native”) starch is a mixture of amylopectin and amylose.
Pure amylopectin (ie. a “waxy starch”) is more stable than the native mixture of both starches, but pure amylose will perform even better than that:
Maize amylose will perform more like the native Tapioca than the native maize does already.
So, we are interested in:
A. Methods to yield purified amylose from native starches
B. Native starches with high amylose contents.
Since A asks for chemistry and such, let’s look at this another time.
The two native starches with the highest amylose content are:
– High Amylose Corn (70% amylose)
and, surprisingly:
-Pea starch (60-70% amylose!)
The problem with pea starch is that the unwinding of its granules during cooking takes a looong time; even after two hours of cooking not all its chains will have unfolded completely.
And that at a cooking temperature of 120°C. !
More info about this here:
http://www.jbc.org/content/162/2/229.full.pdf+html
Hopefully I’ve set things straight again for you all with this.
Happy cooking!
Aart
Aart I salute you, don’t know whether our local supermarket stocks this one, but we’ll be sure to hunt it down and include this in our experiments.
Any clues on how we could make it water resistant or is this just crazy talk?
Fancy a trip down to Berlin? We might be running a week long bioplastics session as part of a festival in June. But in the meantime will be experimenting regularly if you’d like to join us.
Here is a method for separating out amylose from native starches:
*Fractionation* *of* *starch* *by* *differential* *solubility* *in* *water-butanol* *method*
This is a relatively simple method for separating out amylose from any natural starch.
Below is a schematic overview of the method:
Starch + Water
↓ ↓
Precipitate Supernatant
↓
Butanol + Water
↓ ↓
Sediment Supernatant
(Amylose) (Amylopectin)
1 Milled seeds are suspended in water
2 The suspension is left to precipitate out (slower) or centrifuged(faster).
3 The water (“supernatant”) is siphoned off and thrown away.
4 The resulting “gunk” (“precipitate”) is then suspended into a mixture of water and butanol.
5 Again, the suspension is left to precipitate out (slower) or centrifuged(faster).
6 The watery supernatant is, again, siphoned off, but this stuff is kept for re-use.
Original method (steps 1- 4):
According to Curá and Krisman (1990), the milled and dried seeds should first be “defatted by the Soxhlet
method and suspended in four volumes of 3 % mercuric chloride (HgCl2) of pH 7 at 28 °C, and stirred for an hour.”
These steps could – and should 🙂 – be simplified:
Mercuric chloride is one of the most toxic forms of mercury. So, *do not use this.* Just don’t.
We’re looking for a stove-top method here anyway.
And building a working (and safe!) soxhlet set-up is beyond the glass-blowing skills of most of us.
According to the peas article mentioned earlier, starch – especially pea starch – can be defatted by suspending it in 85% methanol.
Methanol is *not* safe! Don’t drink it. Don’t breathe much of it: Keep methanol in an air-tight closed (glass) container, and out of your eyes!
Most other liquids used here are also volatile and unhealthy when breathed in.
So, ventilate well, or better yet: work outside.
Simplified method
Step 1:
Grind the seeds with a coffee-grinder, (hand)mill, etc. Or, buy ready milled flour.
Step 2:
Suspend the ground-up seeds in 85% methanol, in an airtight closed bottle.
Keep the ground-up seeds in suspension by shaking the bottle regularly for 48 hours, or longer.
Or why don’t you construct this simple magnetic stirrer to do the shaking for you?
http://www.instructables.com/id/Magnetic-Stirrer/
Filter out the defatted starch. Keep the methanol for re-use.
Step 3: (you may skip this step)
Repeat this process with ammonia, instead of methanol, to pre-gelatinize the starch.
The ammonias will loosen the hydrogen-bonds in the granules, without need of heating.
Filter out the pre-gelatinized starch. Keep the ammonia for re-use.
Step 4: (you may skip this step also, if you’re skipping Step 3)
Wash the ammonia out by suspending the starch in 96% ethanol.
This can be tap-water, but results will be better when using distilled or deionised water.
You don’t have to stir it for a prolonged time. You can put the suspension aside for precipitating after shaking the container vigorously. The ethanol is siphoned off.
(Or centrifuge the suspension, if you’ve got the gear for it, to save time.)
Step 5: Dry the sediment (starch) to remove all alcohol.
Original method (Steps 5-8):
The pre-gelatinezed, defatted starch suspension is centrifuged at 5,000 x g for 15 min and
the sediment is resuspended in 1-butanol: water
(1: 7), autoclaved for 3 hours at 1 atmosphere,
110° C.
After centrifugation at 3,000 x g for 20 min.
two fractions are obtained:
a) the supernatant
named “butanol soluble fraction” (BS) containing the
amylopectin, and
b) the sediment “butanol
insoluble fraction” (BI) including the amylose.
Polysaccharides from both fractions can be
recovered after the addition of three volumes of 96 % ethanol, then washed with acetone and ether successively, and finally dried.
Switching back to our Simplified method again:
Step6: Re-suspend the starch into a mixture of water (preferably deionised, or destilled)
and butanol (1:7). Heat, while stirring, and cook the starch into a paste.
Keep heating and stirring at 90 °C. while thickness slackens again for 1 hour, or longer (depending on the type of starch). Then cool the the paste to room-temperature.
Now both the amylose and amylopectin chains are fully(?) unrolled.
The precipitate forming on the bottom is amylose starch.
The amylopectin-water-butanol supernatant is siphoned off, and kept for reuse.
Step 7: (you may skip this step)
Re-suspend the amylose into clean water-butanol (1:7).
The precipitate forming on the bottom is more purified amylose starch.
The amylopectin-water-butanol supernatant is siphoned off again, and kept for reuse.
Step 8: The amylose is dried to remove the butanol and most of the water.
We’ve now obtained “pure” amylose.
The final step to make the plastic out of this:
Step 9: Heat 3 parts amylose starch, 14 parts water, 2 parts vinegar, 1 part glycerine, while stirring it. You now have made a bioplastic. Pour it into a mold and leave it to cool.
Now lazzer it into 733t shapez!
Please experiment with leaving out the glycerine, using less water, more vinegar and different cooking times for steps 6 and 9. And with extrusion of this stuff – especially in a 3D printer!
Happy cooking!
Aart
PS. Thanks for the warm invitation Jay. Long time since I’ve been to Germany.
Maybe I’ll even take you up on that offer!
Hi Aart
Please do, after looking at that process we’ll certainly need some assistance 🙂
Going to document our microwave methods and recipe tomorrow, and will then start to look at where we can find the ingredients for these advanced processes. Molded plastic will be a huge breakthrough.
Thanks for the detail, this really gives us something to get stuck into.
*Breakdown of amylopectin in starch by hydrolysis with hydrochloric acid.*
So, amylopectin prevents starch from becoming plastic-like.
Indeed, we could seperate the amylopectin from the starch, keeping the remaining “pure” amylose.
This separation process is, as you’ve read above, lengthy and laborious. [As in “laboratory” 🙂 ]
And it requires you to work with volatile explosive fluids. No fun.
We want something a little more “stove-top”. Shorter. Faster. More fun!
Using hydrochloric acid (HCl) to break down the amylopectin, will rapidly improve the the plastic.
No this is not too “labby” for your home kitchen.
But, please, note: it might be too dangerous for your home kitchen.
Boiling hydrochloric acid, even when diluted, is quite active.
So be sure to wear eye protection, an apron, gloves, the whole shebang.
And, again, ventilate plenty, or better yet: work outside.
Glycerin VS glycerol
Before we begin, a little side-note:
The following method is based on a more “pro” description of the starch-plastic.
Interestingly, it does not ask for glycerin, but glyce*rol*.
Which makes sense: glycerol is a known “plasticizer” for plastics, while glycerin is not – or, well, besides on DIY and Maker blogs, I have not come across an industrial method using glycerin in the literature I’ve browsed through. The “mistake” is made easily, as you can see…
However, glycerin still is an interesting (cheap! Available!) alternative to keep experimenting with.
(Plasticizers or “dispersants” are additives that increase the plasticity or fluidity of the material to which they are added.)
Ideally, you’ll have a steel pan with a glass lid, so you can keep an eye on the boiling fluid.
Make sure the pan is *not* made from aluminium. Cooking hydrochloric acid with aluminium is a bad idea. Please don’t
Materials:
-Starch (any type you might wish to experiment with).
-Glycerol (Propan-1, 2, 3-triol) , or keep experimenting with glycerin.
You may find Glycerol at your grocery store; it is used in foods, such raisins, as a moisturizer.
-Hydrochloric acid (HCl, Minimal hazard); available in a 33% dilution at hardware stores as
“muriatic acid”. (In construction it is used for removing excess cement and such.)
-Sodium hydroxide (NaOH, Irritant); available at hardware- or grocery stores as “lye” or ”caustic soda”.
-Steel pan, preferably with a glass lid
-Glass or steel stirring rod.
-Molds, preferably microwaveable ones for quicker drying.
-Universal Indicator paper (or a pH-meter, if you have one).
-Eye protection 😎
-Weighing scale/balance and glasses, or measuring cylinders.
Dilutions:
Dilute 10 ml of the store-bought 33% hydrochloric acid with 1 liter of water to 0,33 % (0,1 mol).
Dilute 10 ml of the store-bought 50% sodium hydroxide with 1300 ml of water, and dilute 100 ml
of this sodium hydroxide solution even further with 900 ml of water to 0,04 % (0,1 mol).
When you’ve bought sodium hydroxide in powder/flake/pallet form (100%), simply dissolve 10 grams of this into 2600 ml of water, and dilute 100 ml of the solution further with 900 ml of water to 0,04 % (0,1 mol).
These two dilutions are relatively safe to handle, but if you spill it, don’t let it dry up, because then it gets very strong and aggressive again (Chemical burn, anyone?).
Method:
These volumes should work fine, but experiment with changing them all you want 🙂
For each single gram of dry starch, you use:
100 ml of water water,
30 ml of the hydrochloric acid ( “muriatic acid”) dilution.
20 ml propan-1,2,3-triol.
Pour these into the pan, close the lid and bring it carefully to a boil.
Then boil it gently for 15 minutes. Boiling much longer, or with more (or stronger) hydrochloric acid will start to break down the amylose as well, and we don’t want that, now do we?
Make sure it does not boil dry – if it looks like it might, then stop heating and be sure to use more water next time!
Dip the rod into the cooling mixture and dot it onto the indicator paper to measure the pH.
Add enough sodium hydroxide solution to neutralise the mixture, testing after each addition with indicator paper. You’ll need to add about the same amount of sodium hydroxide as you’ve used of the acid at the beginning (about 30 ml). These two dilutions react 1:1.
If you wish to add (food) coloring, now is the time to do so. Mix thoroughly.
You could experiment with different inks and dyes.
Pour the mixture into the mold(s), using the rod to spread it out.
Leave it to dry out. This will take about 1 day on a radiator or sunny windowsill, or two days at room temperature. Or use a microwave to speed-dry the plastic film 😉 (Great idea!)
Well, there you are. An effective, easy, fast, relatively safe stove-top method.
Joris,
The shrinking and deforming is why in injection molding we use several hundred tons of pressure to squeeze the plastic into the mold. I’m wondering if you took your end result, and reliquified it, would you experience as much shrinkage? I’m guessing most of the shrinkage is the boiling off of evaporates.
I was thinking along the same lines.
a little tidbit:
http://en.wikipedia.org/wiki/Plastarch_Material
seems to be a similar material (by ingredients) is hygroscopic and should be dried for 3 hours at 82C. (which should take care of some shrinking and warping).
I wonder what is the ‘temperature window’ is when it’s injectable.
Mike,
I think so too but am probably not the right guy to come up with a process that eliminates this.
Joris
http://dailyartmuse.com/2010/02/05/make-your-own-plastic-sheet/
Do you know if this plastic will deform under heat once set-up? Letting the shrinkage occur in sheet form and then working the material could be an easier approach to shaping.
Bill,
Yes it will deform. This could work also. I see much more experimentation in my future.
Don’t Makerbot folks already offer an extruded starch-plastic (corn based) for their machines? Would this material be useful to shapeways?
-Whystler
Shawn,
You’re right, they have the PLA material. This is also biodegradable. Initially I didn’t even think about it because the dream is a post consumer recycled material. But, we could indeed see if we could use polylactic acid. Getting the machine to run on the material would be a hassle though and a risk. Perhaps we should just buy a Makerbot and offer Makerbot 3D printing.
A makerbot would be a great idea for you folks to experiment with, I think! Since you are on the leading edge of 3D printing technology, this makes sense. I don’t know if it would be lucrative as a machine to make our things because of its slower making time, seeming possibility for error, and need for tweaking, as you go, to get the right settings.
It really does seem to be the tool for tinkering gadgety folks at the moment. But I *do* think it will become a lot easier to use in the future, so definately a must have for Shapeways to start using internally. Then again, I don’t have one, so do I really know what I’m talking about? 🙂
-Whystler
I’m looking for a recipe to make 3d (puffy) paint, and I’m sooooo glad I found your recipe. Will definitely, definitely try this and will compare results from store brought 3d paint. YAY!
I wonder if you’d get a better result if you span the mold as the plastic dried. This is already sounding like more trouble than it’s worth but it sure is fun!
hello
i have been following this. In july I hope to use these recipes for a sculpture that is a version of my iceberg sculpture. In outdoor exhibition in Byron Bay. I will need all the advice I can get.
I want it clear, stiff enough to stand up similarly to the perspex work, and to gradually over 10 days slump and melt.
I am hoping to do this with bioplastics. (or perhaps it should be a sugar glass recipe..but I think bioplastics would be more environmentaly challenging.
cheers
I’m thrilled with this post. I did some molding with plexiglass a couple of times. But to make my own bioplastic is just awesome. I’m going to try this out.
Thanks for sharing
Cheers,
Alexander
I just saw this bioplastics video…have you ever heard of these guys?
http://www.youtube.com/watch?v=Or1G-M6GjUk
Just mixed up the standard recpe at the top of the page for my Chemistry class, it worked great. Thanks for the recipe, and the A in Chemistry. I am definitely going to play around with the recipe, Ideally, I want to make a pretty candy dish with a Tie-Dye effect. The recipe worked great using ice cube trays (there was a lot of shrinkage though), I found this a fun backyard BBQ project. Thanks again.